
You guys know I love CoverGirl products.
I’ve been digging their TruNaked Eyeshadow Palettes for years now, so when I saw that they came out with the cutest royalty-inspired palettes earlier this year, I just had to try them. The problem was that they are actually only available in the U.S.
When I went to the CoverGirl store in Times Square this past summer, I had a makeup done and the artist actually used one of these palettes. Since I was also meeting with their American PR, they were so gracious and mentioned that they could send them over to my New York address. The reason they are only available in the U.S. is because it’s a Walmart exclusive, and although we have Walmart in Canada, a lot of times these organizations will be separate entities of each other.


The limited-edition Her Majesty palettes came out in April of this year (just in time for the Game of Thrones finale) and are four different royalty-inspired palettes. Each one offers up 12 shades of shadows that are pigmented, creamy, and blendable. Each palette has a different theme and contains complementary colours for a very royal look.
There’s Revolution, with oranges, browns, reds, and blues; Overthrown, with darker jewel tones like greys, browns, blacks, dark purples, and creams; Ascension, with pastels like golds, pinks, creams, and browns; and Reign, with golds, greys, blues, and browns. Each palette is significantly different and offers an array of shades to create multiple looks.

My favourite palette is obviously Ascension since I wear a lot of lighter colours. I feel like this one is the most usable of the four since it has a nice variety of different colours to create both daytime and nighttime looks. I have used all four palettes, but find Ascension and Revolution to be my favourites.
Although these are available at Walmart in the U.S., if you are making a trek down, pop in and see if they are in store. They are still available online and retail for $14.98 USD. I would say that the formula is the same as the TruNaked palettes, but these are obviously more fun and give you a wider shade range to choose from.


To pair with the eyeshadow palettes, you may want to also pick up some of their TruNaked Queenship Shadow Sticks, which also launched earlier this year. These retractable stick cream shadows remind me greatly of the Laura Mercier Caviar Sticks and come in eight shades from light to dark.
I received three of these guys from CoverGirl and unfortunately I believe that these are also exclusive to the United States. I do have a few similar ones from previous years, so I think that CoverGirl did at one time have something close to this in Canada, but it looks like they may have discontinued them.
If you can get your hands on some of these, they can be worn either by themselves or as a base for your powder shadow. I like using them underneath these palettes or with other eyeshadow palettes I own. They are also great for hot weather, since I tend to wear more cream products if I’m spending more time out in the sun.

The CoverGirl TruNaked Queenship sticks retail for $9.99 USD and are available exclusively at Ulta (which explains why Canada doesn’t have them). If you are Canadian though, you can order through the Borderfree Ulta site or just make the trek down (who doesn’t like a little vacay or road trip to the U.S.?!).
Let me know if you pick any of these up and what you think of them. I love both products and really hope that CoverGirl brings them to Canada eventually since they both perform like their more expensive counterparts.
Have you tried the CoverGirl Her Majesty palettes or the TruNaked Queenship Sticks?
Please note, products provided by PR. All opinions are my own.
Like this post? Check out these related ones:

If there is one thing that going to NYFW taught me (okay, it taught me a lot, so one of the things I noticed), is that cheek fillers are definitely a thing.
I’ve been going to see Dr. Minuk since last year at his Cosmetic SkinClinic & Laser Centre, and what started with CoolSculpting on my double chin quickly turned into Botox touchups and exploring different cosmetic options I could do to reverse the signs of aging.
I’ve been getting Botox for my crow’s feet since last year and love the procedure since it really helps with preventing fine lines and wrinkles from forming. After I did CoolSculpting, I went back to Botox for my crow’s feet and started doing my forehead, which I feel is the most popular area to get it done, and about a month back I went for a touch up and Dr. Minuk mentioned perhaps getting some cheek fillers as well.

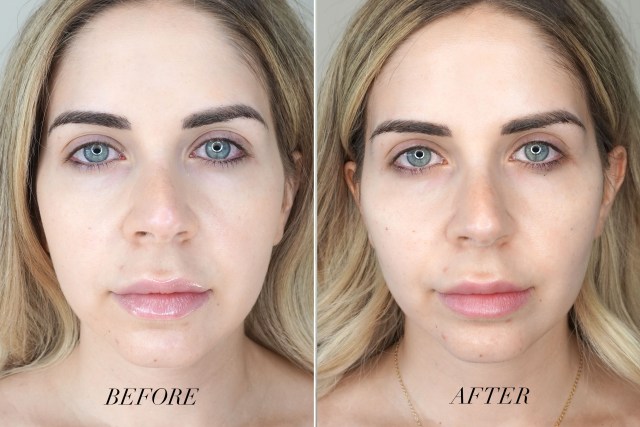
I started my filler journey years ago with lip fillers and still get them done every year or so as I love how it makes my lips – and my face- look. I have been somewhat interested in cheek fillers but didn’t really feel like I needed them. Dr. Minuk explained that when we age (I’m 31 years old), our face starts to droop as the collagen in our skin breaks down and ultimately results in sagging. Taking a look at my face, he said that he did see some sagging in one of my cheeks and this injectable will help lift my cheeks and give me back that youthful appearance and contour my face a bit more for a “top model” look.
Although there are a variety of different filler options out there (such as Juvederm, which is what I get in my lips), Dr. Minuk used Teosyal RHA4, which is a pure hyaluronic acid which is designed to create volume in the cheeks, chin, temples, and for correcting deep skin depressions. I believe that all the different hyaluronic acid fillers are quite similar, but I have read that Teosyal is known to last months longer on average that Juvederm Ultra or Ultra Plus.


Just like there are different fillers that you can use, there are also different methods to inject it. Dr. Minuk chose to use a cannula, which is a long blunt-tip needle that is injected once in the skin as opposed to multiple times. Dr. Minuk created a hole on my cheekbone and then took the cannula and slid it in right along the cheek bone; as he pulled the needle out slowly he was injecting the filler. This method is less painful since it’s only one prick as opposed to multiple ones and it’s quicker as well. I’m told it also allows for a more precise placement and will decrease the chance of bruising since it’s one hole, not multiple ones.
So did it hurt? They didn’t freeze me for this, as I was told that they don’t usually do that with the cheeks since the skin isn’t as sensitive as the lips are (seriously, the worst part about getting lip fillers is the freezing part). It didn’t really hurt; when he made the first poke before inserting the cannula that kind of hurt, but it was a split second thing and then putting the cannula in just felt strange and like a lot of pressure, but nothing painful.

It was definitely a quicker procedure than getting lip fillers and the results show up right away (unlike Botox which can take anywhere up to two weeks for the actual results to show). There was some swelling, but honestly, I didn’t feel like it was too dramatic or anything.
Now that I’ve had the fillers for a month now I can honestly say that I love them. I was scared that I would look too “cat lady-like”, but it’s such a minimal difference and a nice little lift to my face. Truthfully, I don’t find it too noticeable when I’m not wearing makeup, but once I do a full face, I can see it a lot more and love how it makes my face look (especially when I have a killer contour and highlight).
Anyways, to round out my post and what I was saying about fashion week, is that here in New York, it seems like all the fashionistas have gotten it done. I was seeing a lot of Botox and filler in those rooms and it was so interesting to come to a larger city and see how popular these treatments really are.

Dr. Minuk injected a half syringe to my cheeks and mentioned that if I wanted more I could definitely come back. I think that the half was a good amount and it’s super subtle and natural looking. I truly love the way it looks and just like the lips, I’m totally hooked on it now.
Dr. Minuk charges anywhere from $650-$2,500 to get your cheeks done (I was quoted $1,300), but go visit for a consultation for a more accurate amount. I was also told that it can last up to a year, but everyone’s body breaks down filler differently (for example, my lips last me for about a year and a half).


So do you need cheek fillers? We don’t really need anything, but if it’s something that you are interested in getting done, then I would totally recommend it. Cheek fillers can also help smooth out those lines around your mouth as well since they can pull your skin back, so to speak (but obviously with a little more filler than a half).
If it’s something that’s interests you, I would recommend booking a consult and seeing what the best option would be for you. I was a little skeptical on first getting it done, but now that I have it, I recommend it 100 per cent and love how it makes my face look. When we often think “fillers”, scary images can definitely flash through our minds, but I’ve only ever had a more natural-looking experience with them and can’t recommend them enough.
Would you ever get cheek fillers done?
Please note, I partnered with Dr. Minuk on this post. All opinions are my own.
Like what you read? Check out these related posts

Like I mentioned in my first NYFW recap post, it’s always been a dream of mine to go to New York Fashion Week (NYFW).
When I found out my boyfriend was moving to New York for a year, I instantly got excited at the prospect of things I was now able to do, one of those being NYFW. Although it probably wouldn’t have been able for me to attend even as much as five years ago, now, since blogging and being an influencer is such a popular form of marketing, lots of brands are opening their doors (and seats) to bloggers to cover the shows.
So friends, you’re wondering how to score invites to those coveted shows? It’s super easy, but takes a fair amount of planning.


Rule #1: Start planning early
Although the schedule won’t be released until a few weeks before (you can find it on NYFW.com), take a look to see which designers had shows last year and try to find the PR contacts. PR contacts can typically be found on Modem Online and the best thing I did in terms of planning was to start an Excel spreadsheet to keep everything organized. I had multiple tabs to organize the shows I was pitching (include columns for show name, contact name, contact email, date of original email, date of follow up, and notes for what they said), the companies I was pitching collabs to, my schedule, as well as what I confirmed to.
Once you have your contacts, generate your pitch email and then start emailing! Since PR companies get thousands of emails from people, it’s best to keep it straight to the point. I had a similar email for each person I pitched to keep it easy and it basically said who I was, what I wanted (a show invite), what I can offer (social media and blog coverage), as well as my analytics.
I literally spent hours sending emails and then more hours sending follow ups. I sent my initially emails out probably three weeks before the shows and then a week before for the follow ups. Don’t get discouraged if you don’t get replies right away or a lot of “we are unable to accommodate”. Also, I got the bulk of my invites about a week out from NYFW and even some during NYFW. I guarantee you that you’ll get at least one show (even if it’s a designer you’ve never heard of) and that’s something to show these PR companies next time you’re heading to fashion week (but seriously, I ended up getting too many invites, including ones that even some other bloggers with larger followings didn’t get). Just keep positive and the invites will come, I promise!
Although nothing actually came from fruition from this route, you can also look to see who the various beauty partners are and pitch them as well. I had pitched Redken since they do a lot of hair, and although I didn’t get backstage access, I did get invited to their styling suite, which was one of the highlights of the whole event for me. Also, I have to admit that I had way more fun at the events and presentations anyways. Presentations are typically held for a few hours and you can just pop in and leave, and events are awesome since there’s free booze, you get something for going, and it’s a huge networking opportunity (for both meeting other bloggers and meeting the brand).


Rule #2: Make some online friends (and IRL ones too!)
What really helped me the most was connecting with other bloggers through Instagram DM groups or Facebook groups. I was lucky in that I knew a few other Canadian girls going, so we had a DM group and shared what the responses were from the different people we pitched. It really helped out in sharing the right contacts, as well as letting people know what was going on. Since there is more than just shows (there’s also presentations and events), this was extremely helpful in getting to know who to pitch, as well as what was going on since events aren’t usually made public or they can be hard to find.
I know that there are groups out there you can be a monthly member to (I believe ShopStyle is one of them), and prior to really diving in deep I was considering it, but seriously, doing the leg work on my own proved to be way more helpful and didn’t cost me a penny. Plus, it was nice that I knew some friendly faces at these events since we ended up getting invited to some of the same things and I had already connected with some of these girls online through these groups (#InstantFriends).
These groups are also great too if you don’t get a lot of invites or RSVPd to too many things. I was in the Rs NYFW Facebook group and a lot of times people would ask if someone else wanted their tickets to different shows since they may have RSVP’d to two shows at the same time.
It also helps to chat with people in line, as you’ll literally meet so many people and everyone (for the most part) is super friendly. New York Fashion Week really is a giant networking event, so get out of that bubble and add some new faces on Instagram. It will definitely help in getting to know what’s going on around town.


Rule #3: You can wear literally whatever you want
Prior to coming to New York I started about a month in advance in getting my outfits together. The thing about fashion is that you can wear literally whatever you want. Although people do get dressed up and wear some pretty weird things, whatever you choose to rock totally works at NYFW (and you don’t need to go out and spend a million dollars on clothes you’ll probably never wear again).
Rule #4: It’s a hustle, so be prepared
Yes, wearing your tallest heels may go with your outfit, but girl, it’s New York City, and there is A LOT of walking involved.
Since I was coming from the Upper East Side (I highly recommend staying in SoHo or near Spring Studios), I had to travel everyday to get to the shows and that usually included 40 minus of travel time each there and back. What I would recommend would be to bring a roomy bag where you can toss those high heels in and wear foldable flats or flip flops anytime you’re not in the show venue (or standing in line). Speaking of which, NYFW is a lot of standing in line. Literally nothing starts on time and most of the event is waiting in line, then waiting in line again once you’re in the venue, then waiting for the show to start, and then hustling to get out of there. The show themselves usually last only 15 minutes or so.
Another thing you’ll hustle on is the seating. Although your ticket may say “standing room”, very rarely will everyone show up who was invited, which means that the standing room people often get a seat (I don’t think I actually stood for any of the shows). In true Cinderella fashion, I actually went from standing room to front row at the Pamella Roland show, but be prepared, everyone wants to be front row and it’s cutthroat to actually sit there. Your best bet would be to try and sit second row if there is a spot open, or just kind of hover around and if the show is starting soon, then make your way over, sit down, and act like you’re supposed to be there. And if you don’t get front row? Who cares, it’s a fashion show, life goes on.


So would I do NYFW again? Although I was kinda over it by day three (keep in mind that I had other things going on too, I wasn’t there exclusively for NYFW), but I would say that I would definitely do it again. If you are looking to go for the first time, I would try to limit it to three or four days max, and fly out before the official NYFW actually begins. My busiest days were actually before it technically started since a lot of brands hold events and there are fashion shows going on that aren’t part of the official week.
I would say if you have always wanted to come to NYFW, definitely do it. It really is a lot, but it’s such an experience that I will cherish forever and something that I can officially now check off my bucket list.
Been to NYFW? What are some of your tips?
Like what you read? Check out these related posts:
