So just like the Revlon Lip Butters, the online beauty community has been buzzing about the new Maybelline Color Tattoo eyeshadows. I first heard about them from Amarixe’s blog where she picked up every colour, but I’m not quite crazy like that so I picked up one of the most wearable colours in the line, Tough as Taupe.


From Maybelline.ca:
Dare to wear 24HR shadow.
• Ink technology creates 24HR wear shadow for our most intense, long-lasting colour saturation
• Cream formula glides on without creasing and keeps colour vibrant
• Ophthalmologist-tested. Safe for sensitive eyes and contact lens wearers
Alright, so first things first, I absolutely love this colour. I wear a lot of neutral colours, so Tough as Taupe is fantastic as a base colour (think MAC’s Paint Pots). Also, the shade itself has a matte finish, not a glittery one so it’s perfect for layering other colours on top.


When applied, the colour goes on quite sheer, but it is definitely buildable. I haven’t actually worn this colour by itself yet (I’ve just used it as a base) but it would be interesting to get some other shades and create a look with them.
The product is a cream eyeshadow but applies like a powder eyeshadow. When I apply it I use my finger and then grab an eyeshadow brush and then blend it out.

Makeup applied at 8:15 a.m.

Makeup at around midnight
So because the product makes a 24-hour claim, I had to try it out for myself. I didn’t wear this for a full 24 hours because I like to sleep but I did have this as a base on my lids for around 16 hours and it held up pretty good. My makeup doesn’t look at fresh as it was when I first applied it but it held up very good for a drugstore product.
So would I recommend the Maybelline Color Tattoos? Yes! I really want to pick up a few more now knowing how good Tough as Taupe is. I think I’ll shy away from the fun colours and stick to the neutrals because they are more wearable. I really want Too Cool (white) and Audacious Asphalt (a dark grey, perfect for a smoky eye). Would I recommend these as primers? Yes, but nothing will ever replace my trusty Urban Decay Primer Potion. These are great for building colour.
If you love the MAC Paint Pots I would for sure pick up a few shades of these. I’m a little disappointed and surprised that there is no Maybelline dupe for Painterly (a pale nude colour), but maybe they will release something soon because it seems like these have been very popular.
The Maybelline Color Tattoos retail for under $10 CDN. I picked mine up at Wal-Mart for $6, however, it was marked at $6.87 or something like that, but it rang up for cheaper. I believe at the Real Canadian Superstore these retail for $7.99, so shop around.
Have you tried Maybelline’s new 24-Hour Color Tattoo? What are your thoughts? Leave me a comment below!
Like What You Read? Check Out These Related Posts!

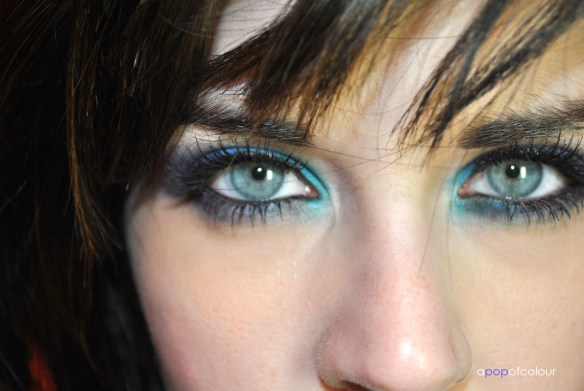
It’s Friday! In honour of the weekend, I thought I would break out the blue eyeshadow and present this fun look. Hope you enjoy it!
Let’s start!

As always, prime your lids with an eyeshadow primer. I used Benefit’s Stay Don’t Stray. Other great primers are Urban Decay’s Primer Potion, MAC’s Paint Pots, or the new Maybelline Color Tattoos (there’s a great blue colour in the collection, which I don’t have, but it would be great for this tutorial). Make sure that you apply the primer on both your lids and under your eyes and then of course blend!


In this tutorial I’m using all MAC colours, three of which are Pro colours (only available in Pro stores or online), however, I’m sure there are a tons of different dupes out there.
Using a light colour, like MAC’s Phloof!, apply this to under your eyebrows.


Using a wet condensed eyeshadow brush, apply an electric blue colour from the inside corners of your eyes to the middle. The colour I used was MAC’s Electric Eel, which unless you apply it with a wet brush it goes on quite sheer; you have to really pack on the colour.


Using a colour that’s a few shades darker (like MAC’s Cobalt), apply this from the middle of your eyelid to the outer corners and blend it with the lighter colour.


Grabbing a dark purple shade (like MAC’s Indian Ink), apply this colour on the outer corners of your eyes, while blending all three together. I also brought the purple up and “windshield wiped” across the crease.

Now that we got the eyelids done, create the same gradual effect on the lower lash line, bringing the brighter blue down over the inner tear ducts of your eyes.

Using a black eyeliner (I used a Joe Fresh Retractable Eyeliner in black) line your waterline and tightline.

Next, using a black liquid liner (like MAC’s Liquid Eye Liner in Boot Black), line your upper lash line, adding a wing at the ends.


Making sure that you curl and apply some mascara to your lashes, grab some false eyelashes and apply them to your eyes. I wouldn’t really recommend heavy eyelashes for this look, because the eyes are so bold we don’t want to overdo it with the fake lashes; they should be subtle but noticeable.

Finally, apply some concealer to under your eyes just in case there was some fall out and to freshen up the look, and you are done!


Hope you enjoyed this look! Have a great weekend!
Like What You Read? Check Out These Related Posts:
Even at my laziest, I always make sure that I at least apply some form of foundation every day. I don’t really have blemishes but I love the look of a perfect, flawless face. Here is my routine.

Sans makeup!
I always start with my daily face routine. I use the Clinique Three Step System, which consists of a soap, toner, and moisturizer. My face isn’t really greasy at all, I have more of a normal skin tone, in the photo it looks kind of shiny, but this is after I just applied my moisturizer.

Next up I always use a primer before my foundation. Right now I am using my sample size of the Laura Mercier Foundation Primer. Once I started using a primer I seriously cannot apply my makeup without it; it’s a staple in my collection.

I have a few different foundations but the one I’m using at the moment is MAC’s Pro Longwear Foundation in NC15. Over the summer I was using Laura Mercier’s Silk Creme Foundation, but now that it’s winter and I’m a white as a snowman it’s back to my Pro Longwear.


Using my E.L.F Studio Powder Brush I first stipple my foundation on my face and then buff it into my skin. Because this foundation dries quite quickly I find that I don’t need to use a setting powder at all to set the foundation.


Because the foundation usually wipes out my eyebrows I use the colour Sable from Clinique to fill them back in.


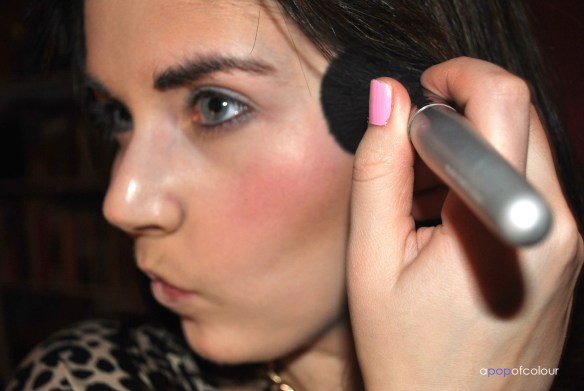
Using a bronzer (I usually flip between NARS’ Laguna and Casino; I used Laguna for this post), I contour my cheek bones and bring the colour up to my temples.

I usually switch blushes up but for this post I used NARS Sin, a berry colour with gold shimmer. To matte the colour a bit I usually take a fluffy face brush and blend the colour in a bit more so it’s more subtle.

To finish up my cheek area, I usually apply a highlighter. I usually use NARS Hungry Heart or Benefit’s High Beam (which is what I used here). I apply the highlight to my cheek bones.

Here is what my face looks like before I apply eyeshadow.


After I apply my eye makeup I apply a concealer under my eyes to freshen up my eye area and to take care of any fall out that may have occurred. I usually switch between Benefit’s Erase Paste (the one I used above) and It Cosmetics Bye Bye Undereye Concealer.
I usually dab some concealer under my eyes and then blend it out with a concealer or small foundation brush (I used an E.L.F. Foundation Brush here).


So that’s how I usually apply my face makeup in the morning. What’s your routine?
Like What You Read? Here Are Some Similar Posts:


