 Looking for an achievable look that can easily transition from day to night? I rocked this look a couple weeks back and loved how neutral and pretty it was.
Here’s how to create it!

1. Starting off with your eyes, prime them and then apply Naked from the Urban Decay Naked one palette all over the lids.
2. With a pencil brush, apply Smog along your crease. Then, with a fluffy brush, blend out the line.
3. Using Toasted, apply this over your crease (so above Smog).
4. With an eyeshadow brush, apply Sidecar all over your lids.
5. With a pencil brush, grab Toasted again and apply this along your lower lash line.
6. Using an eyeshadow brush, apply Virgin (the lightest colour in the palette) along your brow bone as the highlight.
7. Using a gel liner (I used Buxom’s Lashliner in Sequins), apply this along your upper lashline, winging it out. For this particular gel liner, I also recommend setting it with either matte black eyeshadow or black with glitter shadow (like Creep from the UD Naked palette).
8. Curl your lashes, apply mascara, and then if you want, pop on a pair of falsies. I used Katy Perry by Eylure lashes in Cool Kitty.
9. Moving onto the face. Apply a primer, and then with a concealer a few shades lighter than your skin tone, apply this underneath your eyes, down the bridge of your nose, on your forehead, and then on your chin to brighten up your face. Then blend. I used Make Up For Ever’s five-colour Camouflage Palette in number two.
10. After your concealer is blended, apply your foundation. I used Make Up For Ever Pro Finish in shade 115. I applied it using my elf Studio Kabuki brush.
11. Moving onto the contour. With a bronzer, apply this lightly down the hollows of your cheeks, onto your temples, on your chin, and the along the bridge of your nose. I used Smashbox Bronze Lights Suntan Matte bronzer, which I got with a Sephora 500-point perk. I have been obsessed with this bronzer because it’s matte and applies really smoothly (not muddy like other bronzers on the market).
12. With a dusty-pink blush, apply this to the apples of your cheeks. I used Makeup Designory (MUD) blush in Rose Beige.
13. To finish up the face, swipe a highlight along your cheekbones and down the bridge of your nose. I used It Cosmetics Hello Light Illuminating Powder.
14. To finish off the look, I kept me lips as a nudish pink. I first applied NYX lip liner in Flower and then topped it off with NARS lipgloss in Turkish Delight.

And that’s the completed look!
I chose to use the Urban Decay Naked palette because it’s a palette that a lot of people have (especially those obsessed with makeup, like myself). It’s also the palette that is the most versatile in my collection and the one I recommend the most (and the one I always bring to travel).

Have a great weekend!
Like what you read? Check out these related posts:


As much makeup as I have, I find myself often reaching for a nude cream shadow on my lids and a strong winged liner on weekdays. Maybe because it’s easy to do, or less time consuming than a full look, but cream eyeshadow has become my best friend as of late (well, aside from Ziggy..).
I’ll usually reach for MAC’s Nubile Paint Pot, however, recently I have been grabbing Benefit Cosmetics Creaseless Cream Shadow/Liner in RSVP. I actually picked this up at the Sephora Boxing Day sale this past year, where I just grabbed it and then took a look at the colour after (hey, it was $12 and there was a crowd!). Since it’s a nice neutral I thought I would try it out.

This is my first foray into Benefit’s Creaseless Cream Shadow/Liners, which are similar to MAC’s Paint Pots, Make Up For Ever’s Aqua Creams, and Maybelline’s 24-Hour Color Tattoos (in fact, I’m pretty sure they are the same packaging). You can sport the colour as either a base under your eyeshadow, or rock it out by itself.


RSVP is a champagne colour with pink undertones, similar to MAC’s Bare Study Paint Pot (which I also own). I couldn’t find it on sephora.com, however, I did see it at my local Sephora store selling for C$24. There is a bit of sheen to the product and it seems to have kept it’s creamy consistency, unlike Maybelline’s Color Tattoos, which tends to dry out until you swirl your finger in it.
I have worn this as both a base under eyeshadow and on its own, and it’s great both ways. I have to say though, and I’m not sure why, but I prefer MAC’s Paint Pots over the Creaseless Cream Shadows. They are similar in nature, however, I find that the MAC product sets better on my skin, plus the Paint Pots I own (which are both neutrals) seem to be more pigmented once applied. With that being said though, Benefit’s Creaseless Cream Shadow does tend to stay put better than MAC (but not nearly as much as Make Up For Ever’s Aqua Creams). I would say it’s more personal preference, however, I believe Benefit’s product costs more.


The magic of this particular shade is that its universal, you can use it for really any look. Benefit’s Creaseless Cream Shadow/Liner comes in a variety of shades, but with a neutral like this you can either use it as a base or primer for any look, or rock it on it’s own with some liner and mascara.
I didn’t really need another neutral cream eyeshadow, but for $12 I thought, why not? Overall, I’m glad I bought it and would love to try out different colours, however, for the higher price tag I think I’ll just stick to MAC.
Have you tried Benefit’s Creaseless Cream Shadows? What are your thoughts?
Like what you read? Check out these related posts:
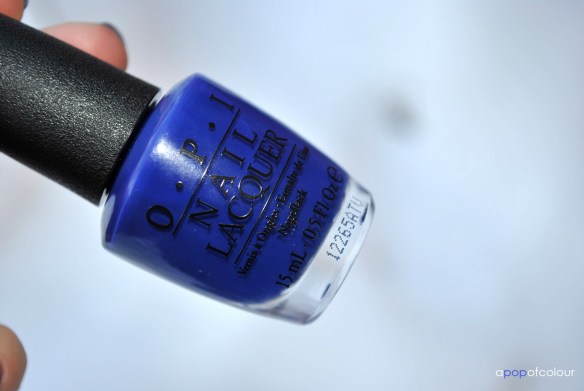
If there is one colour I have been obsessed with in the past month it is OPI’s OPI…Eurso Euro, a deep navy blue creme to be release in February for their spring/summer 2013 Euro Centrale collection.
Since the weather is still cold, it’s the perfect winter shade to sport on your nails. The colour reminds me of Essie’s Butler Please, however, that one is a bit lighter than this hue.
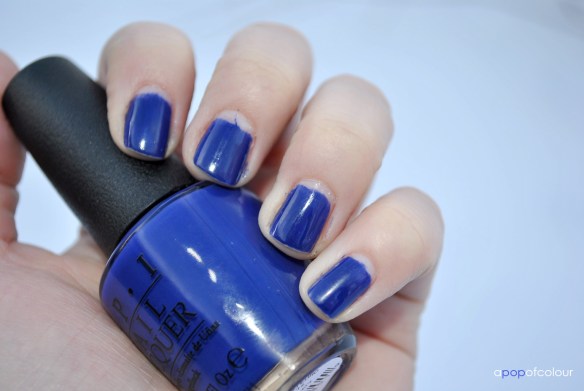
Two coats of the polish left me with an opaque finish. I used OPI Nail Envy underneath and Poshe Top Coat on top. The polish lasted three to four days before some minor chipping.

I have found that OPI polishes, more so than any other brand, seem to last the longest before they start to chip. I also love the application of the polish, which probably has to do with their ProWide brush.

As a side note, I have been obsessed with OPI… Eurso Euro paired with Polka.com (a purple and blue glitter), also from their spring/summer 2013 collection. The two polishes together make the prettiest combo. If you pick up the blue shade, I highly recommend picking up Polka.com as well, this glitter is so universal, it looks good over blue, purple, and nude polishes.
Is OPI… Eurso Euro on your wish list?
Please note, I was sent these products from the company that handles PR for OPI in Canada. All opinions are my own.
Like what you read? Check out these related posts:
