 I’ve always loved CoverGirl foundations. When it comes to my favourite drugstore foundation brands, CoverGirl and Maybelline top the list for me. Although I have a wide range of different foundations in my collection, it’s nice knowing that sometimes you don’t need to spend an arm and a leg to get a fantastic product.
I have previously reviewed CoverGirl’s newest foundation, the Vitalist Elixir back in the summertime, but I guess that product is getting so much traction that the brand decided to come out with a whole line of face products under the Vitalist umbrella. Available in 14 shades, Vitalist Elixir is a hydrating, vitamin-infused formula to give you flawless-looking skin. Although I do find this to be a full-coverage foundation, it is definitely buildable if you like wearing something lighter on your skin. Best of all, it’s very lightweight and contains a special antioxidant and vitamin complex plus SPF 20 to make your skin look and feel healthy.
New to the range are a variety of products to accompany this foundation (which I really do love BTW), including a pressed powder, a concealer, highlighters, and a luminizing lotion.

Out of everything, I was most excited about the Vitalist Healthy Concealer, available in six shades and full coverage. The product comes out via a soft-brush applicator that you twist up and paint the product on. It contains the same vitamin-infused formula which brightens complexion for a healthy look. I have tried this together with the foundation and found that that combination of both of them makes my skin look very healthy and radiant.
For that dewy look, start first with the Vitalist Go Glow Glotion. This product is available in two shades (light and bronze) and is infused with vitamins E, B3, and B5. Covergirl says this is a moisturizer with light-reflecting pigments to give your skin a naturally hydrated glow. I haven’t used this as solely my moisturizer, but I apply it after my regular stuff and it acts as a primer. I actually participated in a webinar featuring these products and the makeup artist used this over top of the foundation as well for that glowing from within look. I feel like just using this as a moisturizer alone wouldn’t be that beneficial, but I did like t layered underneath the foundation, or just to wear by itself (maybe on a hot vacation?).
For even more glow, the Vitalist Healthy Glow Highlighter is available in six shades and is a cream highlighter in a little pot. This shimmering highlighter makes skin look radiant and dewy and best of all, you can use it for multiple areas of the face. Apply it to the tops of the cheek bones or use it as a base for your eyeshadow, or just as a cream eyeshadow alone. I received two of the darker golden shades, which is too dark for my skin tone to act as a highlighter alone (unless I go in with a really light hand), so I like applying this to my lids for a bronze goddess look.

Finally, to set everything, CoverGirl came out with the Vitalist Healthy Powder, available in seven shades. This setting powder is super soft and has built-in hydration and is incredibly lightweight on the skin. Brush it on to reduce shine, for a mattified finish. If you wanted to have a low-key makeup day, pair this with the Go Glow Glotion and some mascara and gloss (skip the actual foundation), for an easy to wear no-makeup, makeup look.
Ever since Coty bought Covergirl a couple years back, I’ve found the brand has really stepped up their game and has come out with products that are new to the line. They also redid the branding, so if it looks a little different, that’s why. Like I said, I really like the Vitalist Elixir foundation, so when I heard they came out with a whole line of products to go with the foundation, I knew I would love these too.

Have you tried CoverGirl’s Vitalist Elixir line?
Please note, I received this product for review. All opinions are my own.
Like what you read? Check out these related posts.


I’ve said it before and I’ll say it again, I don’t mess around when it comes to skincare.
Back in the beginning of November I started trying out the Silk’n Titan, an anti-aging device for tightening and lifting. You can read my first post on the gadget here, but basically it’s a device that you use twice a week for 10-15 minutes per zone to help reverse the signs of aging and get firmer, more lifted skin.
I was challenged to try out the device for 10 weeks (which is what Silk’n recommends for best results) and I’m a little over halfway, so I thought I would come on here to do a quick recap of how I’m liking the device so far.


Like I said, I use this twice a week and focus on my under-eye area. I have pretty good skin to start off with, but as I’m already 29, turning 30 next year, I want to keep my complexion looking young. So yes, you may be wondering, why am I using this product when I don’t need it, but I like using these things for preventative measures. It’s the same reason why 21 year olds get Botox, so that they don’t get wrinkles later on.
Since I’m doing both eyes, I have to invest 20 minutes twice a week into using this guy. Now that doesn’t sound like a lot, but since I’m basically blind without glasses, I have been finding it a little challenging finding time to actually use this. Since I essentially have three jobs (my full-time gig, teaching fitness classes, and doing this blog), if I have downtime I like to spend it in front of the TV watching Netflix or reading a book. Since I wear glasses I have found it to be a little bit of an inconvenience to sit there and hover my glasses over my eyes while using this. As a result, I’m more inclined to use this after a shower at night, curled up in bed with a good book, which I usually don’t need my glasses for if the book is super close to my face.
When using the machine I first slather on the Slider Hyaluronic Gel, which Silk’n insists must be used prior to using the device since it will not work without the gel. I do find that after about five minutes or so the gel has worked itself into my skin so I have to reapply, otherwise the device pulls on the skin, whereas the gel makes it easy for the device to slide. There are also five different settings and since I have a pretty high tolerance of pain, I can do level five (the highest one) no problem. Unlike other anti-aging devices I’ve tried, this one doesn’t sting, it uses three different energies, so all you feel is a hot sensation, but definitely nothing burning. In fact, I like using this before bed since I find the heat to be very relaxing and it makes me sleepy using this.


So what have my results been like? Well, so far so good. I have found that my under-eye skin has been looking more radiant and I look more alert and awake. As you’ll see in the before and afters, my undereye area does look more lifted and radiant, which I’m really happy about. I’m excited to see my final results at the end of next month. Once I’m done the 10 weeks, I’ll keep using this device once every two weeks to maintain the area. I also wouldn’t mind trying this out on my neck as well, as that could definitely get a little more firmed.
Have you tried any anti-aging devices? What areas would you treat?
Please note, I am working with Silk’n on this post. All opinions are my own.
Like what you read? Check out these related posts:
 For all of those who celebrate it, Merry Christmas!
Even though I don’t partake in the holiday, my boyfriend does, and I’ve always found Christmastime to be the most magical season. Anything glitter is so on point this time of the year, and an easy way to incorporate a little sparkle is on your nails.

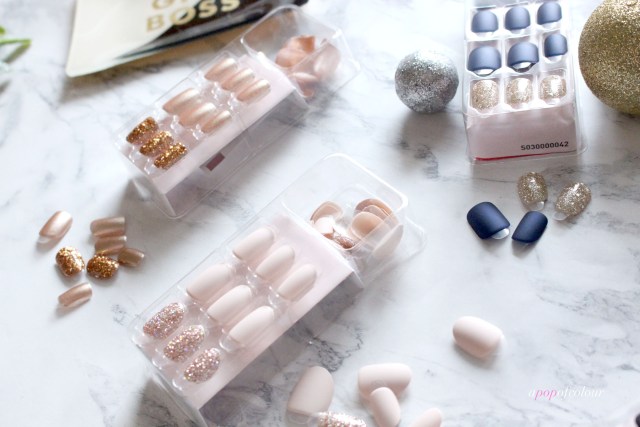
Now as much as a love shiny nails, I’ve always found glitter polish to be difficult to remove. Thankfully, I have quite the collection of press on nails, that not only give me nice-looking tips, but it’s an easy way to sport some sparkle. I’ve tried many different faux nail brands but ImPRESS has always been my go-to. I find they stay on the longest and they always come in trendy designs. For the holiday season they have so many sparkly, show-stopping nails that it was hard choosing which one to wear this week. I ended up going with these metallic copper nails with glitter accents that are just so festive for this time of the year.
In case you haven’t tried ImPRESS yet, each kit comes with 30 nails guaranteed to fit every nail shape. They also include a prep pad, which you use on your nails first, a wood stick for pushing down your cuticles, and a little emery board. The only thing is, if you have long nails already, you will have to cut them depending on how long the press-on is otherwise your real nail could be longer. Anyways, I pick out which nails fit my real ones first, then peel off the backing and press it down. Five minutes later, I have a perfect manicure.

I’ve blogged about these before, but since New Year’s is now coming up, there’s nothing like a little glitter to ring in 2018. I’ll be skipping the polish this season and using these instead.
Do you wear press-on nails? What’s your favourite brand?
Please note, products provided by PR. All opinions are my own.
Like what you read? Check out these related posts.
