So I have a thing for purses. When I see one that I really want, I won’t stop thinking about it until it’s mine.
Being the budget-friendly gal that I am, I have had my eye on Rebecca Minkoff’s Affair bag, a Chanel-esque shoulder bag that can also double as a cross body. Since the Affair retails for over $300, I figured I would just wait it out because to spend that much money for a handbag that isn’t even Chanel (it looks so similar), would be a waste in my opinion.
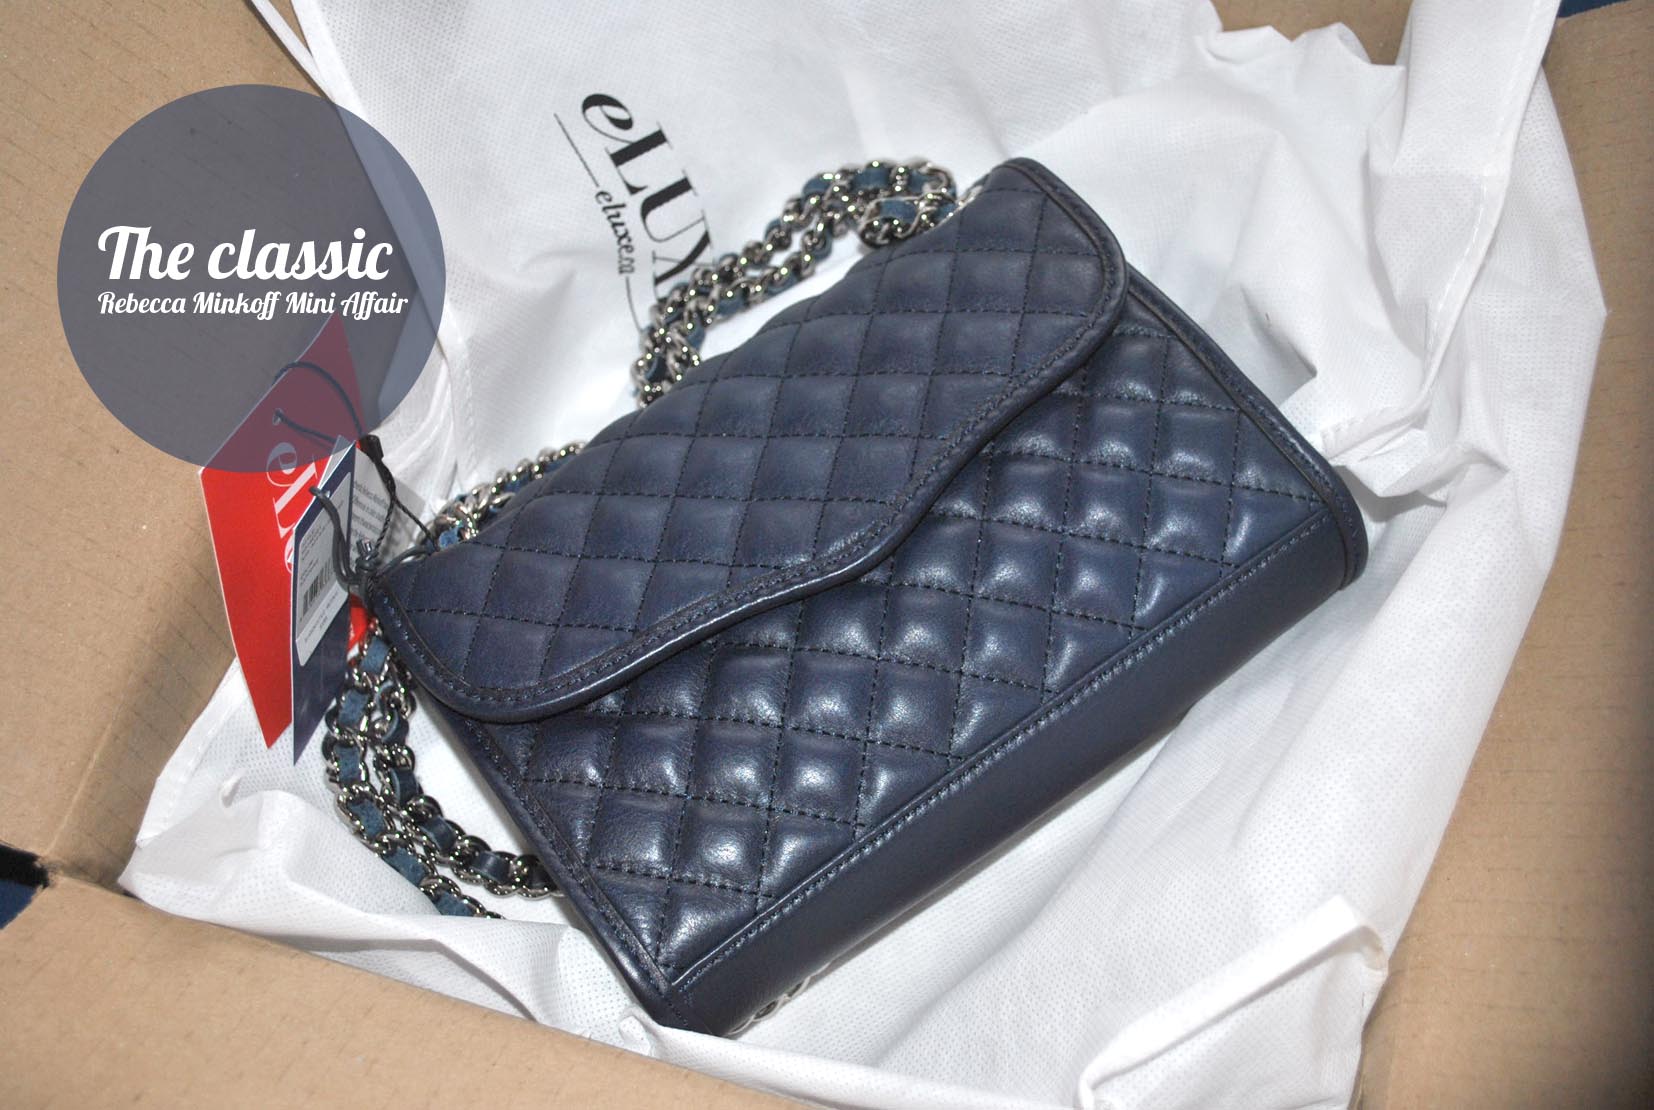
Then, she brought out the Mini Affair, the little sister to its counterpart, which is smaller and more affordable at C$225. Although I do prefer the Affair to the Mini Affair, eLuxe started carrying the latter, and since I have had luck with them in past on scoring good deals, I have kept my eye on it for a while.
And then last week it went on sale. The bag was marked down from $225 to $168 and change, plus I had a $20 voucher (and I got four per cent cash back through Ebates Canada). After a lot of back and forth (do I really need a new bag? I should save my money… I just gave a deposit for a condo…), I bought it. I figured I deserved a new bag. Plus, this one is so classic.


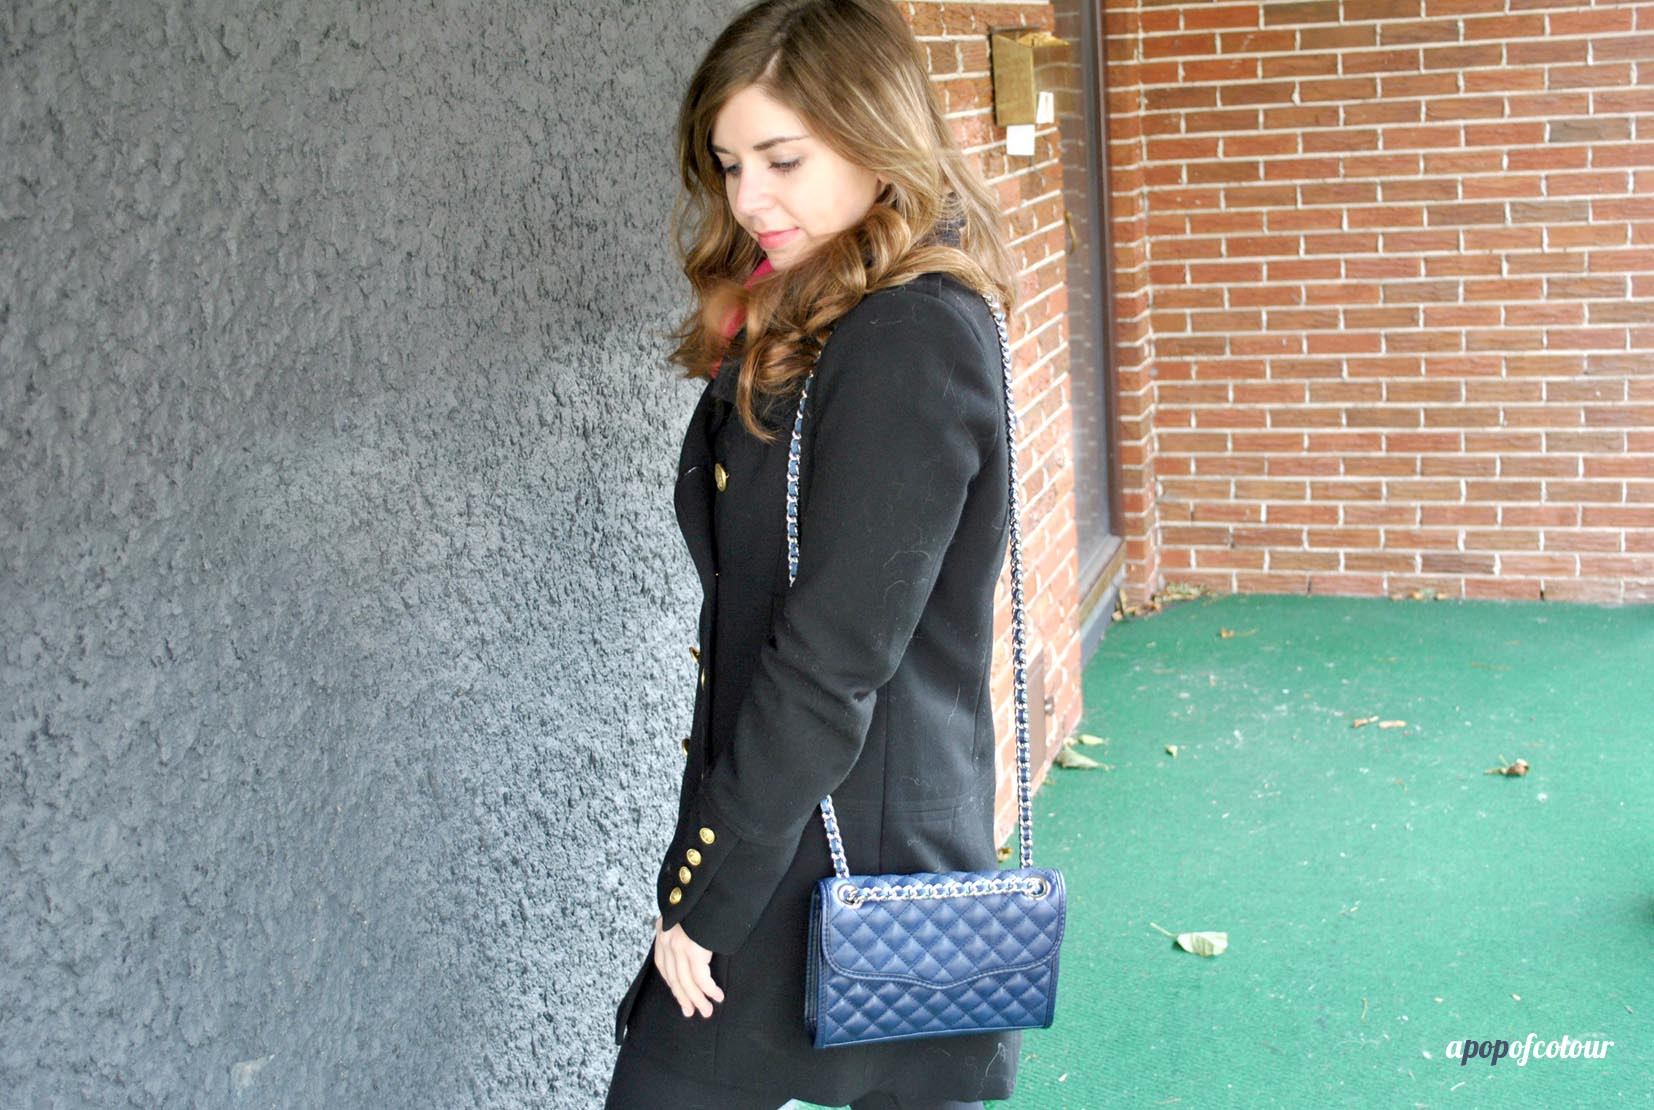
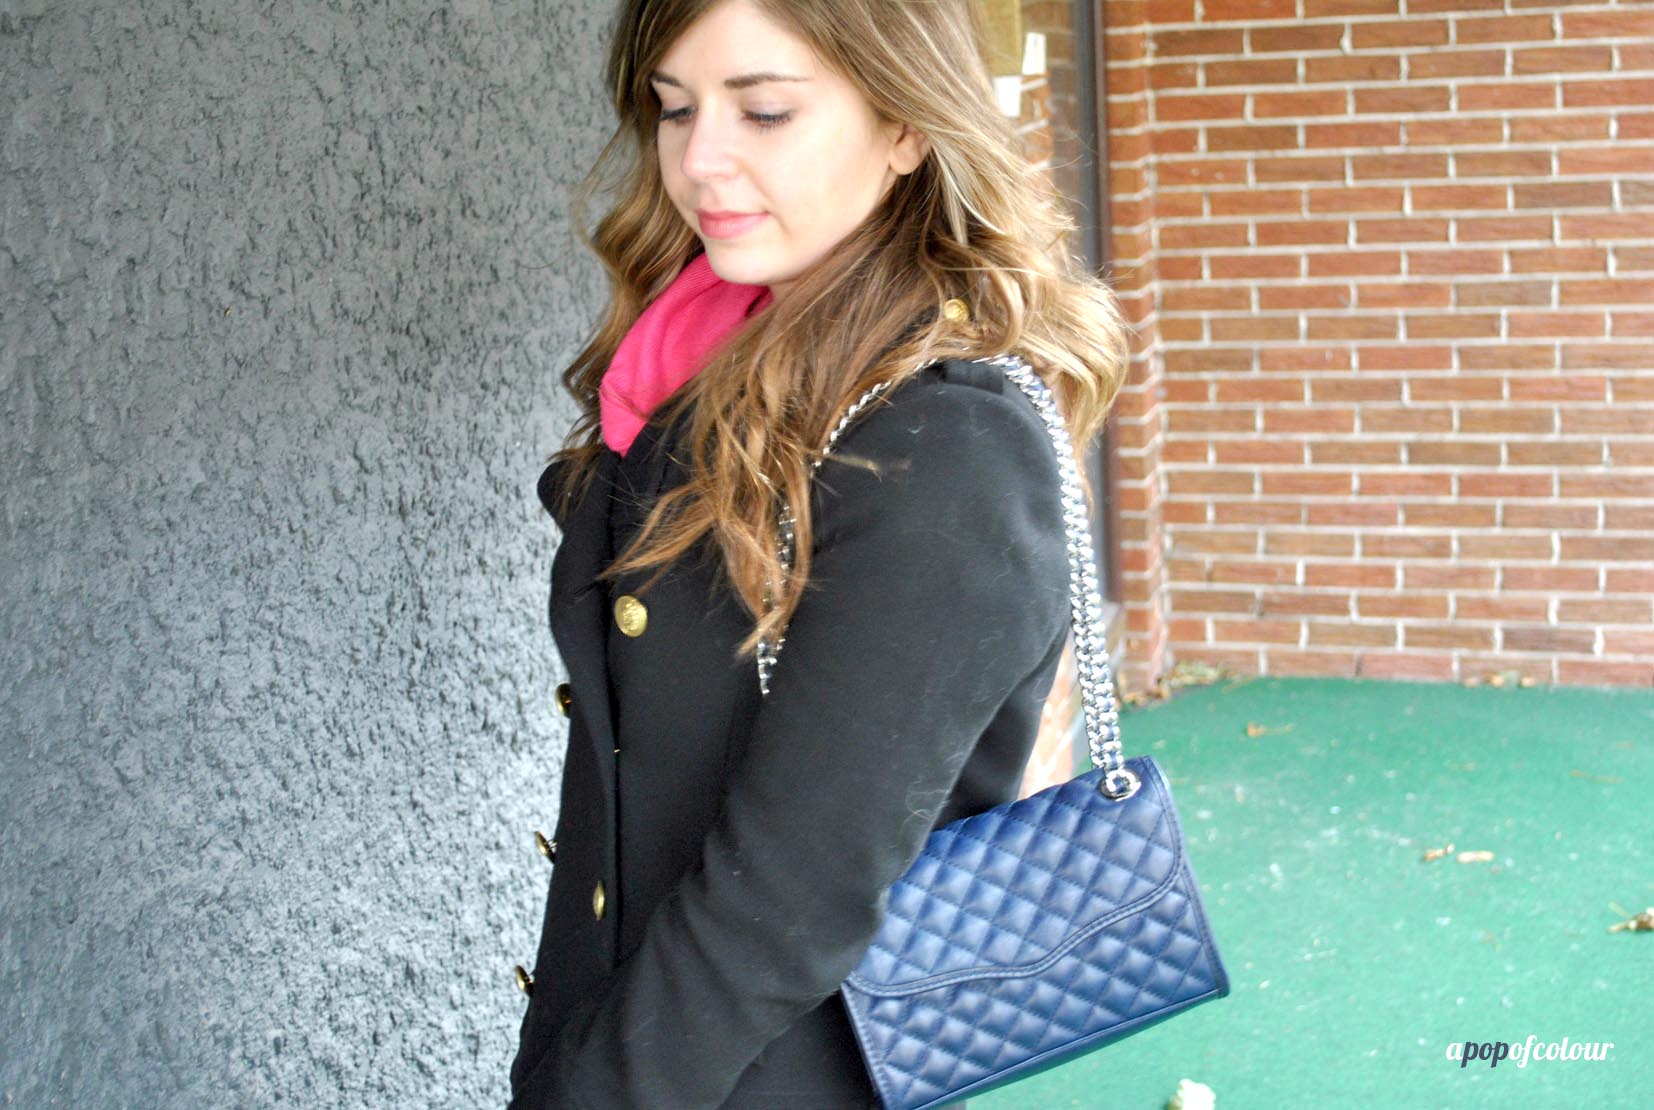
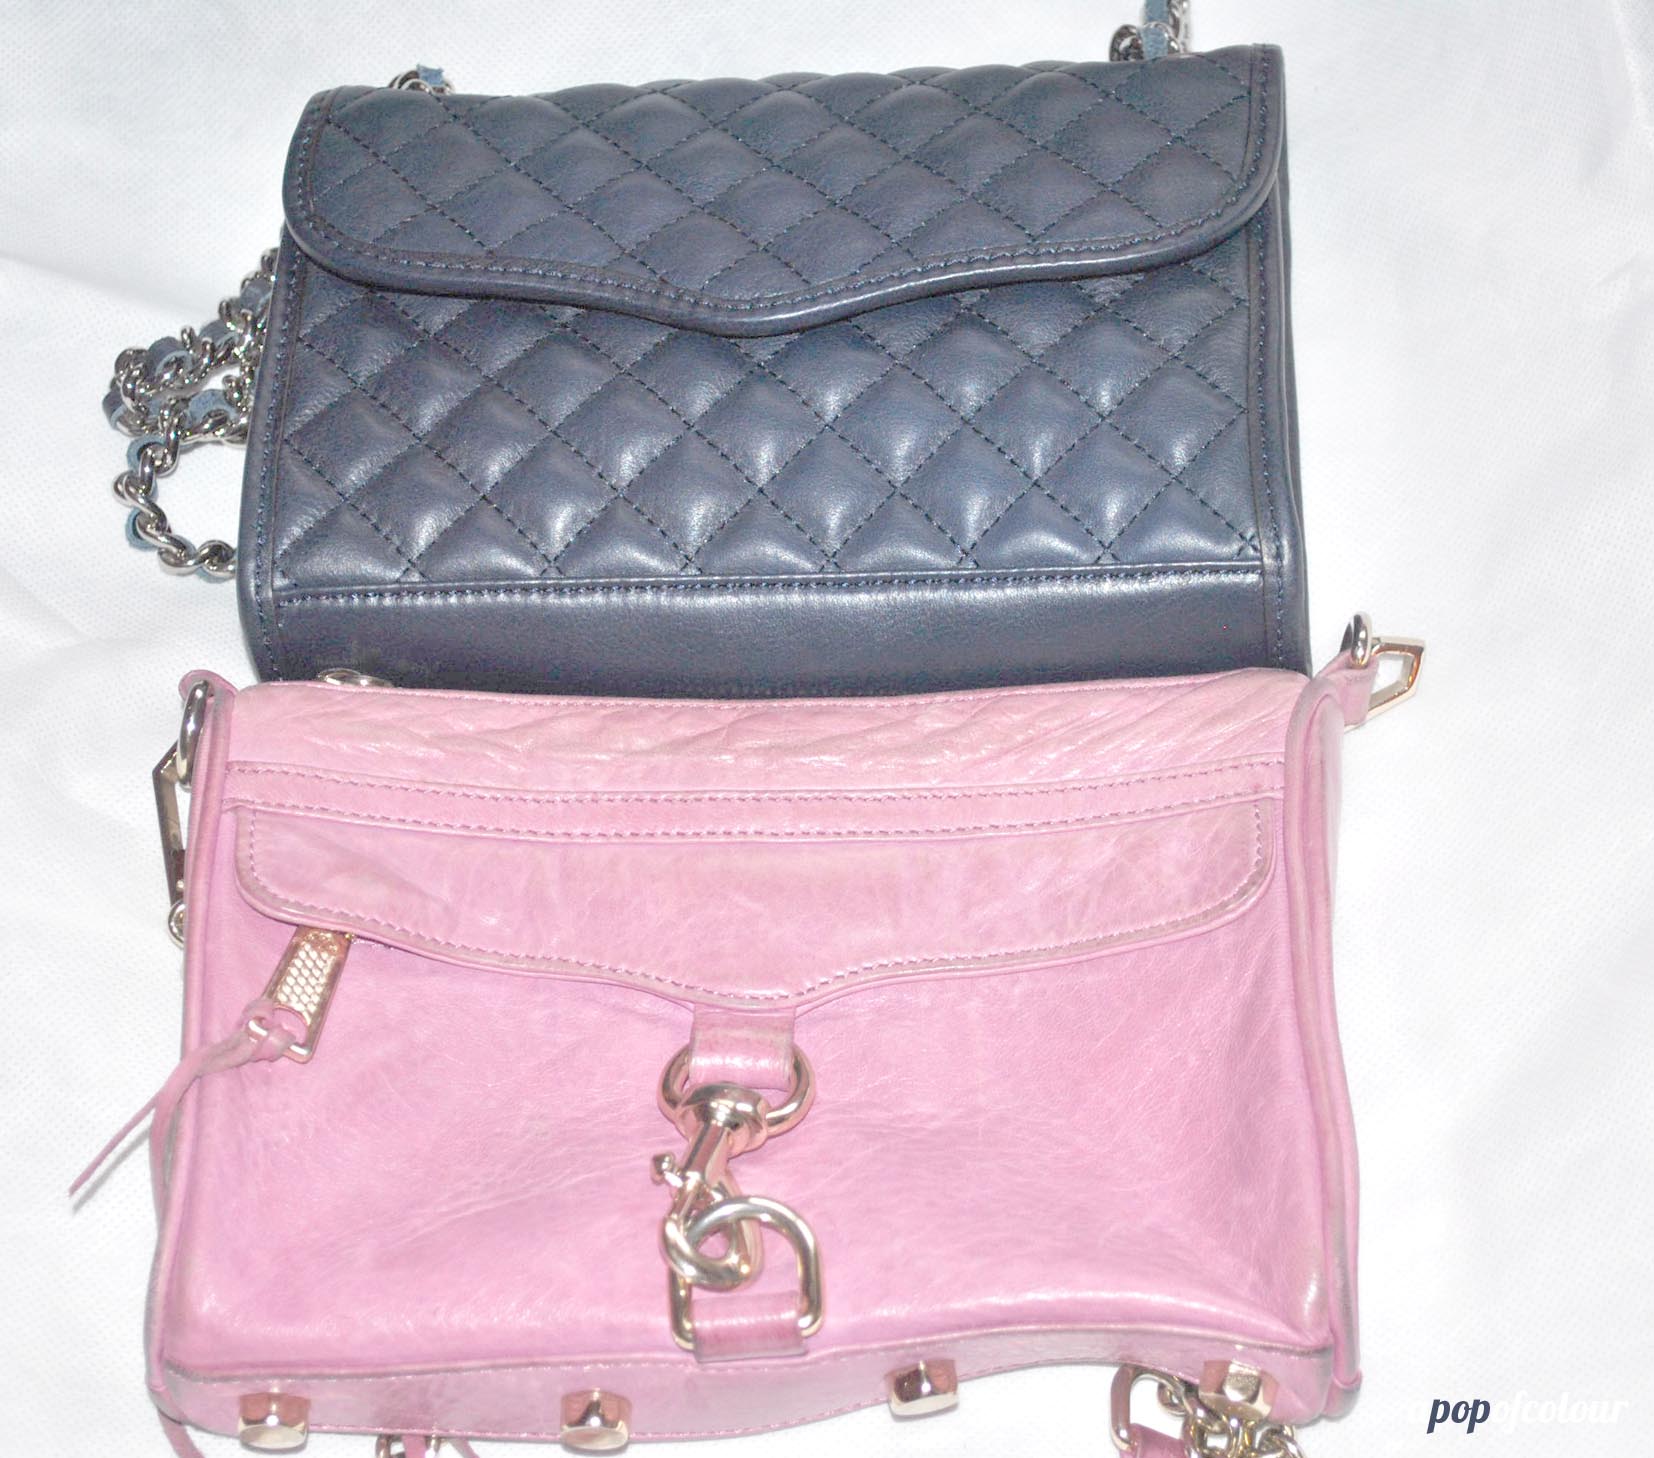
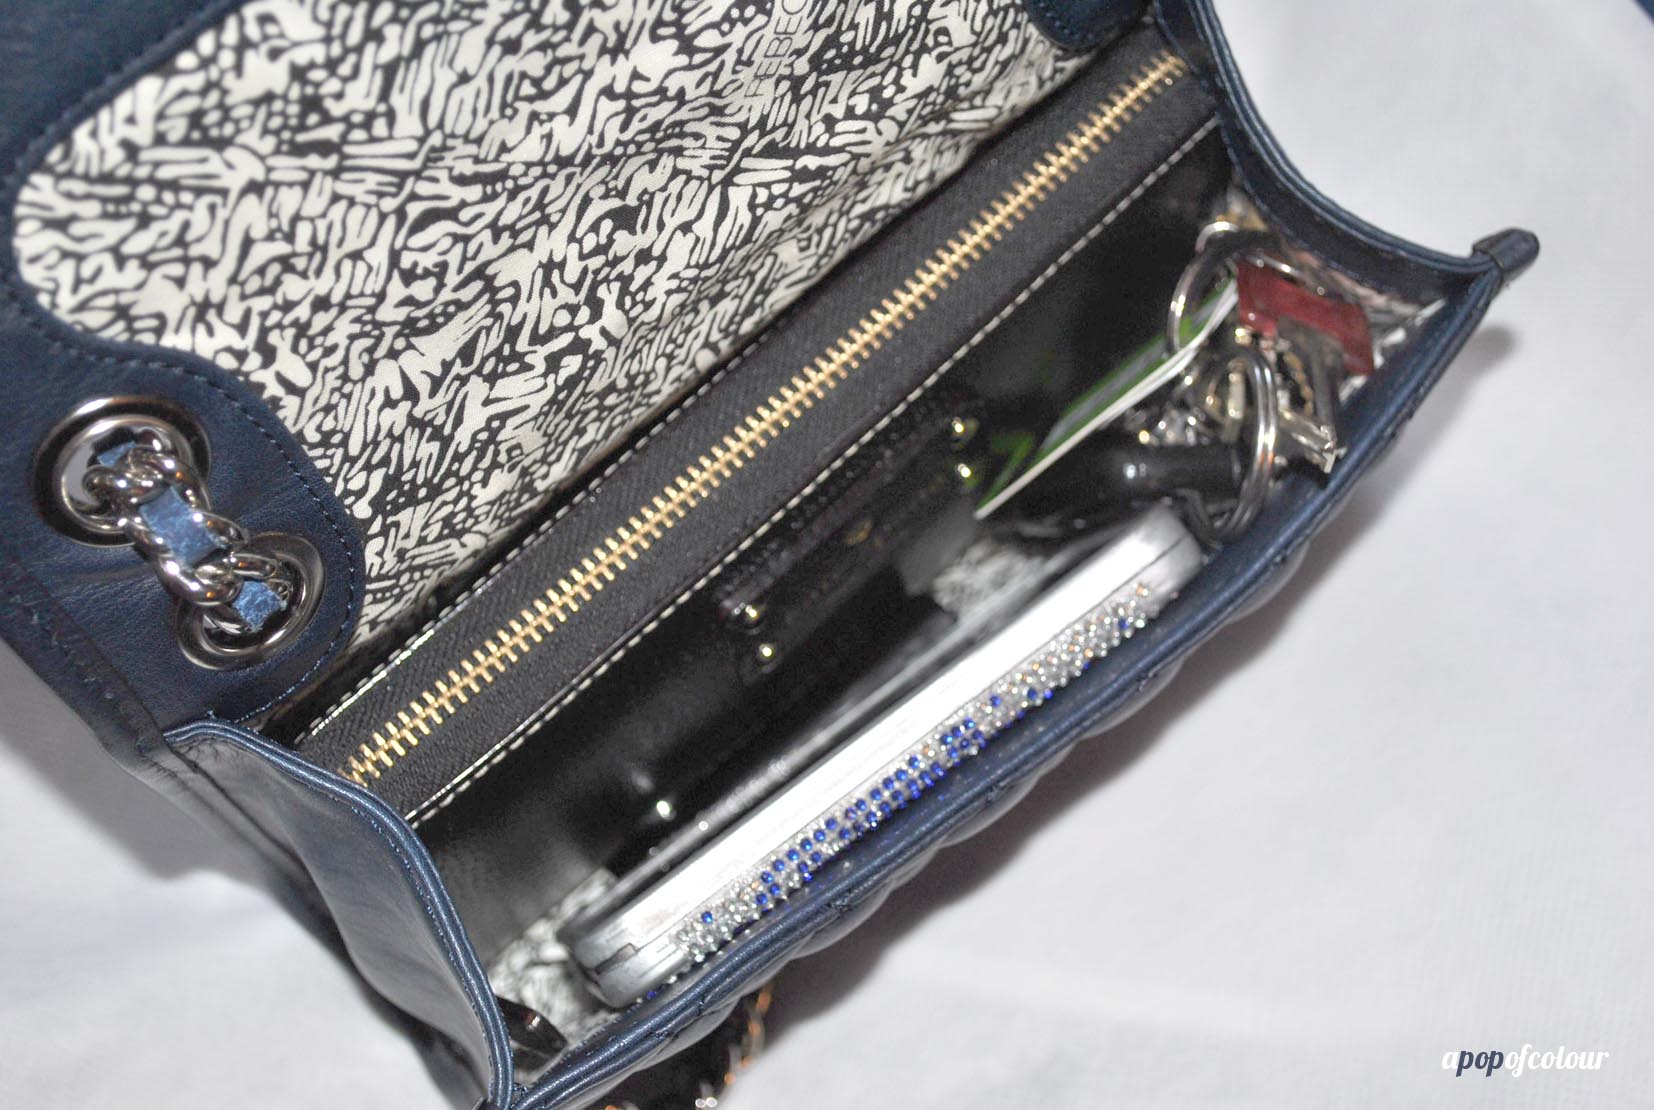
I got the Mini Affair in the colour sapphire, which is a navy blue. My first preference was black, but the black wasn’t on sale, so this was a close second. I have a Rebecca Minkoff Mini Mac already (and so does every blogger, YouTuber, and their dog) so I figured the size would be similar and that bag holds all my essentials no problem. Since my Mini Mac is a lavender pink, I wanted to retire it for the winter season and use a different bag instead (but something small – I only carry my wallet, keys, a lipstick or gloss, and cell phone when I’m not at work). Plus, my Mini Mac is so beat up by this point – one of the tassels is half off (I was white girl wasted one night and sat on it while grabbing the bag, breaking it off), plus since it’s a light colour, there is colour transfer all along the backside. I love the colour, but if you are not careful like me, definitely go for a darker colour in this style because the leather is so delicate.
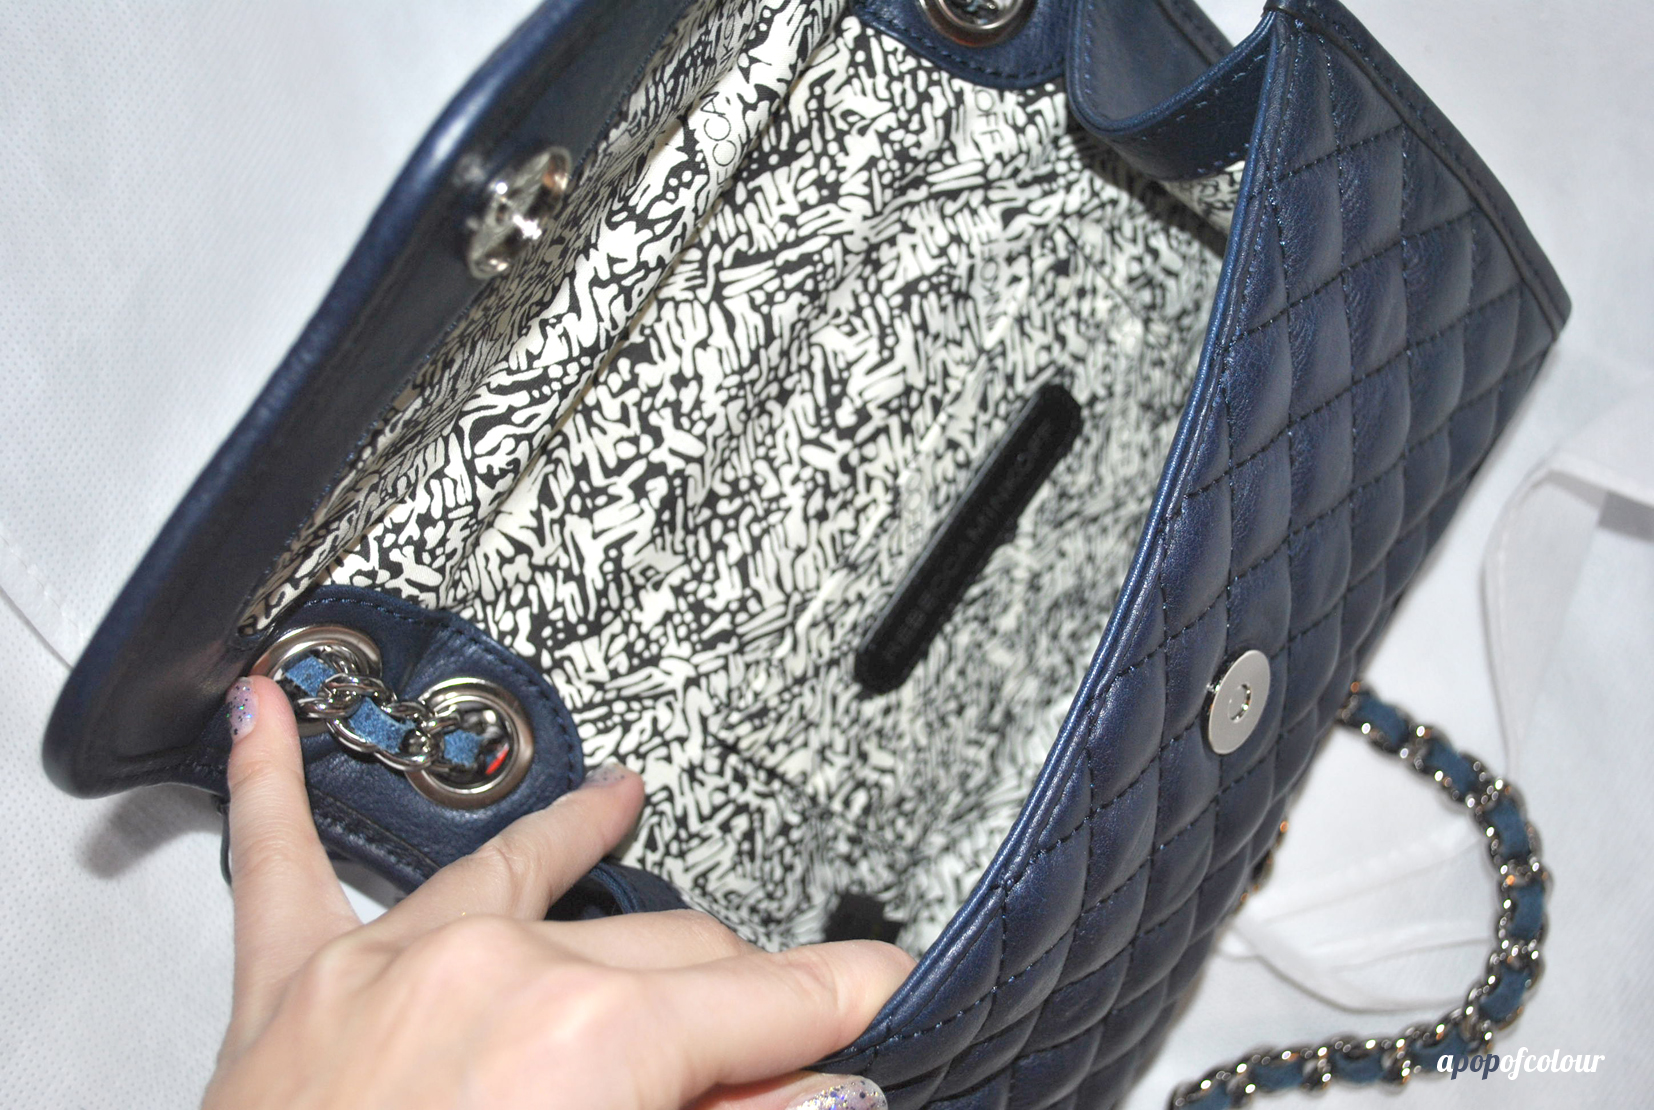
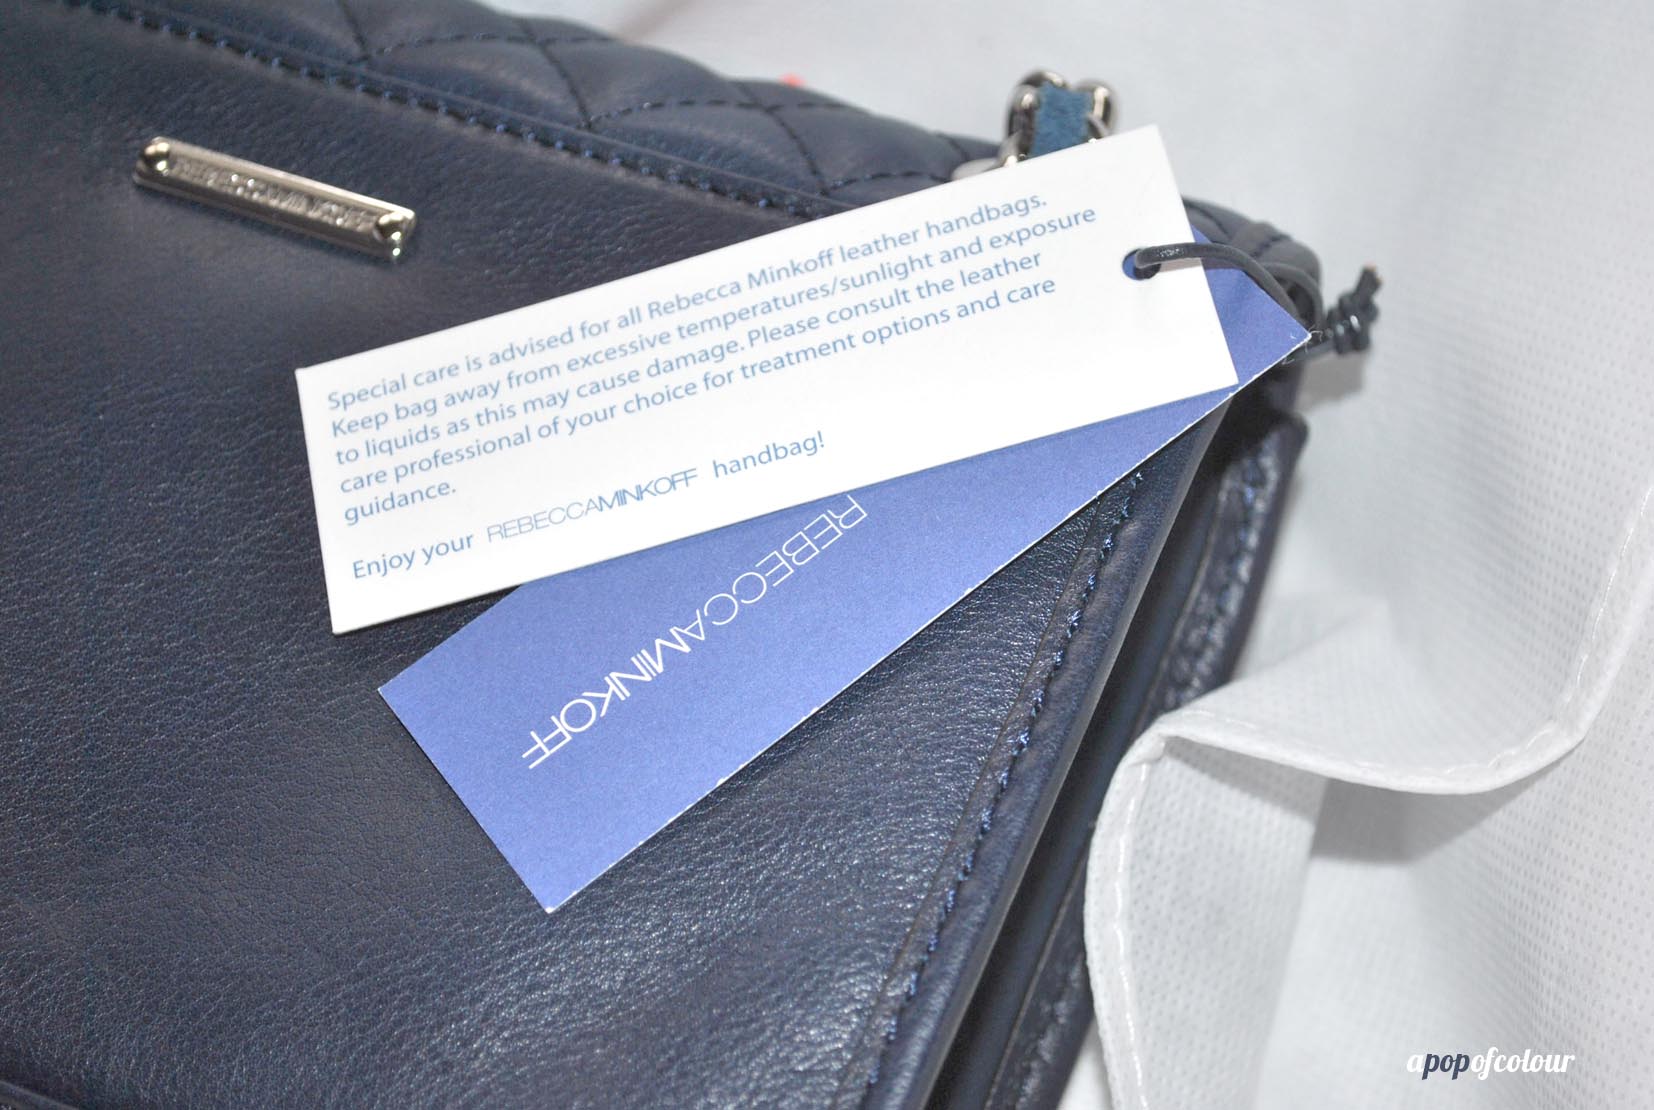
Anyways, back to the Mini Affair… I received the bag two days after ordering it (eLuxe is great in terms of shipping times) and it came with a dust bag that is the same black and white print as the inside liner. The bag is imported from China and features cowhide leather. Like Chanel, there is interwoven leather in the polished silver-tone chain strap, which can be worn long or doubled, and the flap top opens to a logo-lined interior with a single pocket. On earlier models of the bag, it featured an outside pocket along the backside, which this doesn’t have, although I wish it did (the more pockets the better!).

 The bag is six inches in height, 8.5 inches in length, and has a two-inch depth. Compared to the Mini Mac, the dimensions are pretty similar. The only big difference would be the leather (if you were to compare this to Chanel, the Mini Mac would be a lambskin – a smooth leather – whereas the Mini Affair would be a caviar – a pebbled leather) and the closure. The Mini Affair features a magnetic snap closure, which can pop open if the bag is too stuffed, whereas the Mini Mac features a top zipper.
Overall, the two are so different in style that I think it justifies the purchase of having both even though they are so close in size. I absolutely love the Mini Affair for it’s classic look, and although I was a bit hesitant to purchase it because it’s so similar to a classic Chanel bag (it even has that same Chanel chain noise that makes my heart skip a beat), I already own a Chanel bag, so I don’t feel too bad for having this imitation.


If you are interested in purchasing the Mini Affair, and are in Canada, eLuxe has one colour left that is still on sale – the mahogany shade (which according to the site, there are two left of). They also have a variety of other colours that are full price. Also, if you buy it through Ebates Canada, you can get four per cent cash back (hey, anything helps, right?)
Aside from eLuxe, you can buy this bag (and its big sister) at Holt Renfrew in Canada or any of the luxury department stores in the states (Sak’s, Neiman Marcus, Nordstrom, etc.) or even Shopbop and other online retailers.
This would also make a great holiday gift. I mean, who doesn’t want a Chanel bag? Those are so expensive (and the prices keep climbing), so to have a lookalike that is also a designer brand? Can’t get better than that.
Is the Rebecca Minkoff Mini Affair on your holiday wish list? Already own it? What are your thoughts?
Like what you read? Check out these related posts:


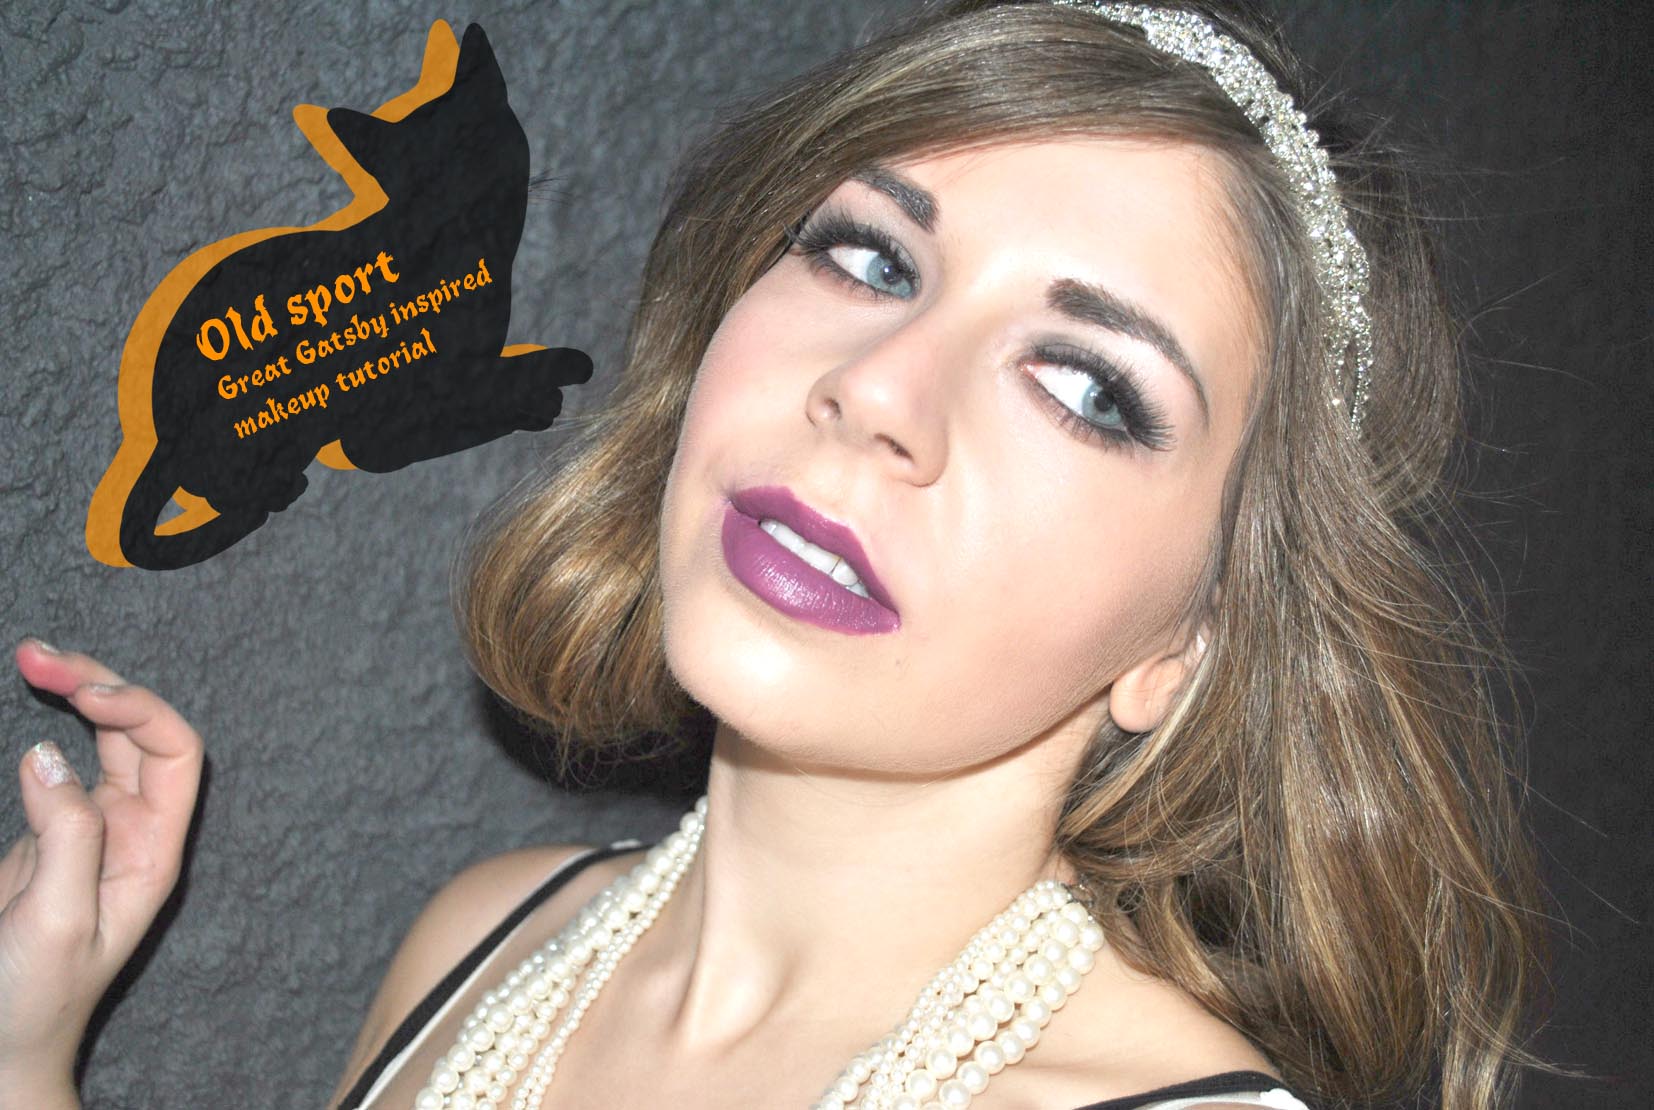
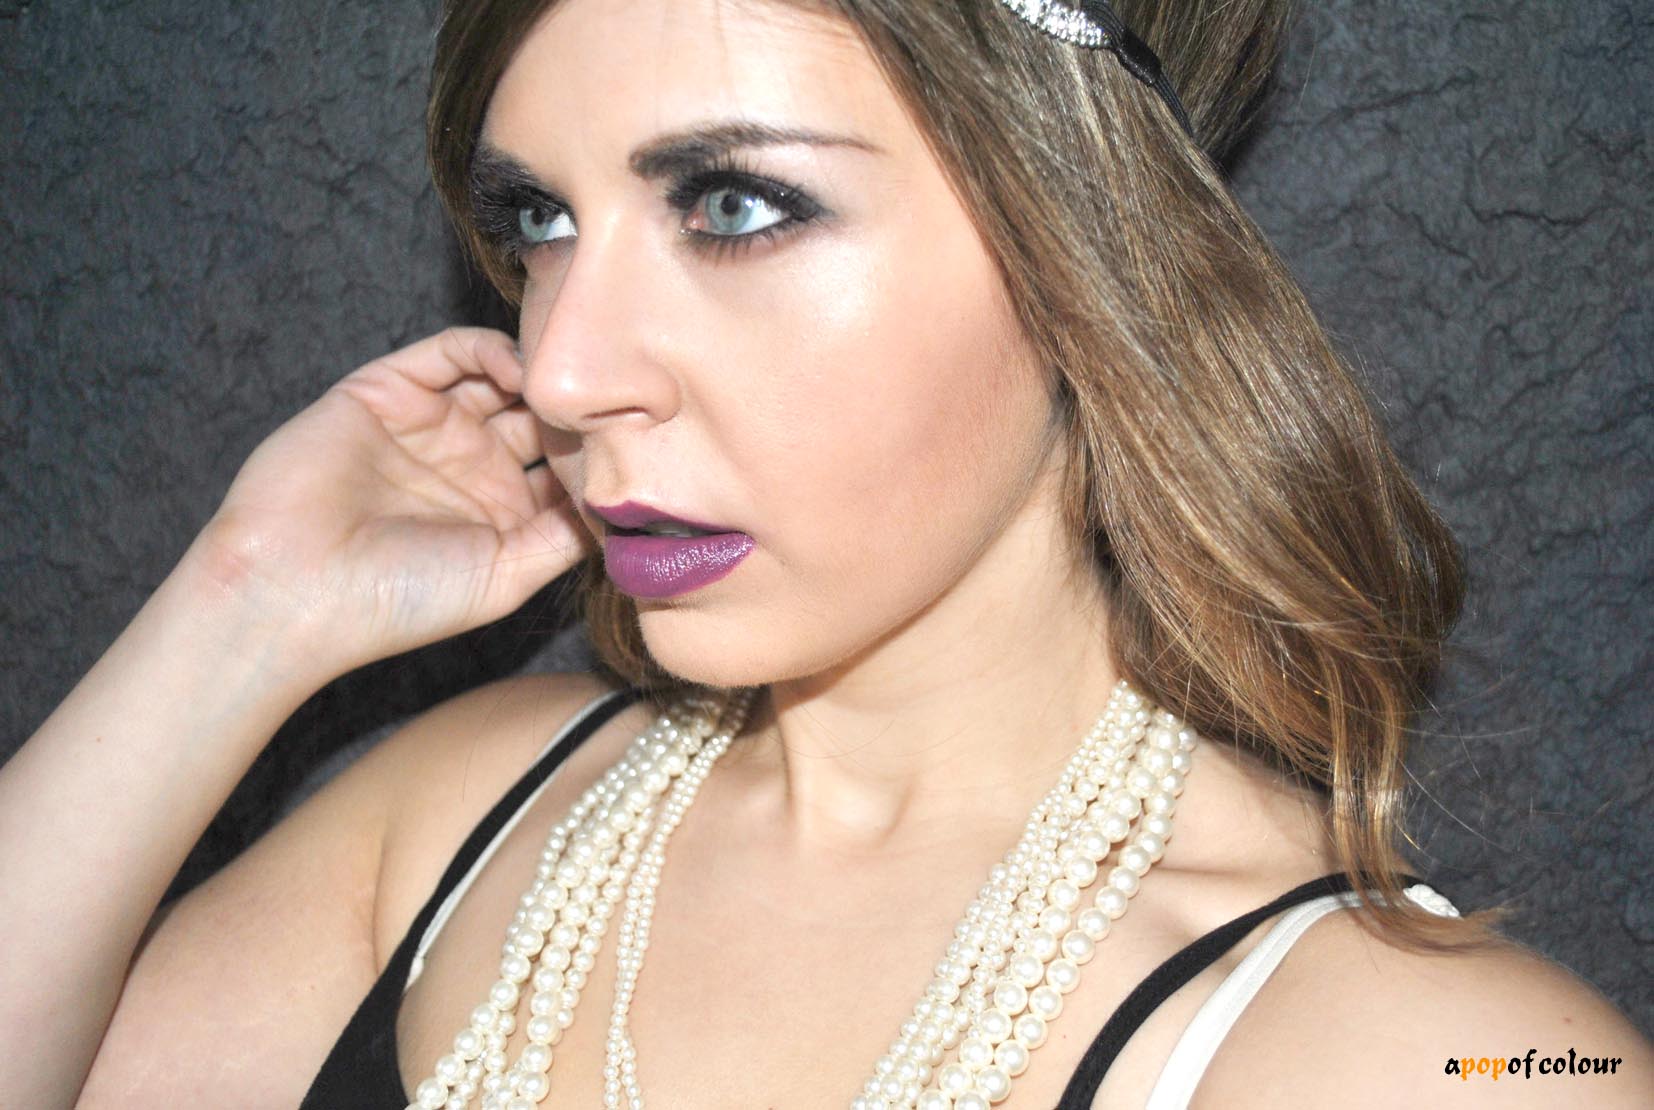
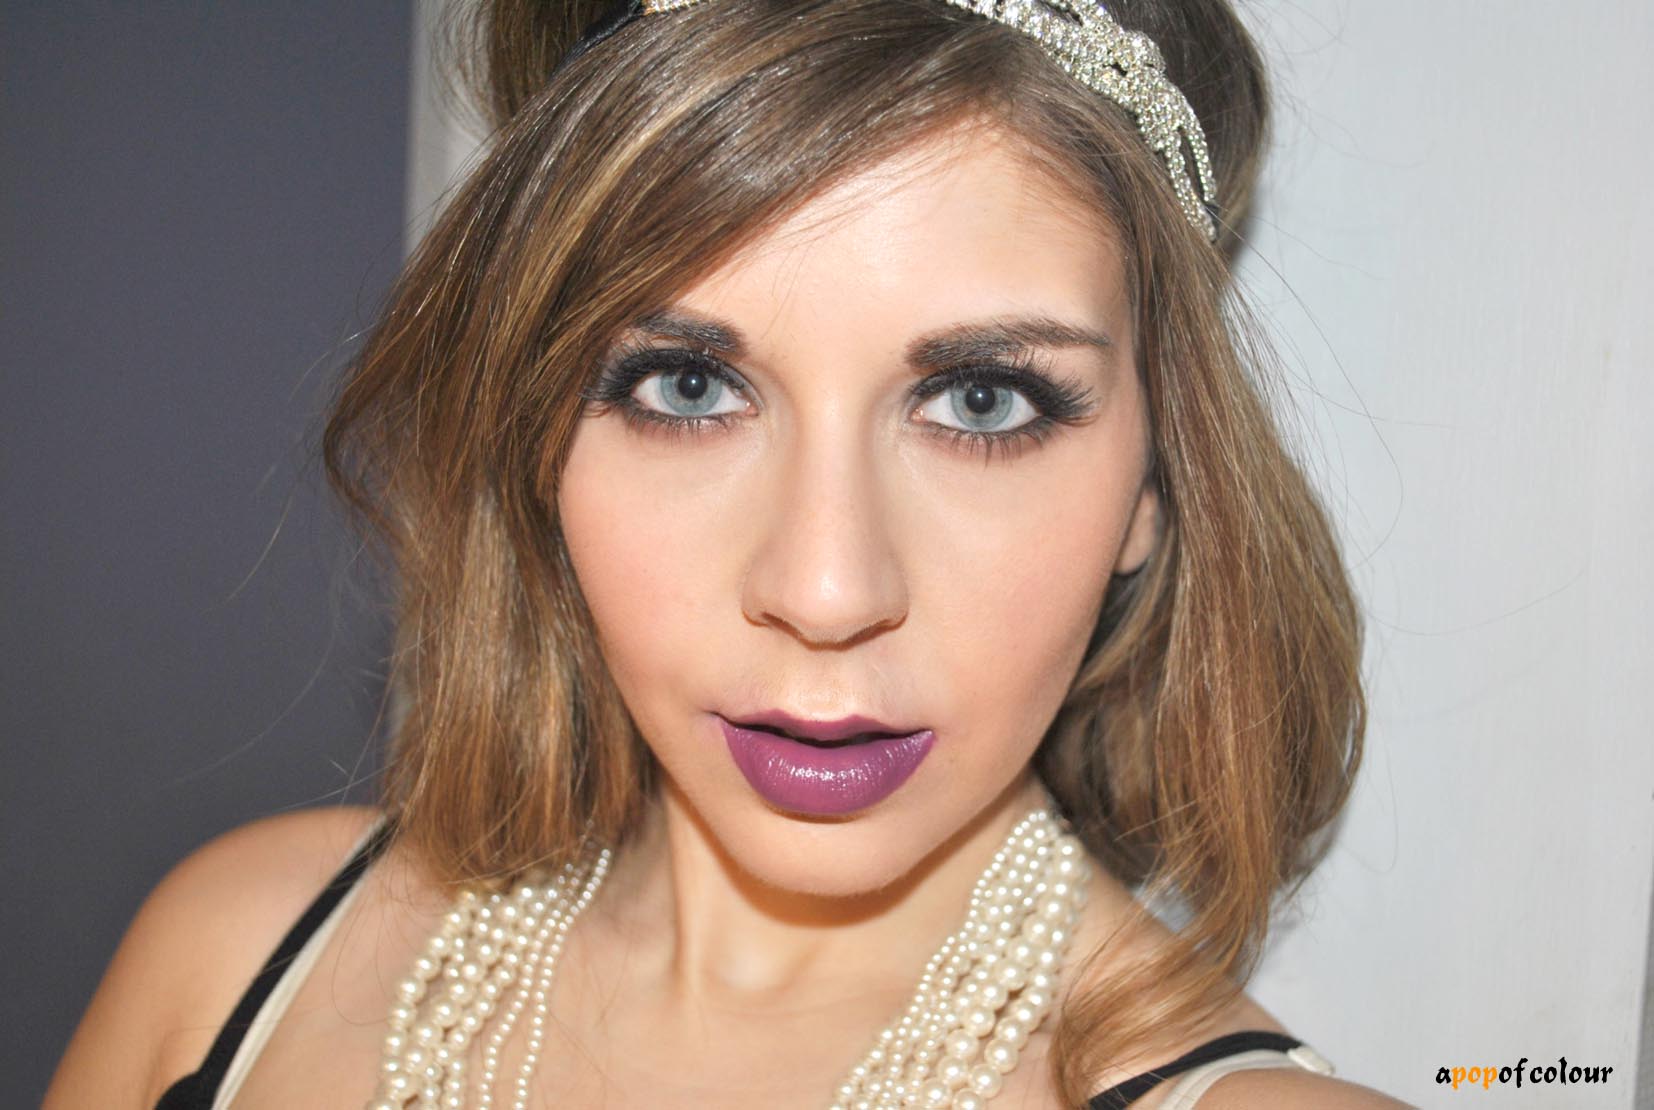
I’ve read The Great Gatsby numerous times throughout high school and university and it still remains one of my favourite novels. The tragic story is filled with 1920’s glitz and glamour and was recently launched back in the spotlight with the Baz Luhrmann adaption that came out earlier this year. As a result, I’m sure a lot of people will be dressing up as Daisy Buchanan this Halloween.
F. Scott Fitzgerald’s masterpiece also holds a special place in my heart as it was my late boyfriend’s favourite novel. I saw this year’s adaption of the film with him, although he hated going to the theatre, and he also gave me Gatsby’s Girl, a novel by Caroline Preston about the girl that the character of Daisy was based on, for my birthday.
I wish he were still here to see this look, he would have loved it. This one’s for you, Joel.
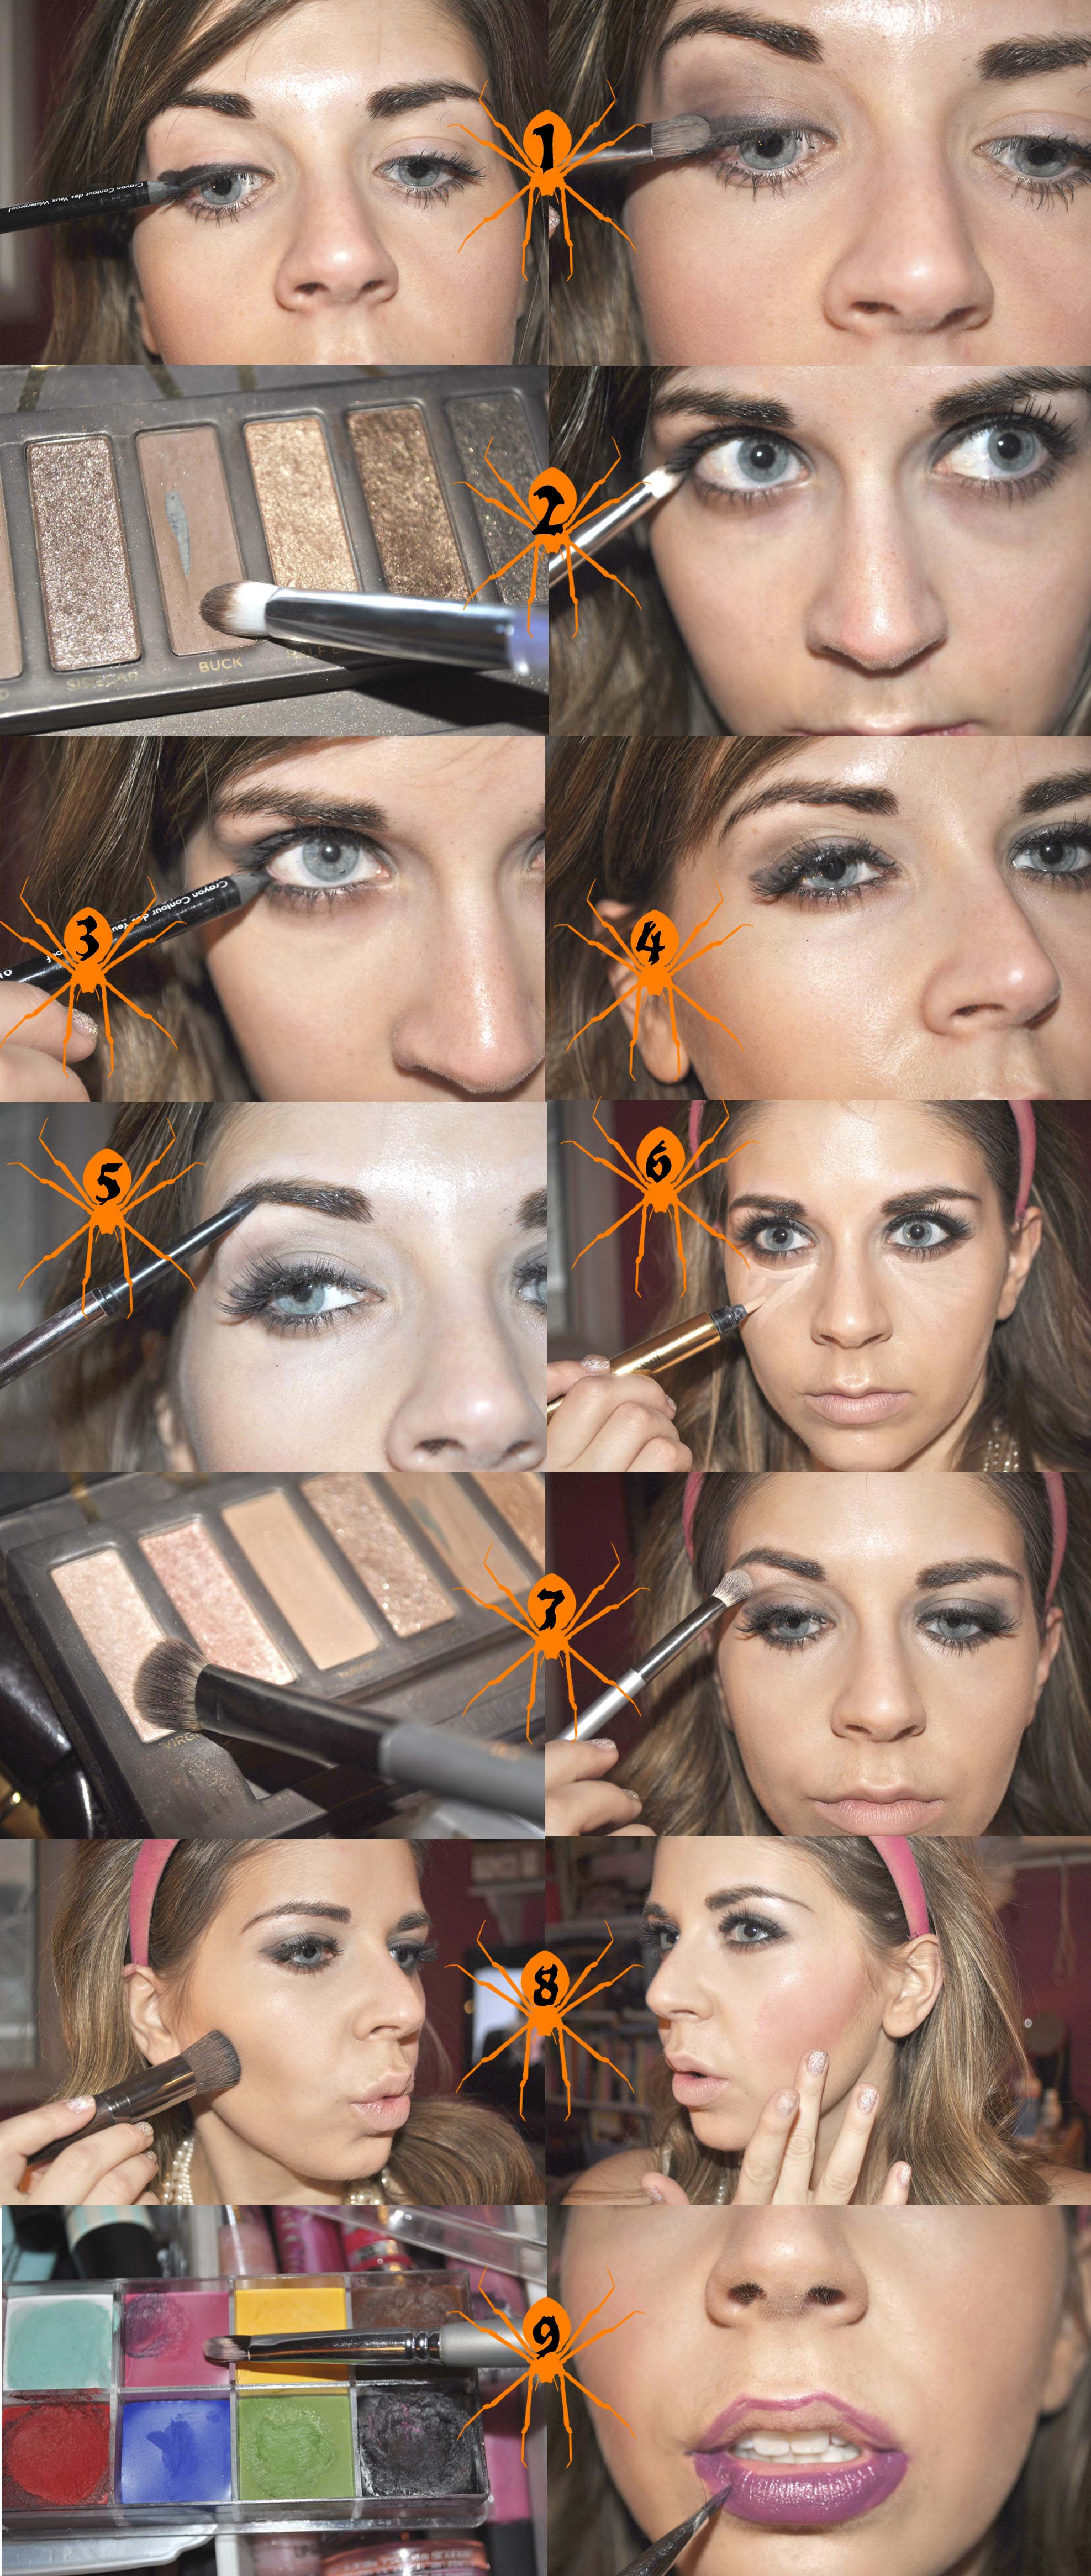
 1. Starting with the eyes, lay down a primer, then with a black eyeliner (I used Make Up For Ever Aqua Eyes in Black), thickly line your upper lash line, winging it out. With a flat-shader brush, smoke out the liner.
2. Using a matte brown eyeshadow (like Buck from the Urban Decay palette), apply this along your lower lash line.
3. With the black eyeliner, line your waterline and tightline.
4. Curl your lashes and apply mascara. Also, pop on some wispy false lashes.
5. Fill in your eyebrows. I have thick brows so I tried to fill them in more straight rather than accentuate the curve like I always do. The women of the ’20s had quite thin brows, so you can either use spirit gum to cover yours, or if you have think brows already, even better.
6. Apply your foundation and a concealer under your eyes. I used IT Cosmetics IT-O2 Ultra Repair Liquid Oxygen Foundation in Light and YSL Touche Eclat.
7. With a matte beige colour, apply this along your brow bone to highlight.
8. Using a matte bronzer, contour your cheekbones. Then, I used a red cheek stain (Benefit Benetint) as my blush for that natural flushed look (plus I didn’t want anything shimmery).
9. For the lips you can either do red or plum, I chose plum. I mixed the purple and black from the Make Up For Ever Flash Color Case together to create this shade. First line the lips using a lip brush, making sure to accentuate your cupid’s bow, and then fill in the rest.


And that’s it. For the hair, curl it, or if you have really short hair you can straighten it. I pinned mine up underneath to make it a bob and then I popped on a sparkly headband (a must for this look – mine is from Claire’s). As for a costume, pearls and jewels are an obvious, so is a flashy dress.
Have fun and make sure you follow your green light ;).
“Life starts all over again when it gets crisp in the fall.”
― F. Scott Fitzgerald, The Great Gatsby
Like what you read? Check out these related posts:

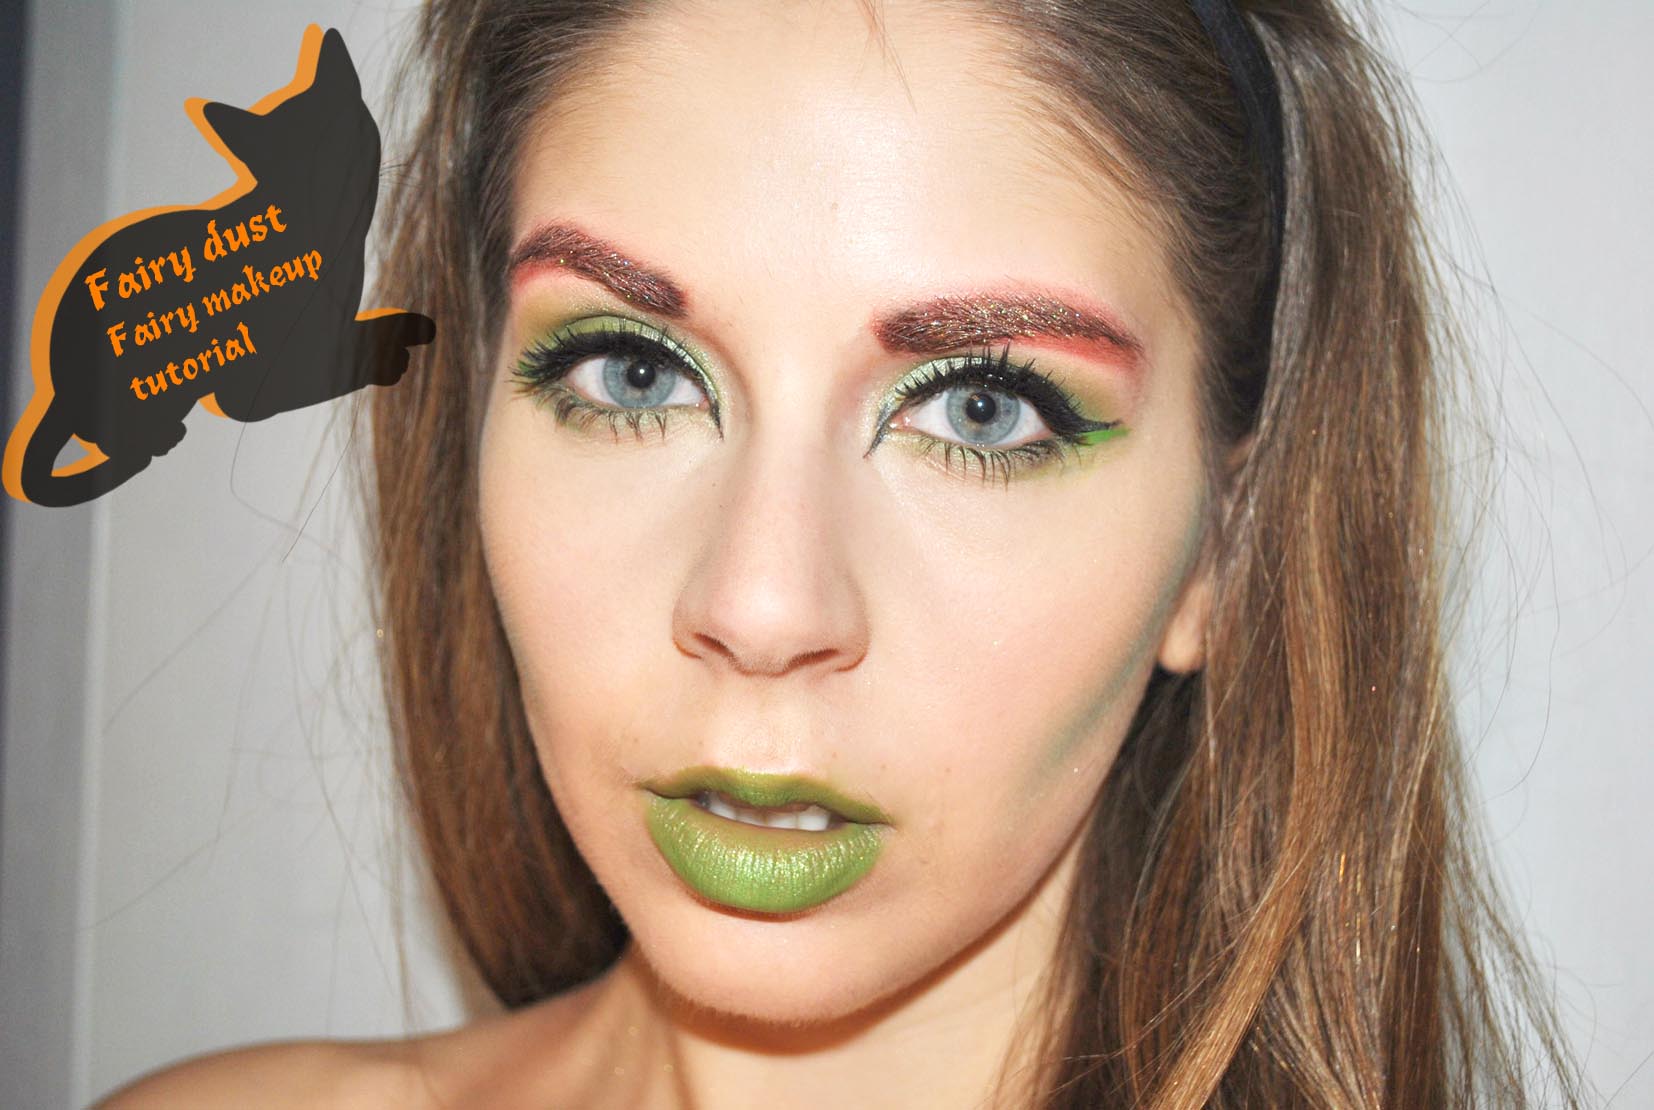
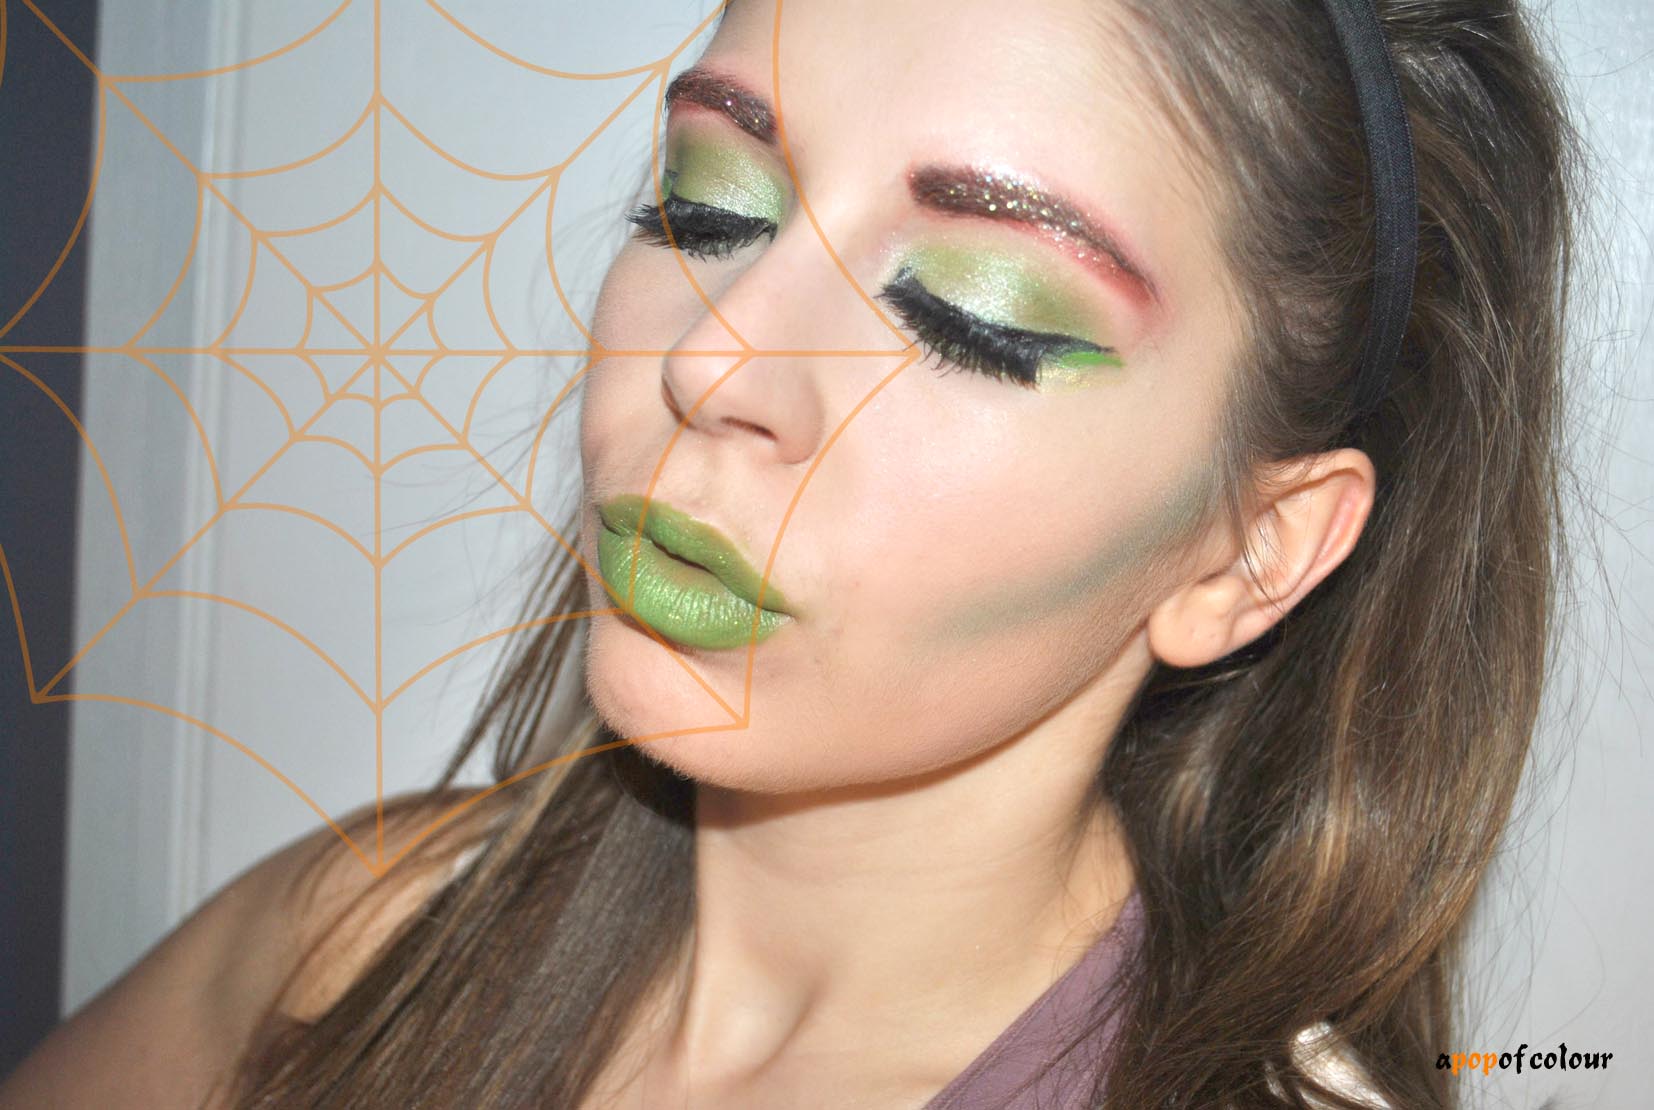
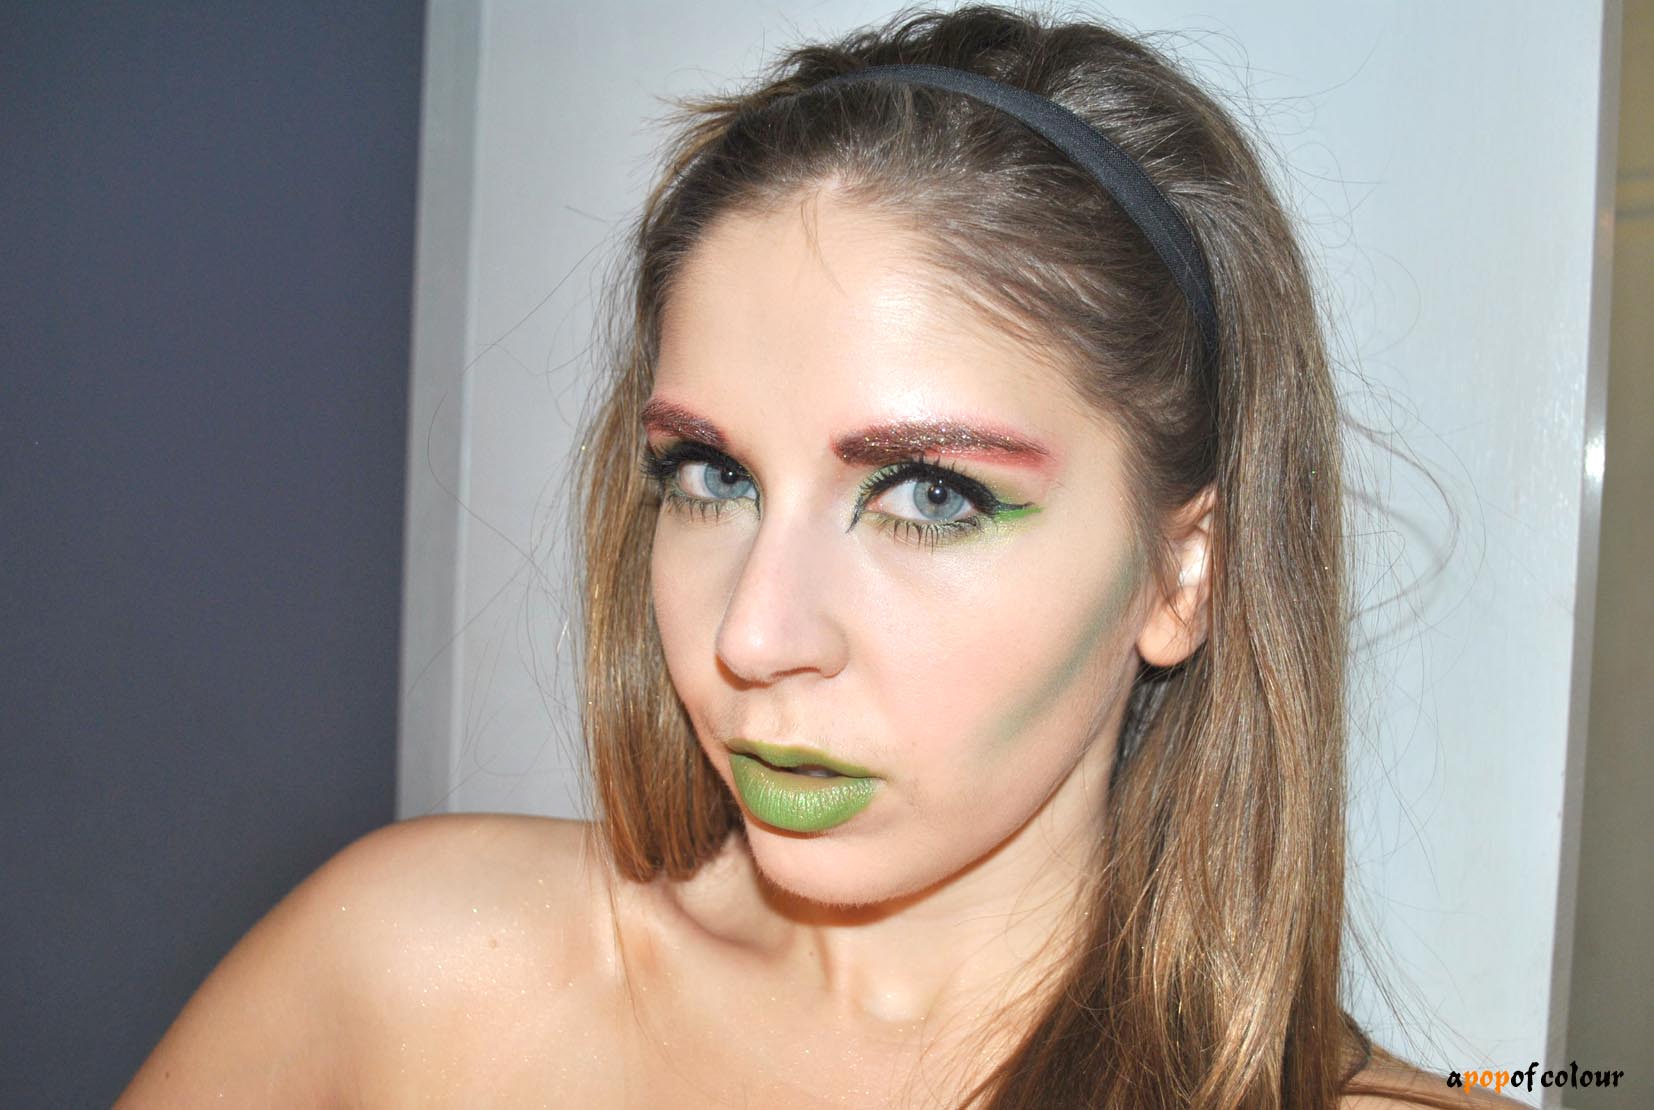
I haven’t been much inspired this year to create any Halloween looks on here but then I got a spark today and just had to do something. I did a fairy look last year but that one was much different from this – more glam, whereas this is more forest nymph. The best part is that you can swap out the green lipstick for red, glue some leaves above your eyes and this can easily translate into Poison Ivy.
Anyways, enjoy the look and let me know if you recreate it!
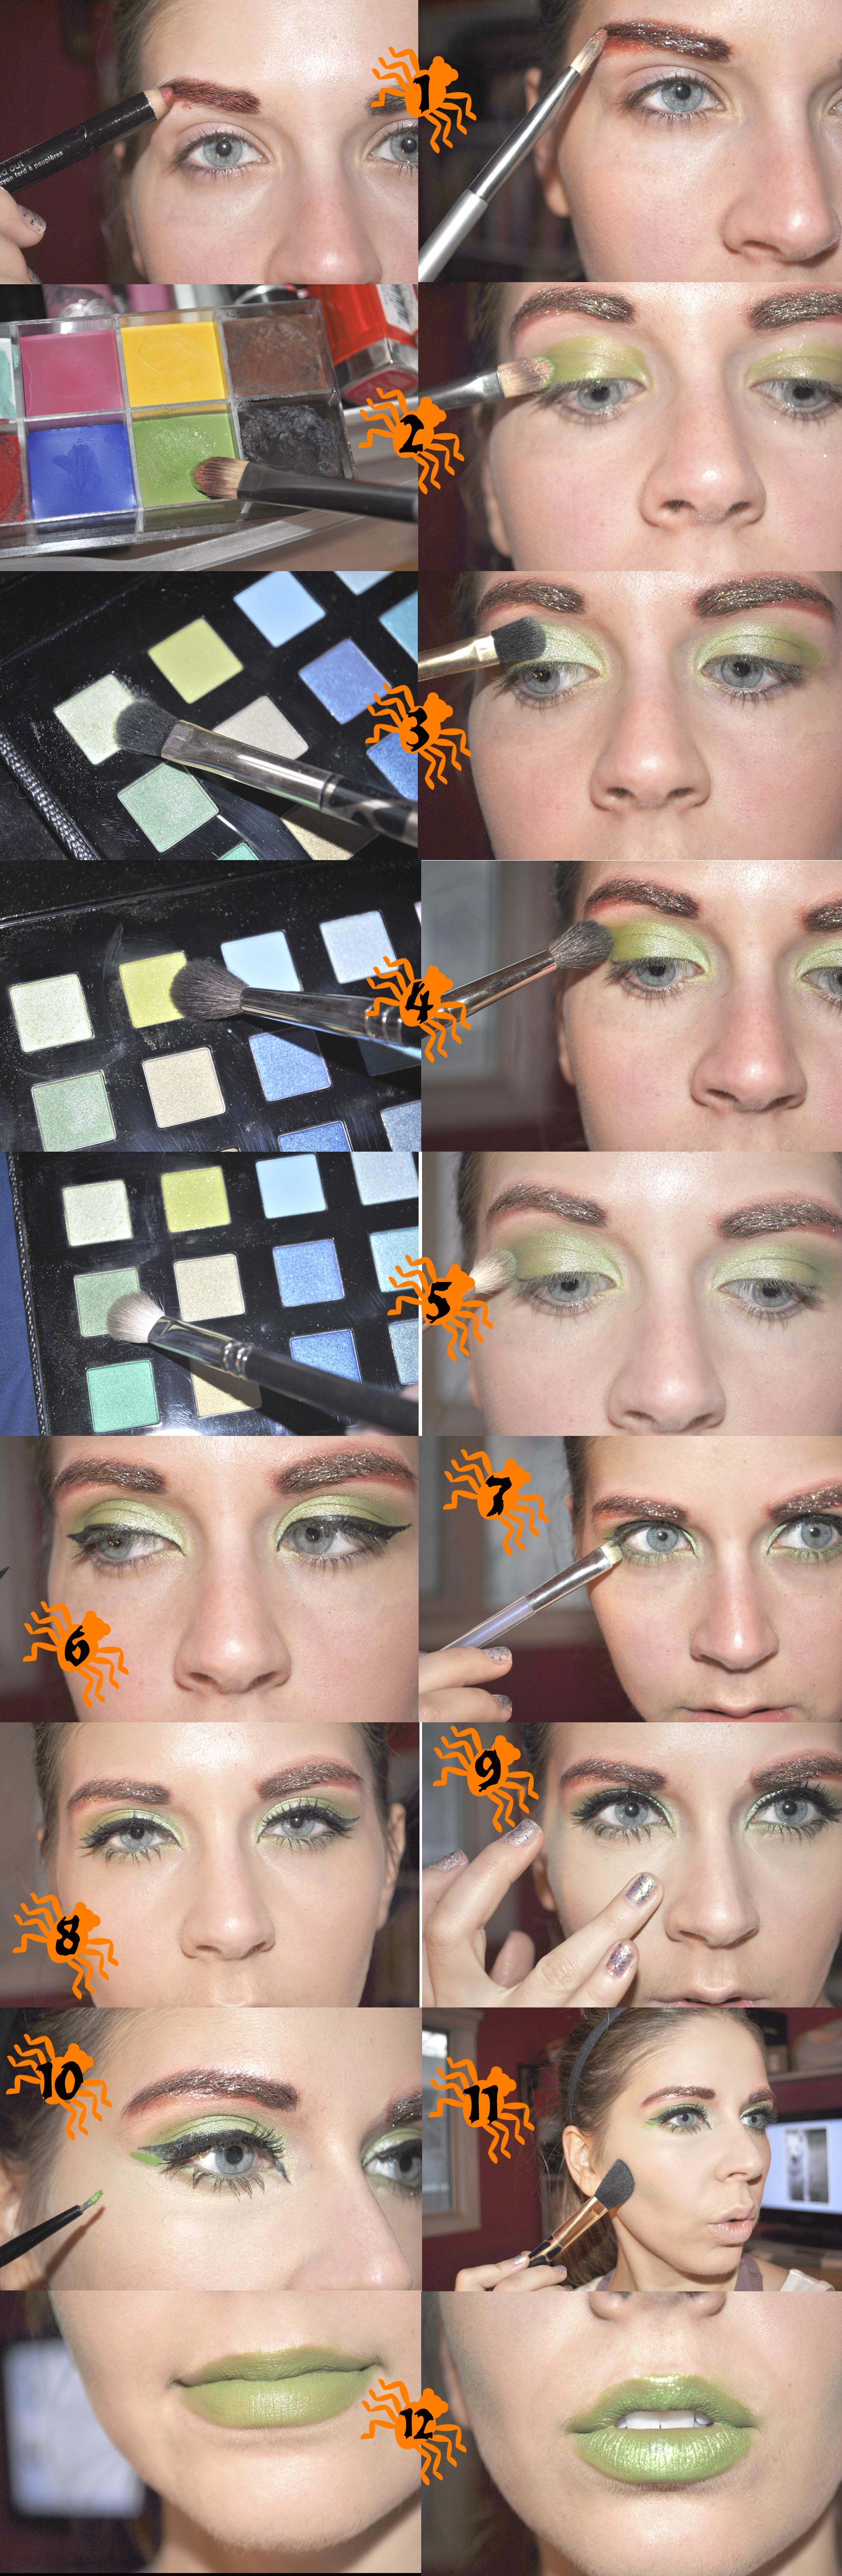
 1. Starting with the eyebrows, grab a red cream eyeshadow and paint this over your eyebrows. I used Covergirl’s Flamed Out Shadow Pencil in Red-Hot Red (if you have the Make Up For Ever Flash Color Case – which I use in this tutorial – you can use the red from that). If you want to be really gung-ho, use spirit gum to cover the brows them draw them back on with the red.
From there (and before the cream product has set), grab some loose glitter and coat this on your eyebrows over the red. I used Make Up For Ever Holodiam Powder in #302 and #303. These were limited edition for the holiday season last year but you can use any glitter, this was just the stuff I have in my collection.
2. Using a green cream product, apply this on your eyelids acting as a base. I used the green colour from the Make Up For Ever Flash Color Case.
3. With a light green eyeshadow, apply this to the inner corner towards to the centre of your lids. The green eyeshadows I use in this tutorial are from the Sephora Color Anthology palette which is limited edition for this holiday season (review coming soon!).
4. Using a blending brush, grab a matte lime-green eyeshadow and sweep this into the crease area.
5. With a darker green eyeshadow and your blending brush, work this into the crease, darkening up the eye area.
6. With a black liquid eyeliner, apply this to your upper lash line, winging it out longer than you normally would. I also took this longer in the inner corners of my eyes to make them appear more whimsical.
7. Using the darker green shadow that you used in the crease (not the matte one), apply this along your lower lash line.
8. Apply a couple coats of mascara and some false lashes (a must!).
9. Apply your foundation and concealer. The concealer should be at least two shades lighter than your skin tone and really layer this under your eyes to brighten up the area. To set everything, use a translucent powder. I used IT Cosmetics It-02 Ultra Repair Liquid Oxygen Foundation in Light, Make Up For Ever’s Five-Color Camouflage Concealer palette, and Make Up For Ever Microfinish Powder.
10. Going back with that cream green, draw a line right underneath the black wing. Here is where you can get really creative with this look. I chose to keep it simple but you can definitely show off your art skills with different colours and designs if you wish.
11. Using the green eyeshadow again, sweep a crease brush in it and then apply this to the hollows of your cheeks to contour.
12. To finish up the look, use either a green lipstick or the cream green colour and apply this to your lips. To add a little shine, apply the glitter over top.


Happy Halloween! I hope to have one more makeup look up before next Thursday, but we’ll see if I feel inspired ;).
Also, I am one of many beauty blogs participating in the Made In Blog Awards. Click here (or click on the button in the sidebar) to vote. You don’t have to register (it literally takes a second) and can vote once per device. Thanks in advance!!
Like what you read? Check out these related posts:

 So I have a thing for purses. When I see one that I really want, I won’t stop thinking about it until it’s mine.
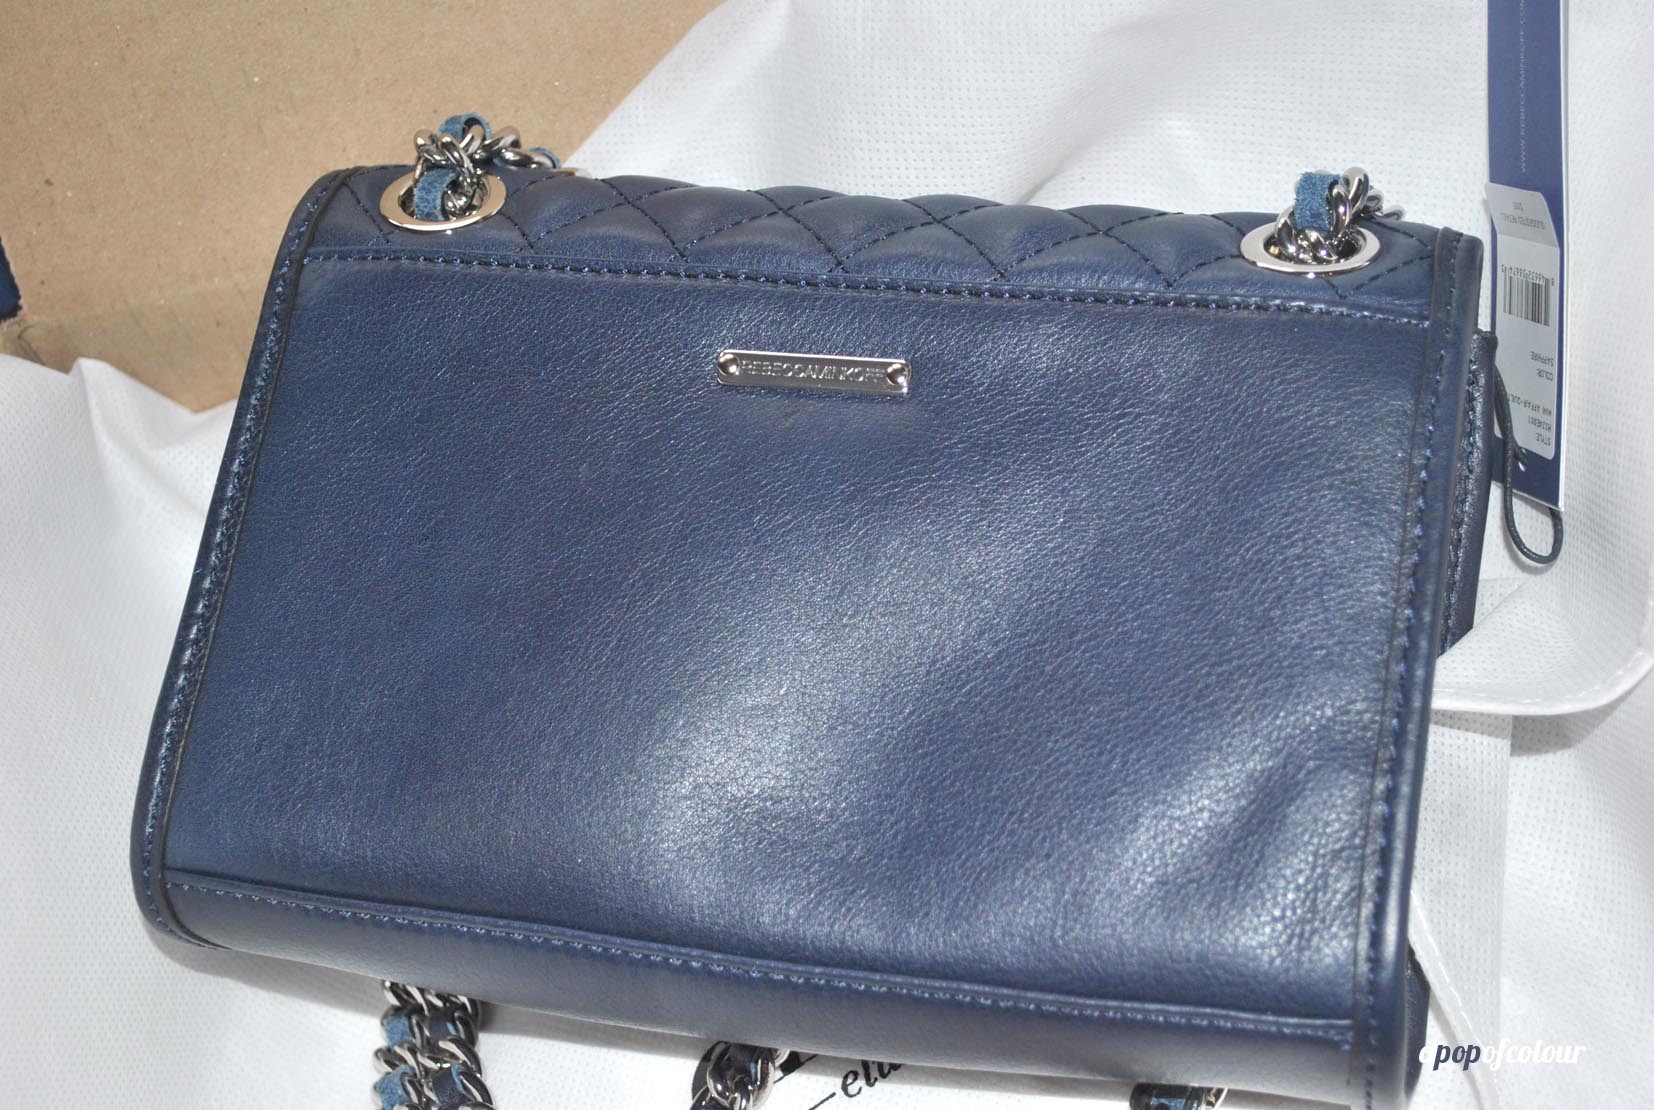
 The bag is six inches in height, 8.5 inches in length, and has a two-inch depth. Compared to the Mini Mac, the dimensions are pretty similar. The only big difference would be the leather (if you were to compare this to Chanel, the Mini Mac would be a lambskin – a smooth leather – whereas the Mini Affair would be a caviar – a pebbled leather) and the closure. The Mini Affair features a magnetic snap closure, which can pop open if the bag is too stuffed, whereas the Mini Mac features a top zipper.