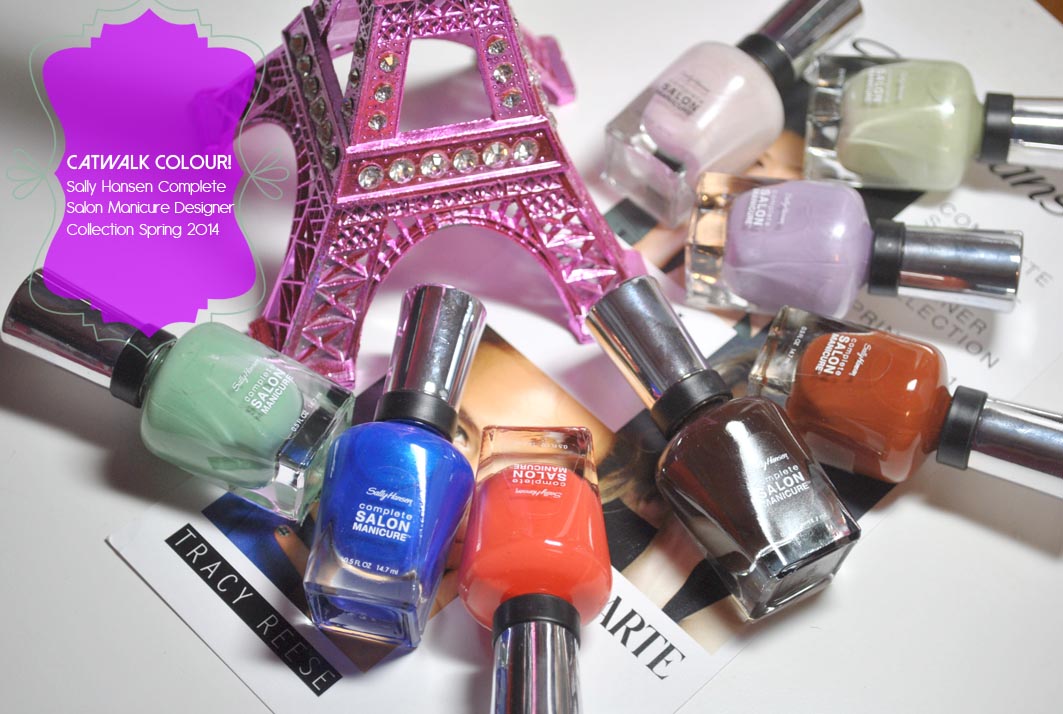
Limited edition colour + fashion designers + Sally Hansen? Yes, please!
I’ll be the first to say that I have lots of nail polish (some may say it’s a problem…) in a wide range of colours from many different brands. I’ve said it before, but I used to be a nail snob; I only wore shades from salon brands like OPI or Essie. Well, Sally Hansen has quickly become my go-to brand for polishes because the colours are stellar and the formulation is fab. The Complete Salon Manicure line in particular is my favourite from the brand, as well as one of my favourite formulations in general. The colour goes on so nice and I absolutely love the brush, it paints the colour on perfectly.
Because Sally Hansen makes great polishes, Tracy Reese, Prabal Gurung, and Rodarte teamed up with the brand for their spring/summer 2014 shows during NYFW last year. I actually found out about the collections in September 2013, but lucky for us non-models (aka regular folk), Sally Hansen will be releasing the Complete Salon Manicure (CSM) Designer Collection Spring 2014 in June 2014, available for one month only, so we can all have runway-worthy nails!
The collection is composed of eight colours, three for Prabal Gurung, two for Rodarte, and three for Tracy Reese.
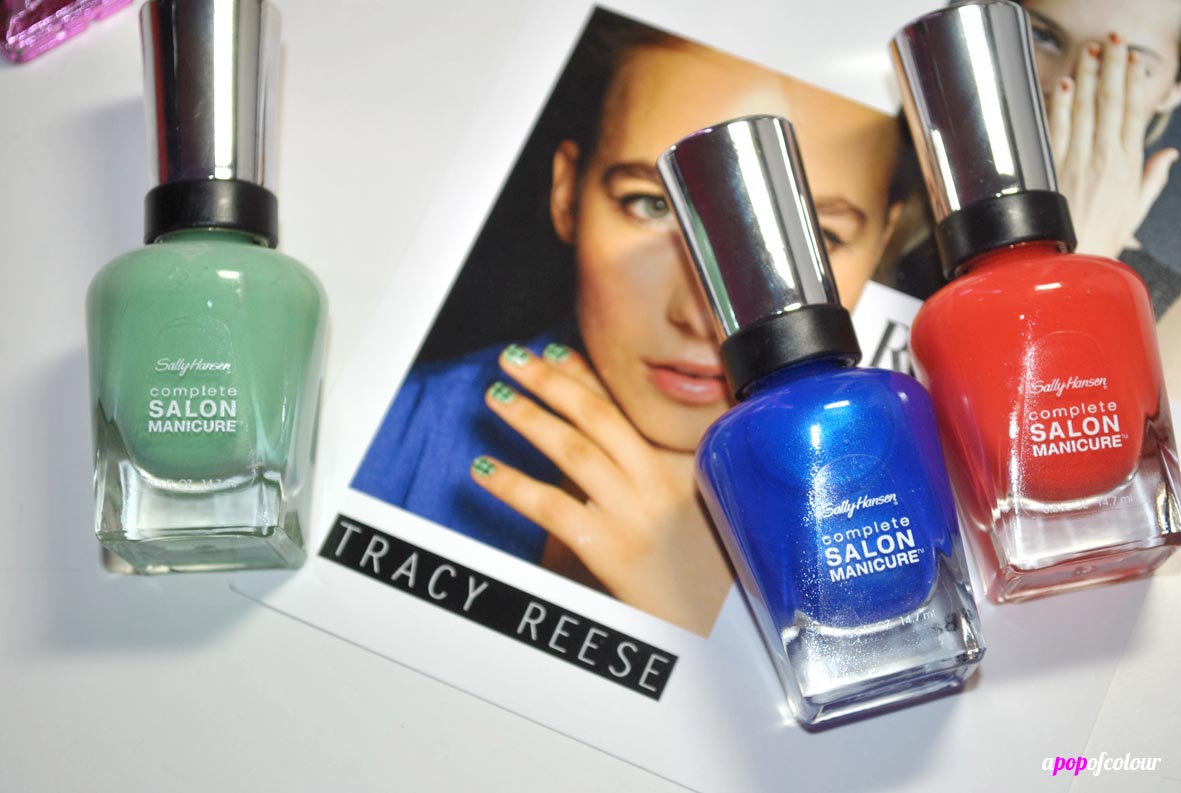
Inspired by Afro-Cuban culture, the Tracy Reese Spring 2014 collection incorporates fabrics full of detail, textiles with geometric laces, and tribal embroideries, with prints ranging from gingham and window pane to tropical floral.
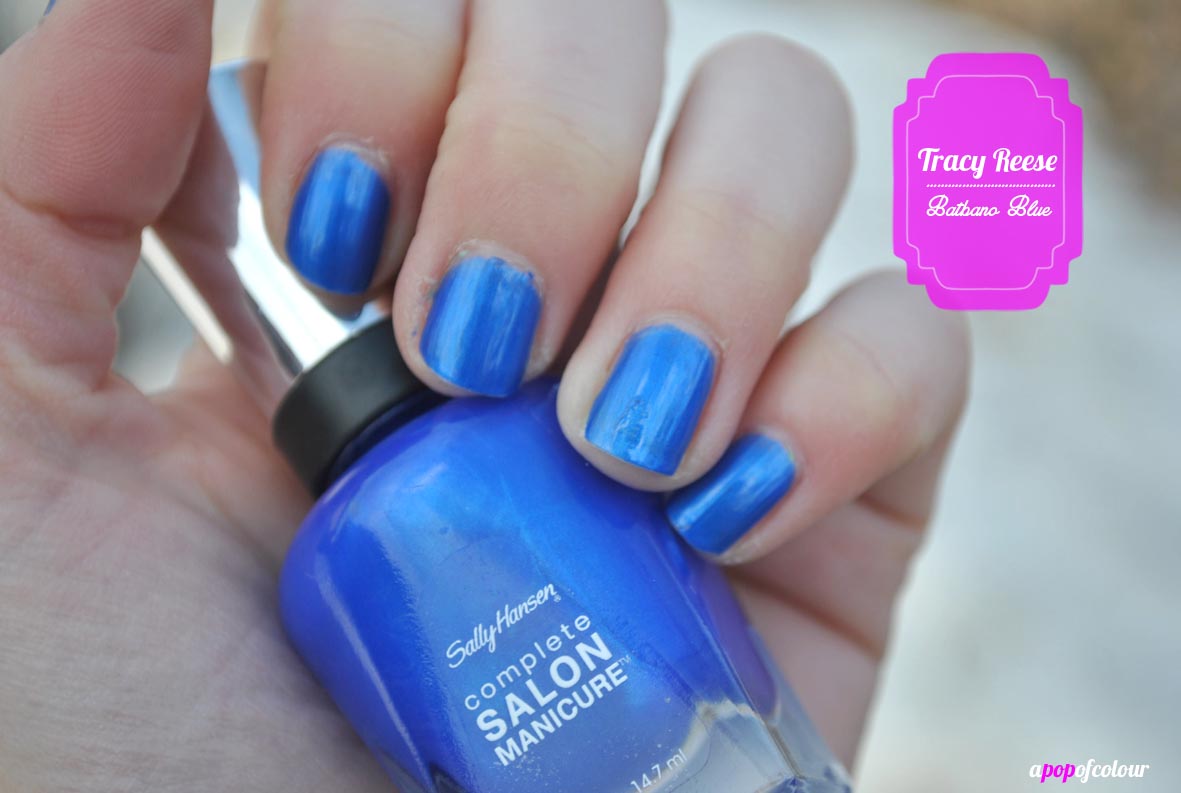
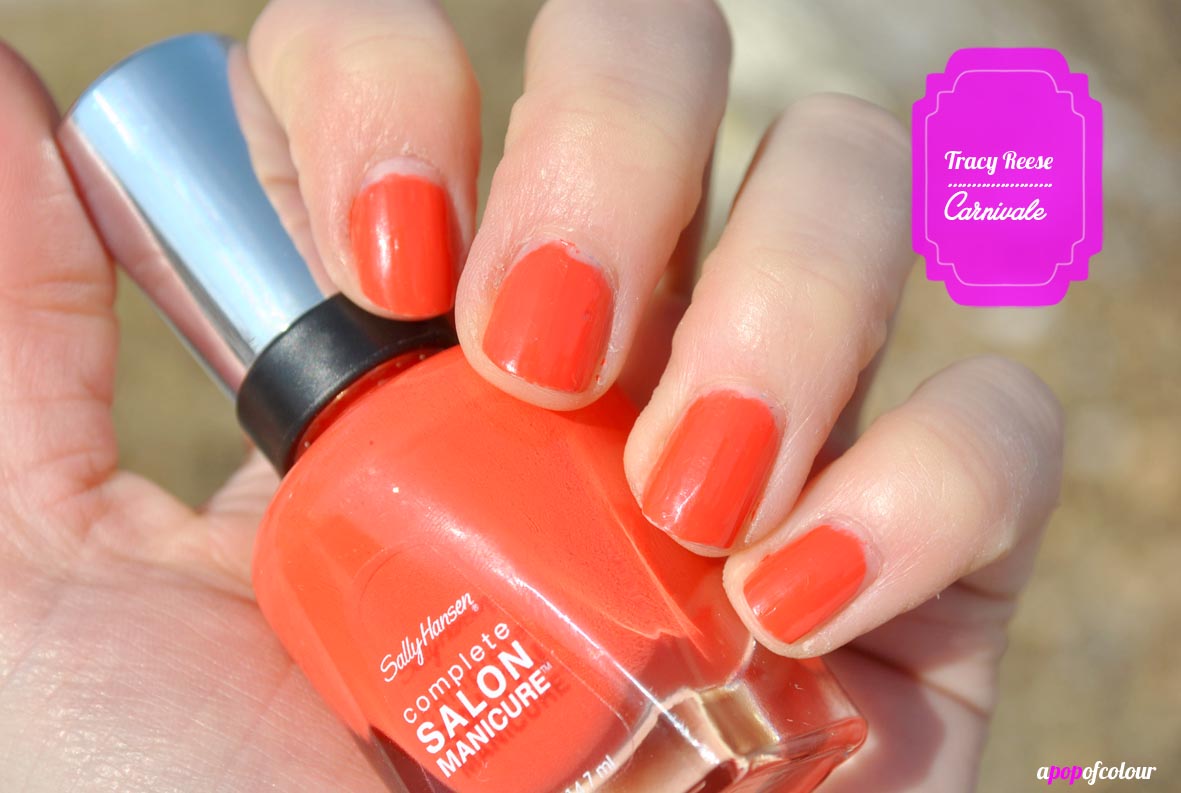
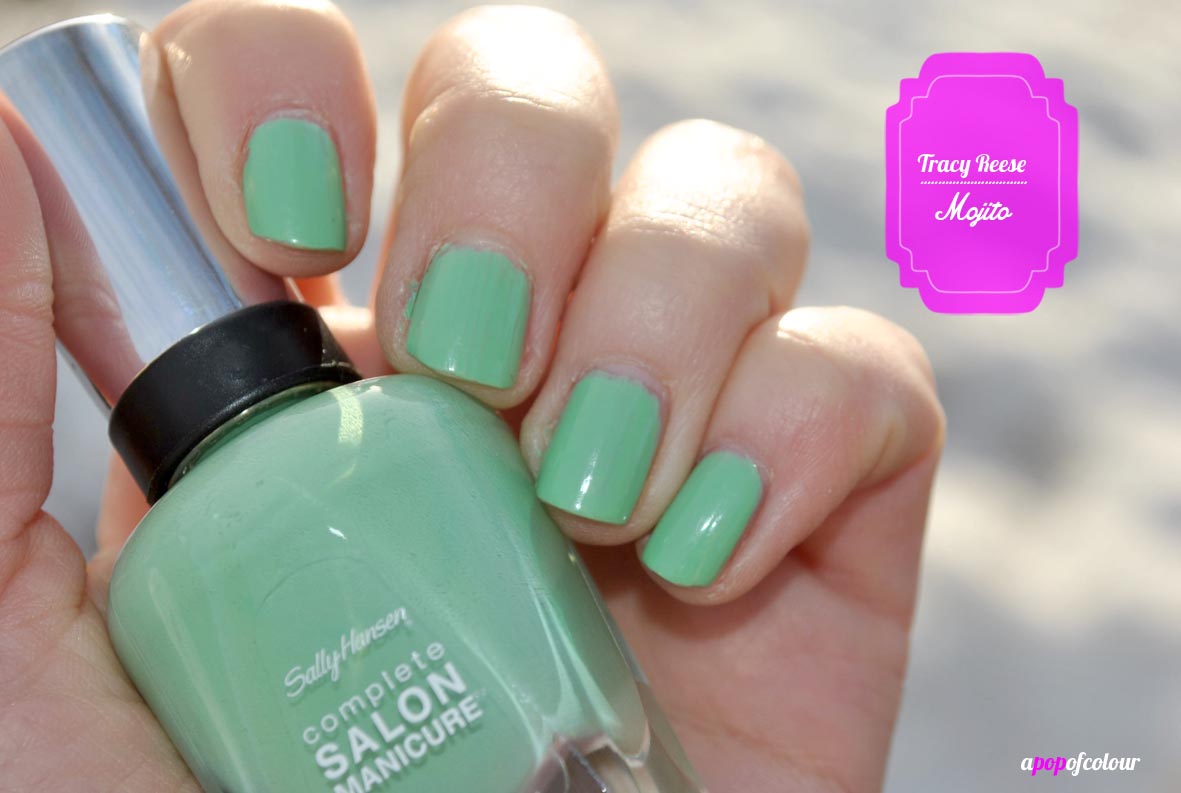
The nail collection consists of Batbano Blue, a pearl barracuda blue; Carnivale, a vibrant orange; and Mojito, a mint green. For the NYFW show itself, the three bright colours were painted to reflect a window pane pattern.


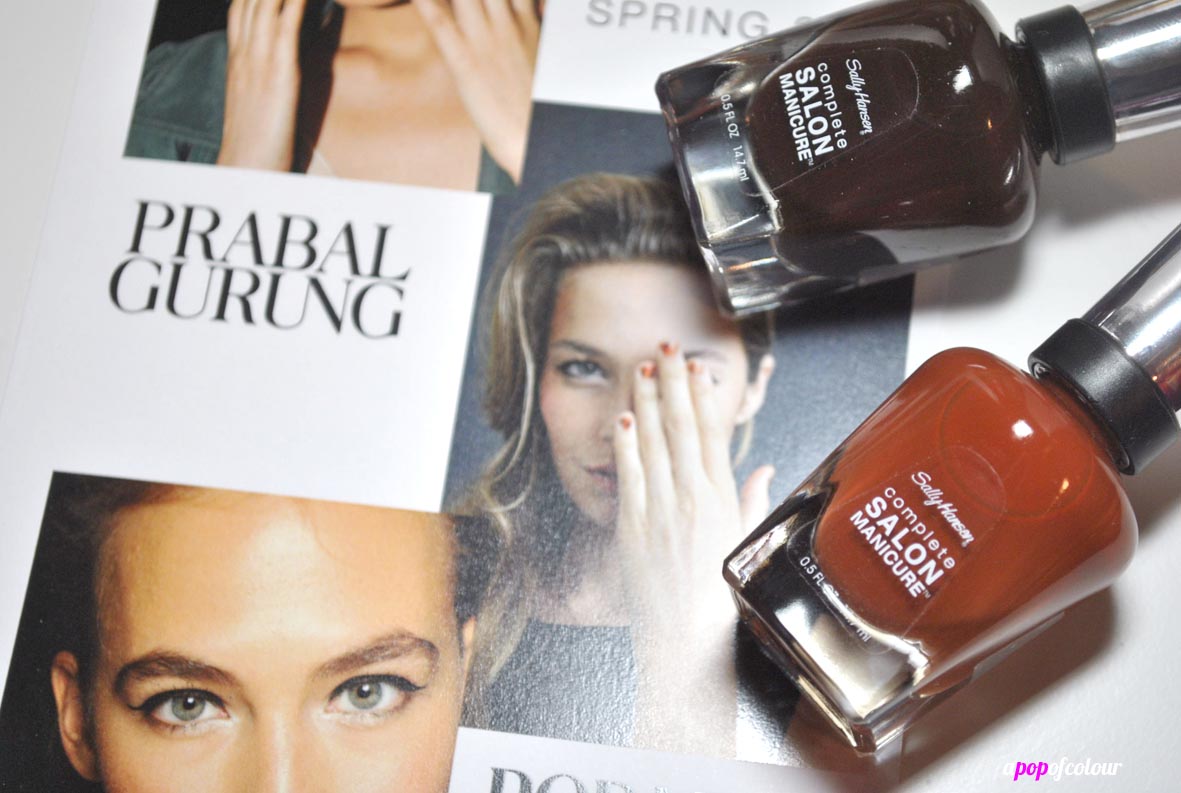
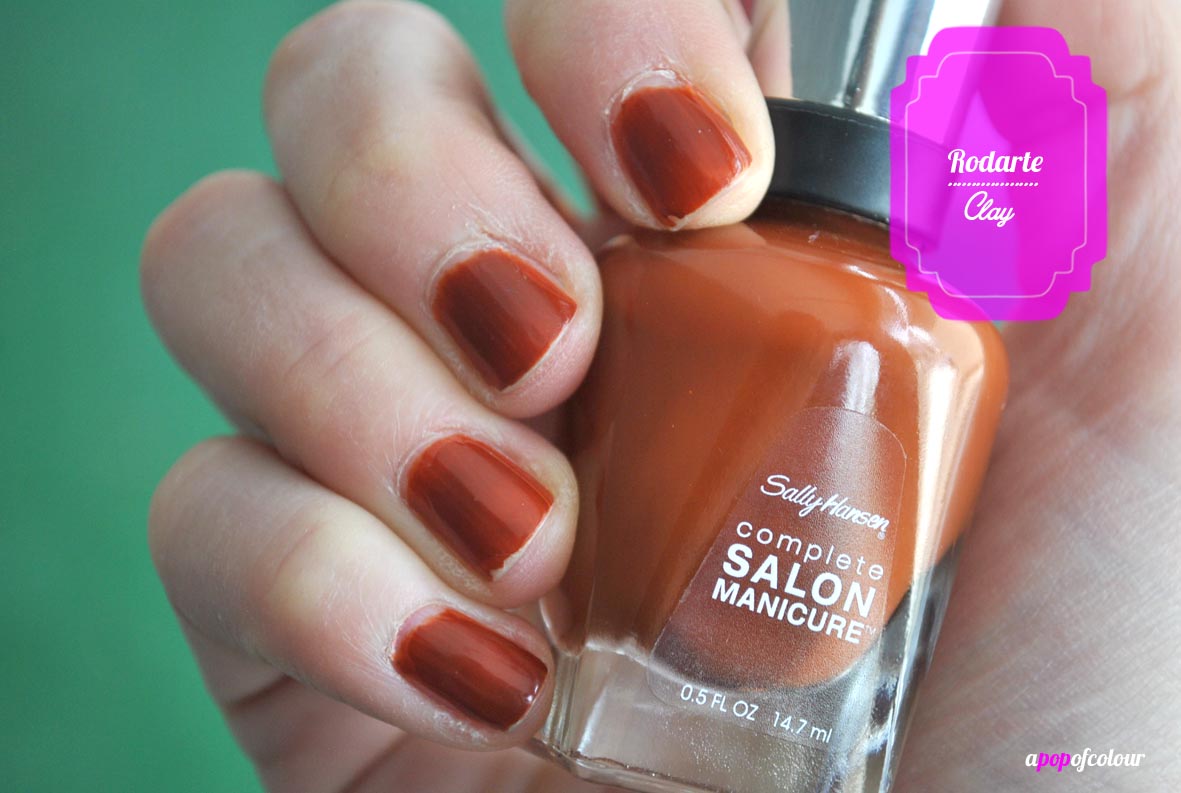
For the second season in a row, Sally Hansen teamed up with Rodarte to create two limited edition colours that reflect the texture and colour combination of a tortoise shell, creating a multi-dimentional effect.
Both of these colours, I feel, are more appropriate for fall and winter as they are both muted, dark neutrals. There’s Clay, a terracotta brown shade; and Cinnamon, a deep brown.


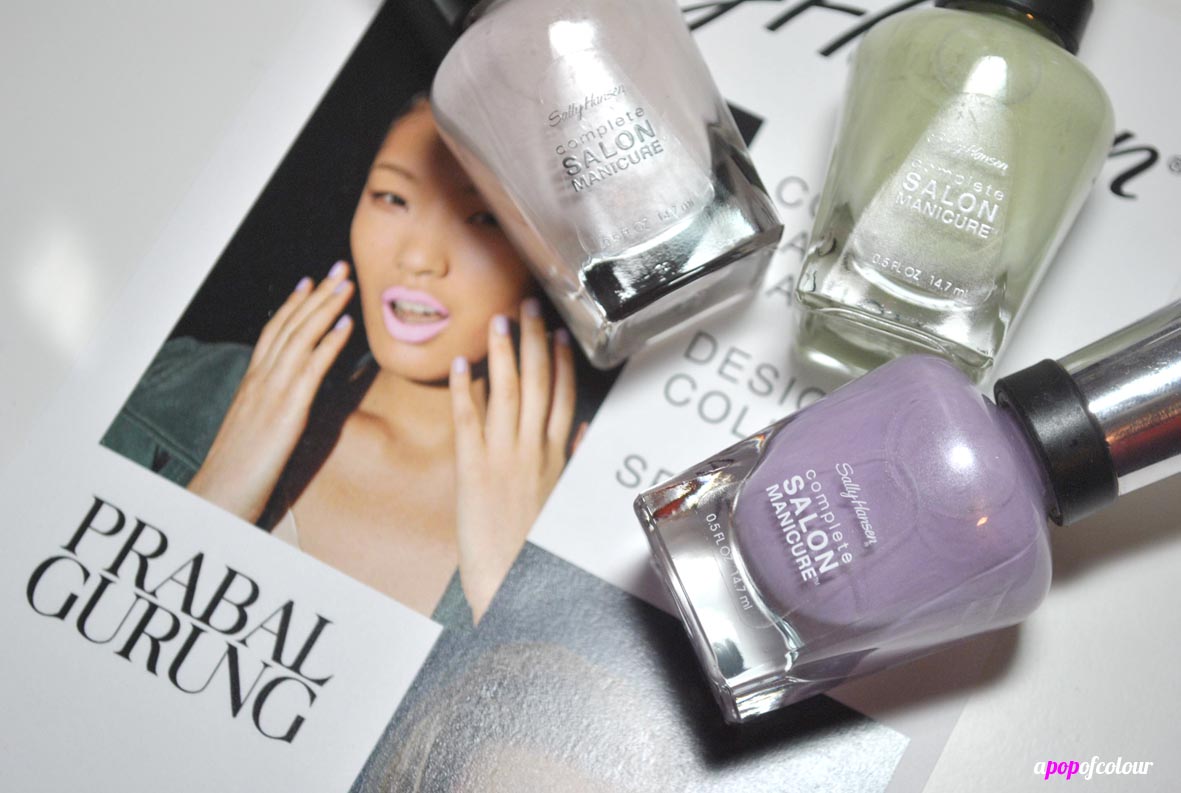
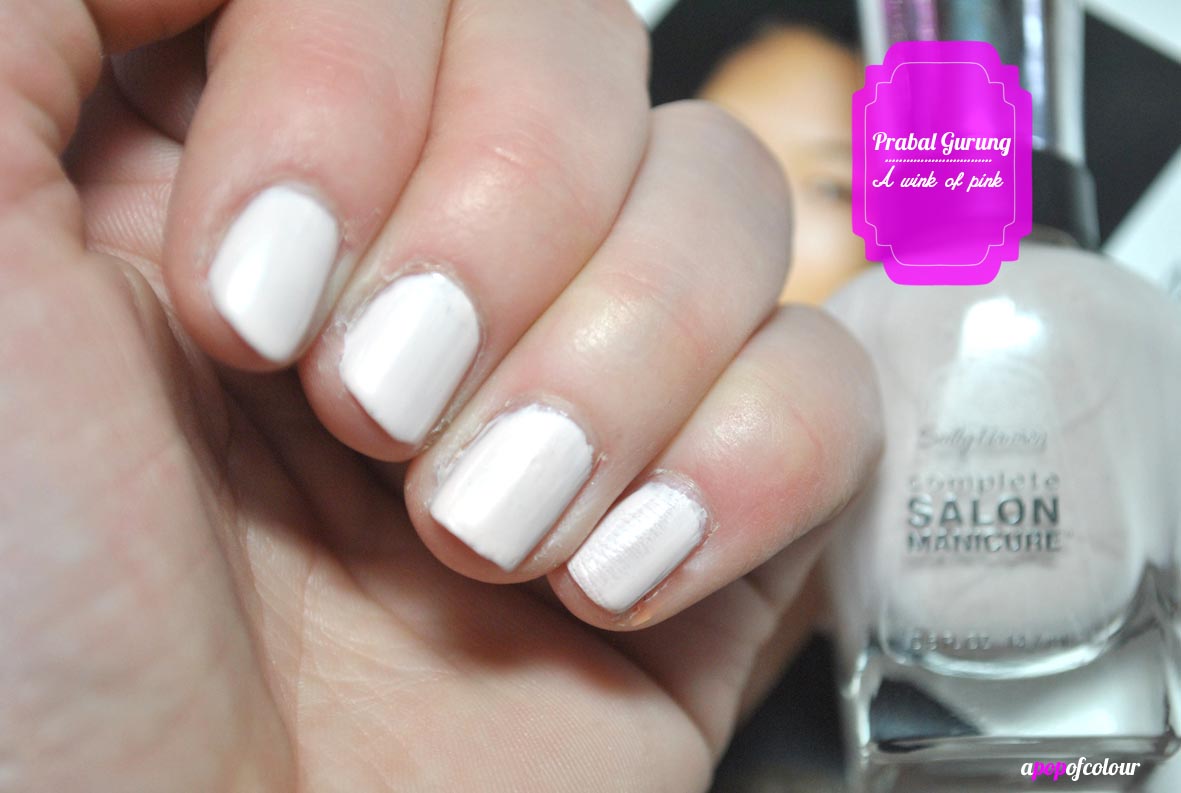
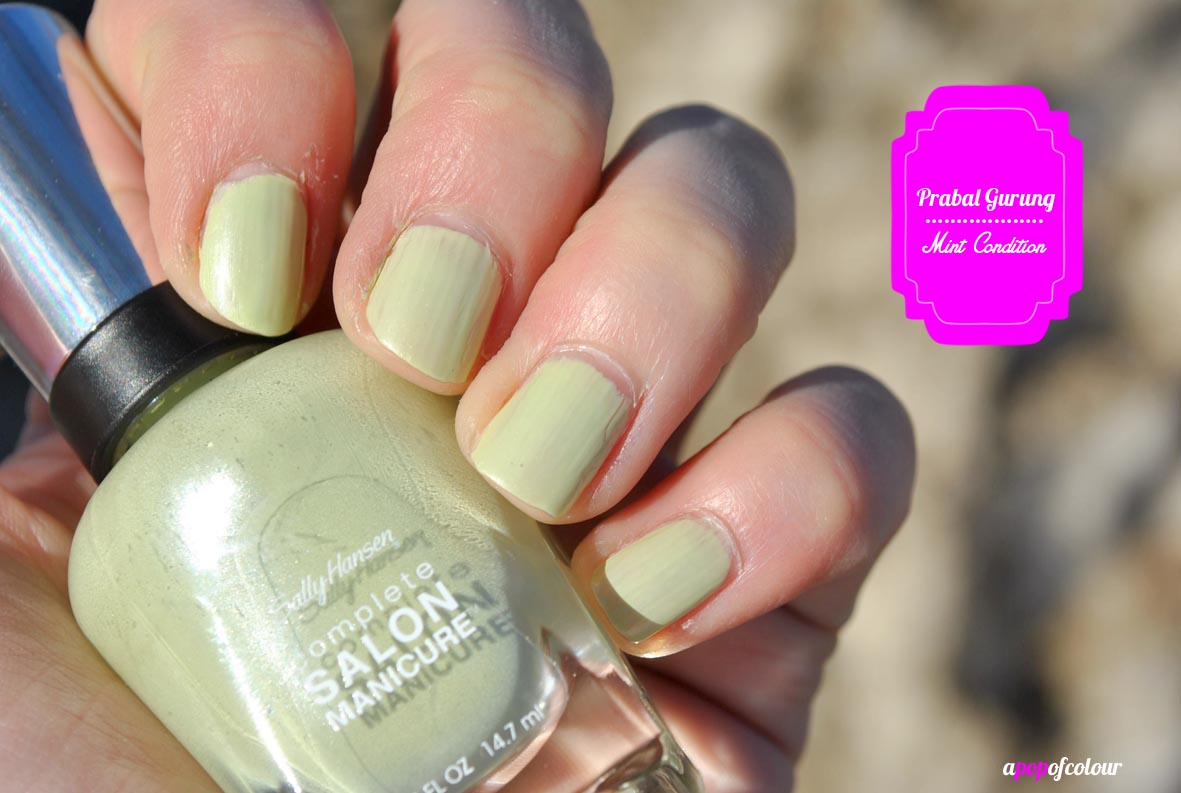
Finally, the three shades from Prabal Gurung are chic pastels that are infused with modern elegance. The nail look from the runway highlights a contrast of matte and glossy textures, as seen in the fabrics Gurung used in his designs.
The three colours in this collection are very on-trend for spring and summer. There’s A Wink of Pink, a nude-pink pearl; Lady Lavender, a pearl lavender; and Mint Condition, a pearl mint green.


All the colours go on quite opaque. For the most part, I did two coats for each colour, aside from Clay and Carnivale, which used three coats. I do have faves from each line. If you had to pick one colour from each, hands down it would be A Wink of Pink (this one is a must, I’m actually obsessed), Cinnamon, and Mojito. I feel like each of the colours can be easily duped but CSM is such an amazing formulation that if you can pick up some of these colours, I highly recommend them.
I used a couple different topcoats and base coats with each of the swatches, including Sephora FORMULA X and Poshe, and for the most part the colour stayed put a couple days before it started to chip.
In case you guys don’t know Sally Hansen Complete Salon Manicure nail polish is 5-free (Formaldehyde, Toluene, DBP, Formaldehyde Resin and Camphor). The formula is designed to serve as base coat, colour and top coat. It also has ingredients to help promote growth, strength, extended wear and high shine.
Are you going to pick up any colours from the CSM Designer Collection Spring 2014?
Please note, I was sent this product from PR. All opinions are my own.
Like what you read? Check out these related posts:


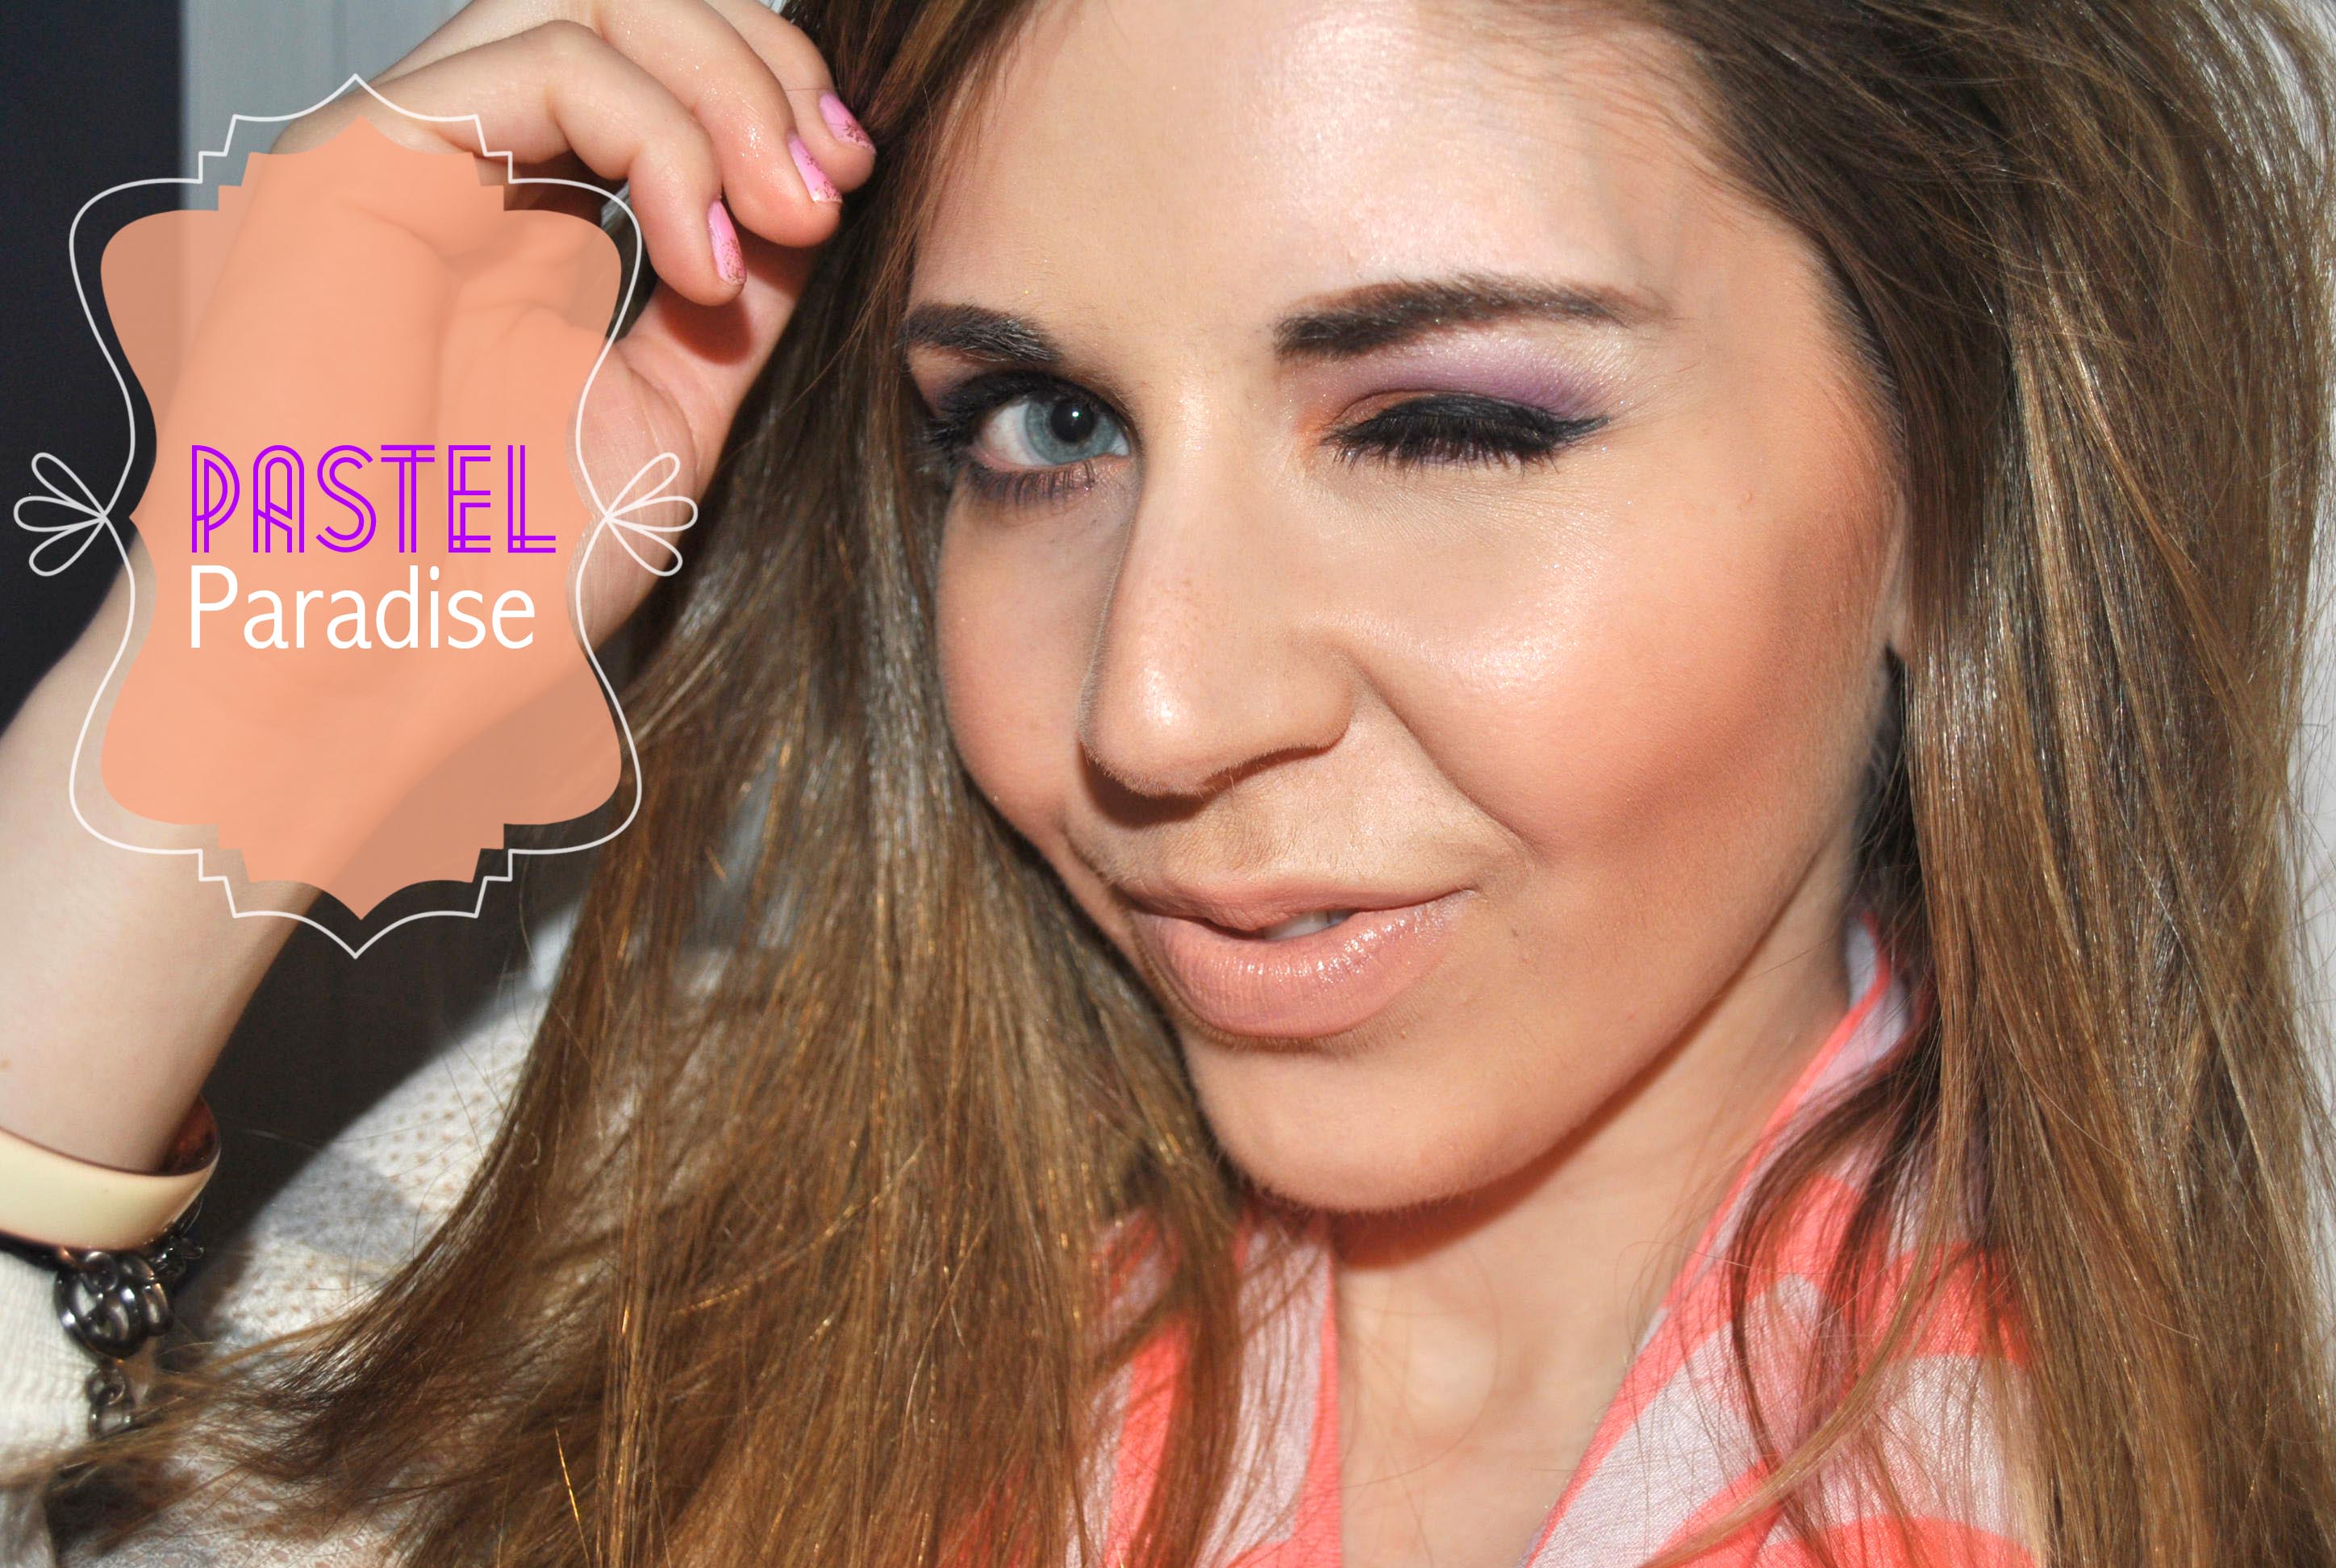
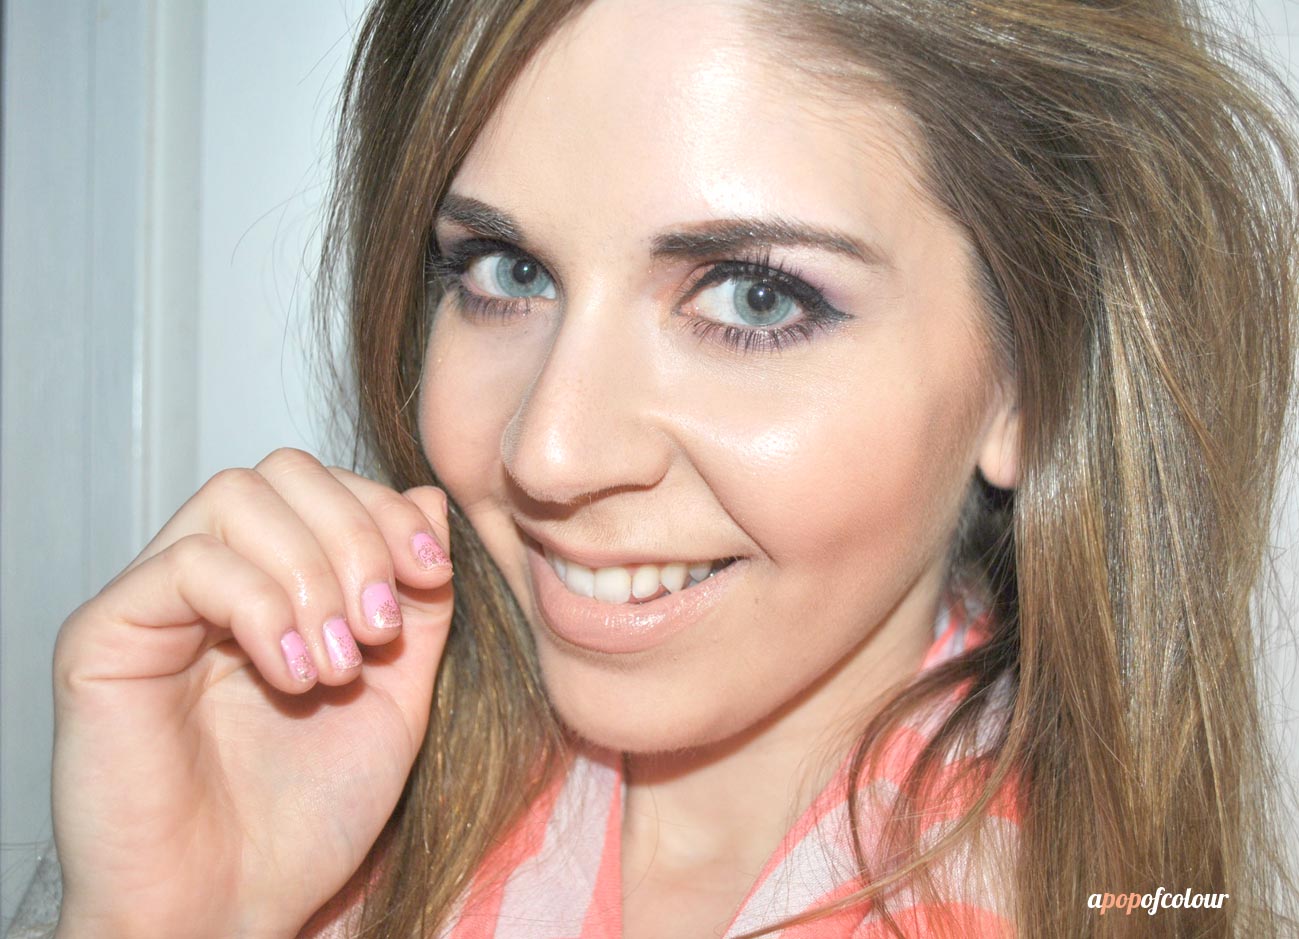
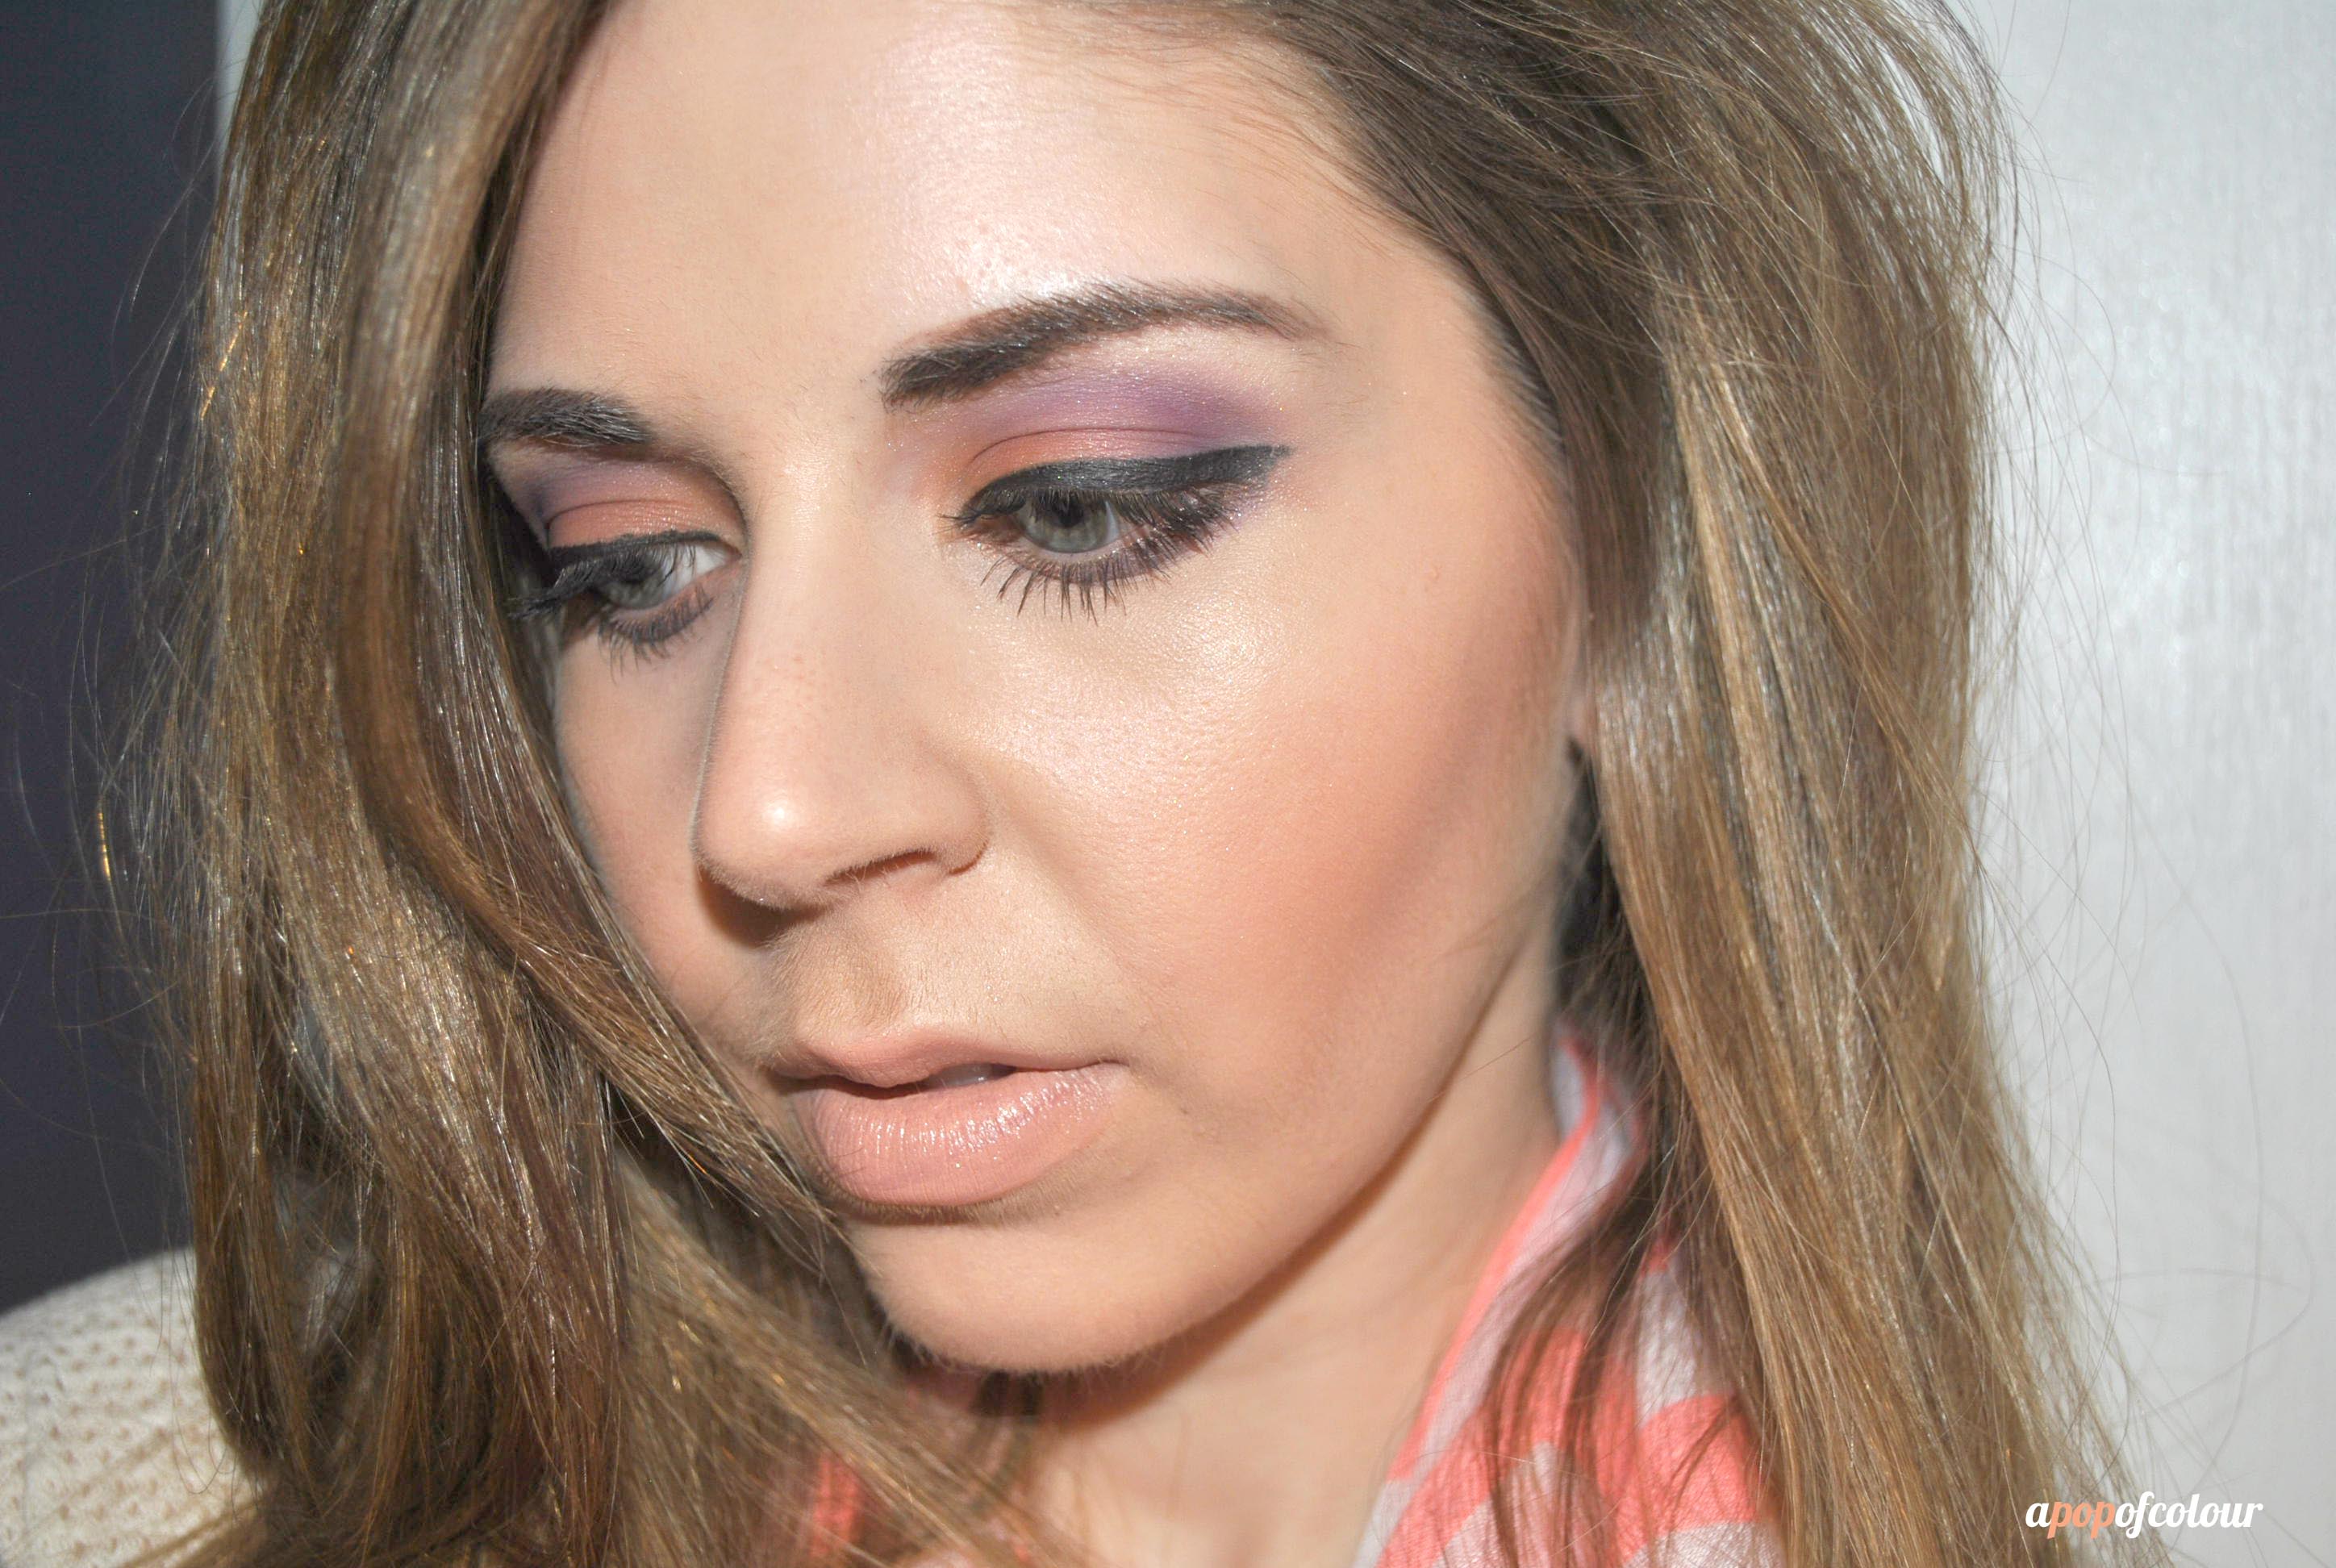
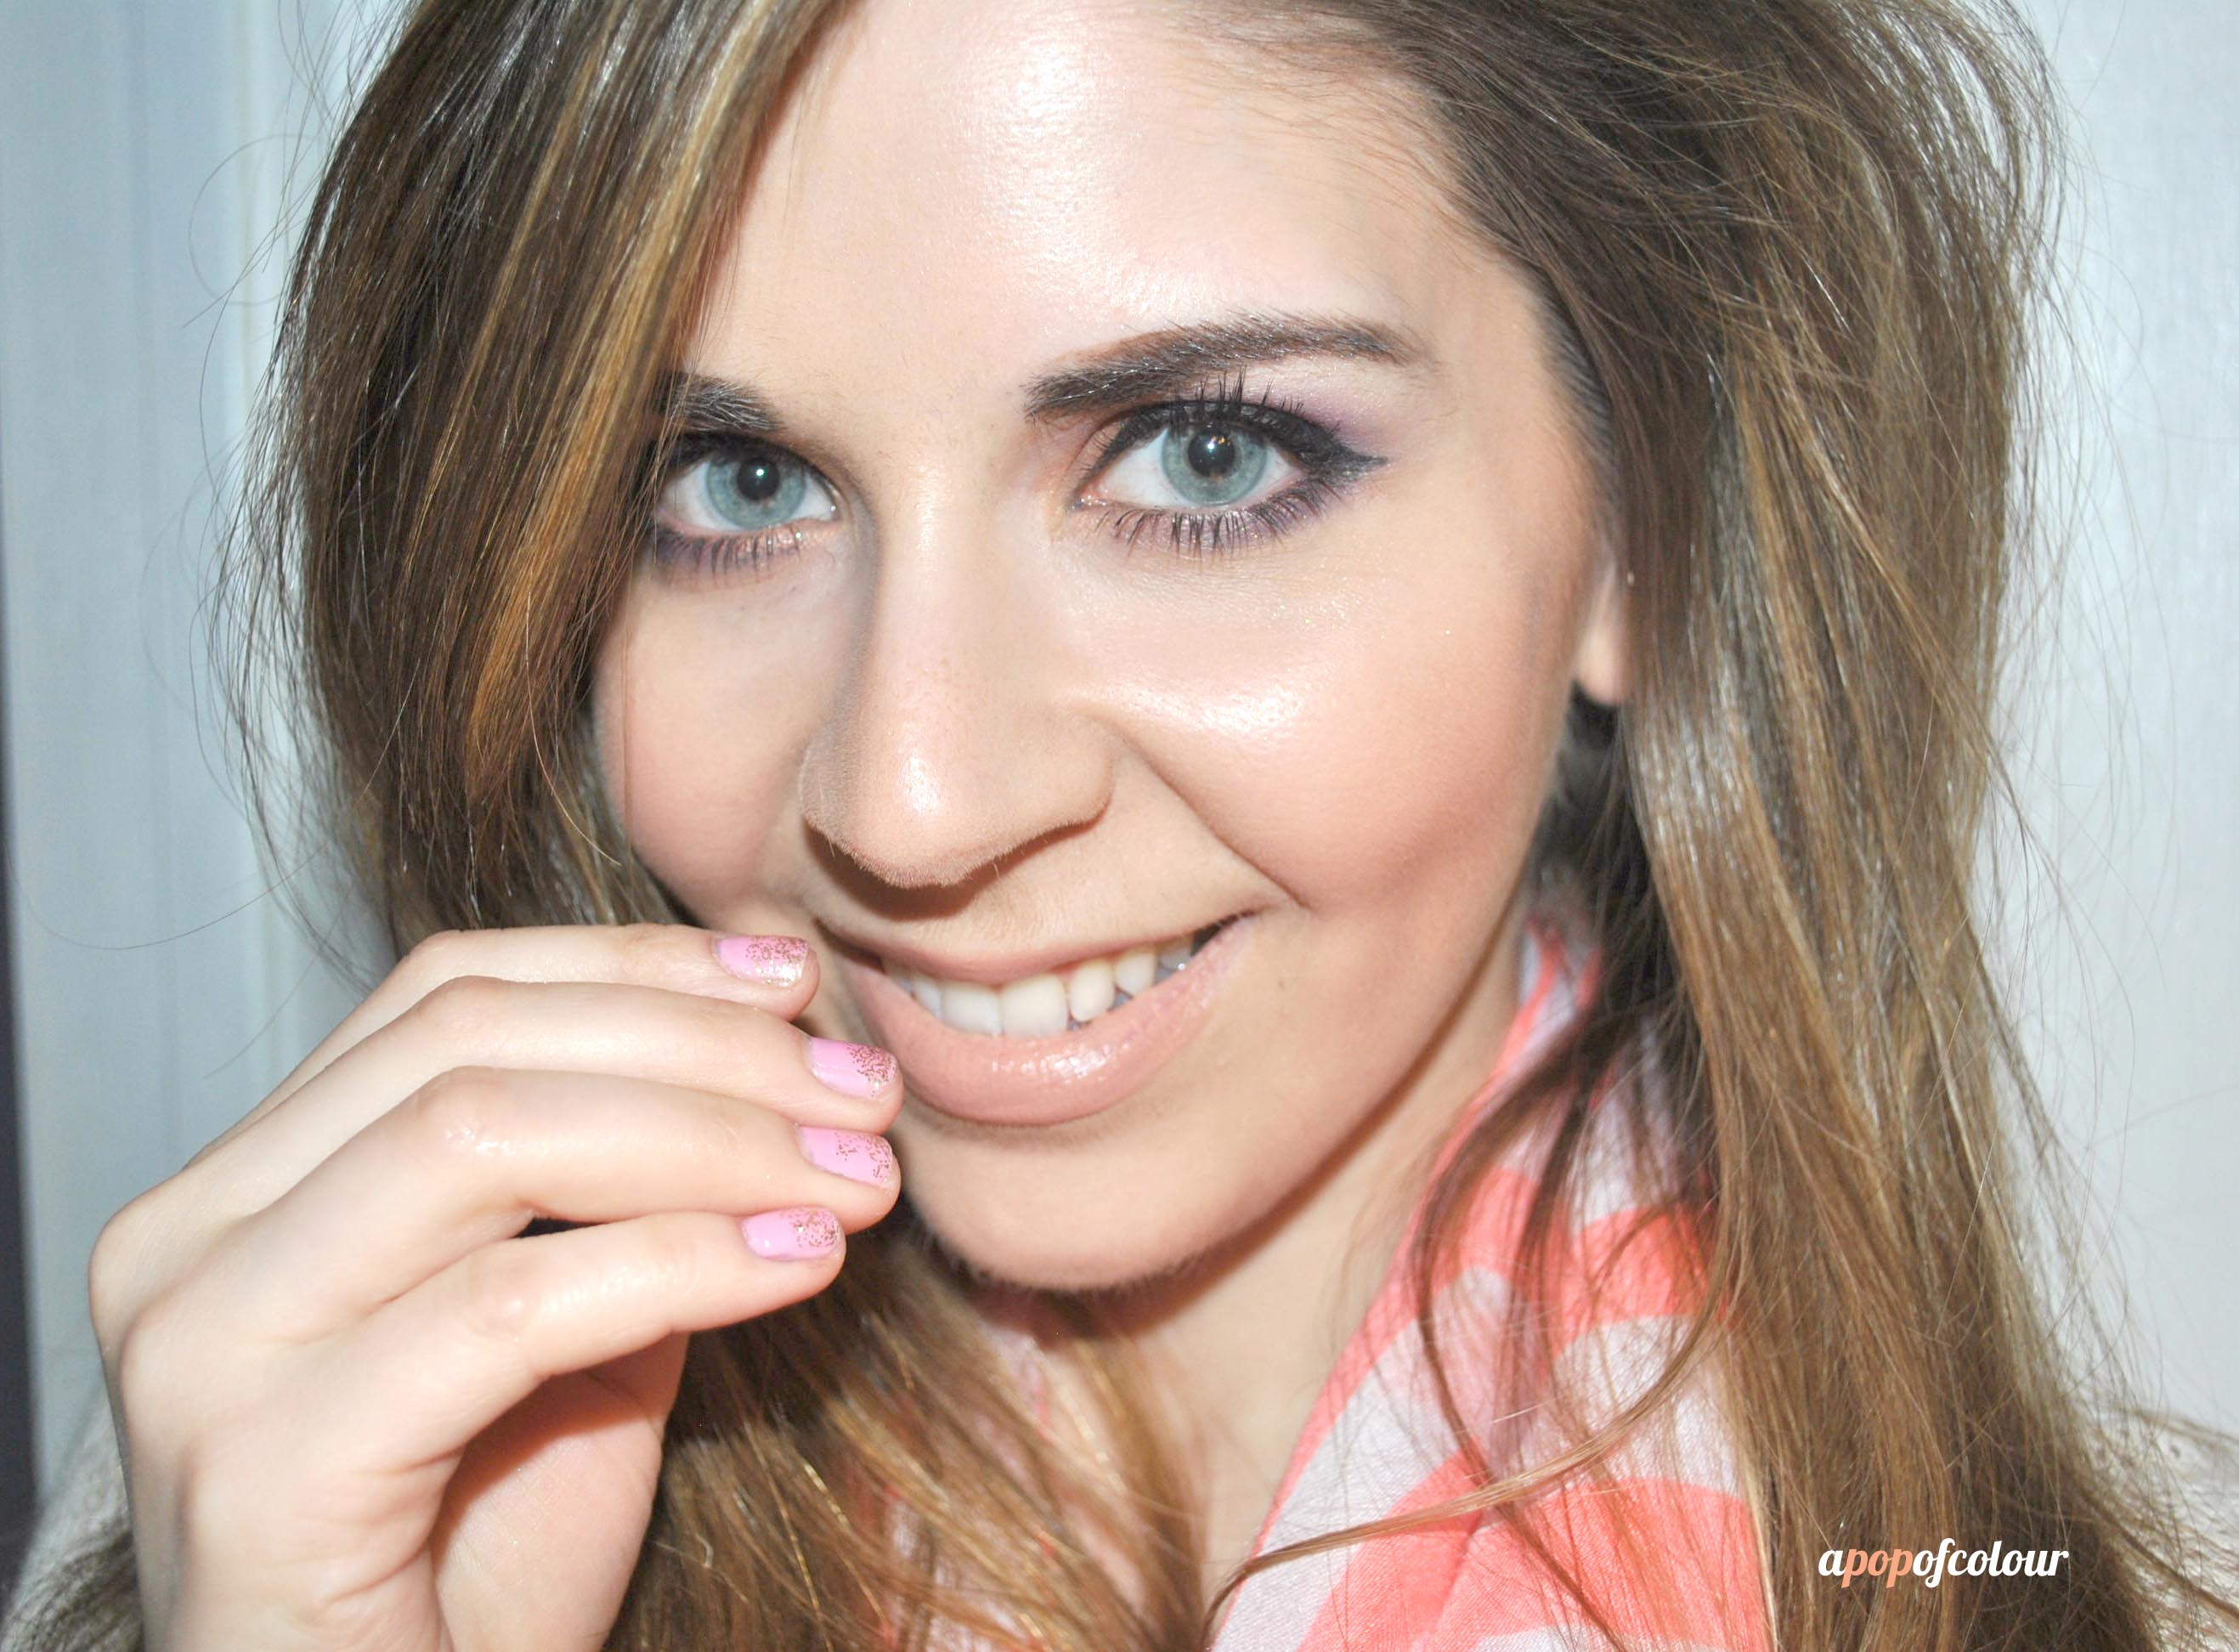
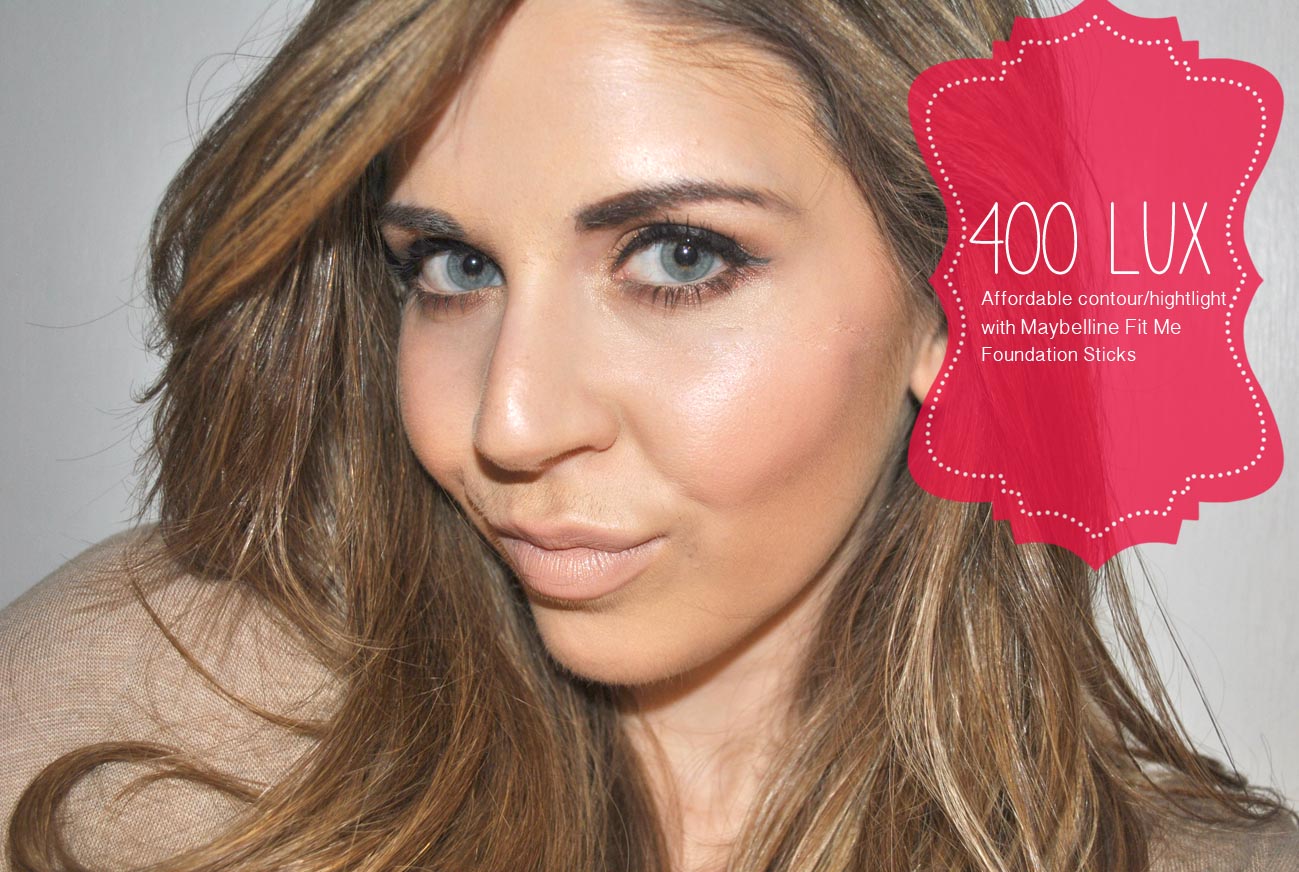
It’s spring, it’s spring! Although we have been having cold weather (again!) here in Winnipeg for the past week, the snow is slowly melting and my mood is picking up. I absolutely love spring because that means that summer is coming (patio season!) and colour is making a comeback. Pastel is all the rage right now and although it’s an easy shade to sport on your nails, it may be a bit trickier to add to your makeup routine. I wore this look this past Saturday and was totally digging it because it’s something different and totally on-trend.
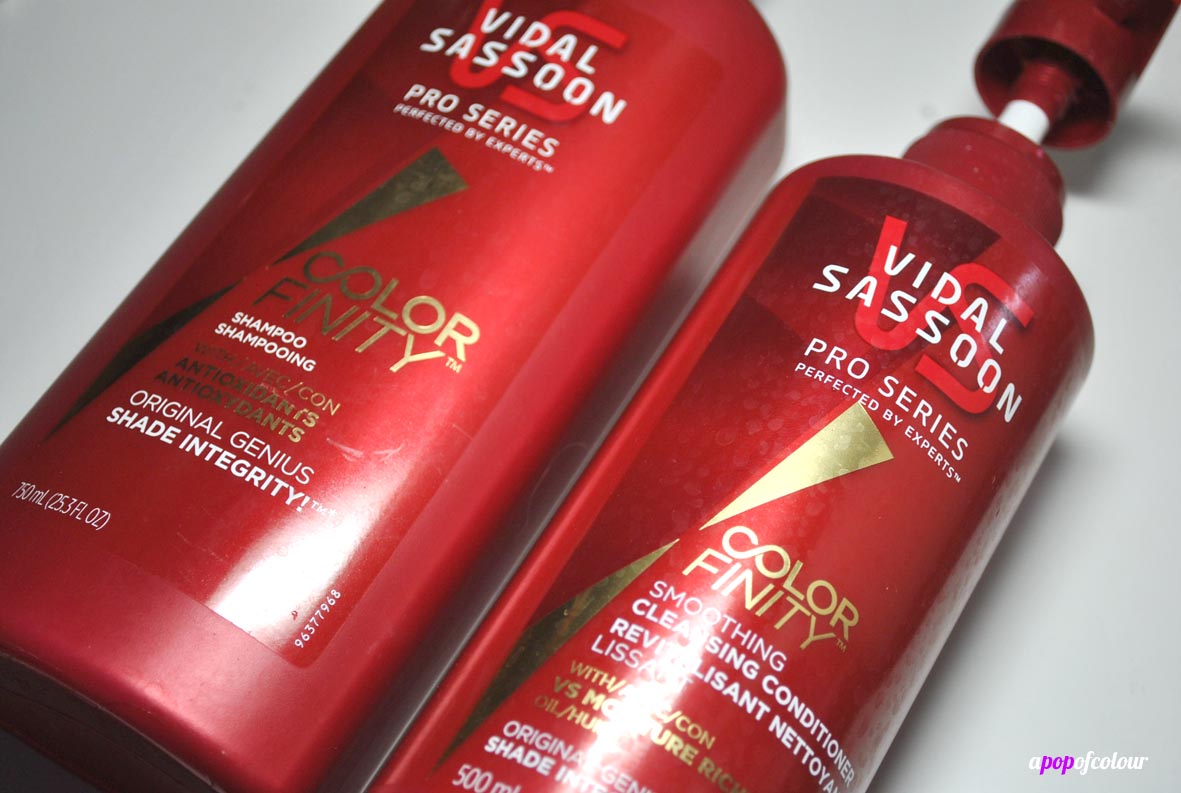
With that being said, it’s not just about the makeup! I’ve been keeping my hair looking fab and fresh with Vidal Sassoon Pro Series’ ColorFinity Shampoo and Colorfinity Smoothing Cleansing Conditioner, which keeps my colour looking fresh and my locks silky smooth. I don’t usually wear my hair straight, but I wanted to keep it all natural, so after my wash, I put in some rollers for volume, letting them set while I did my makeup.


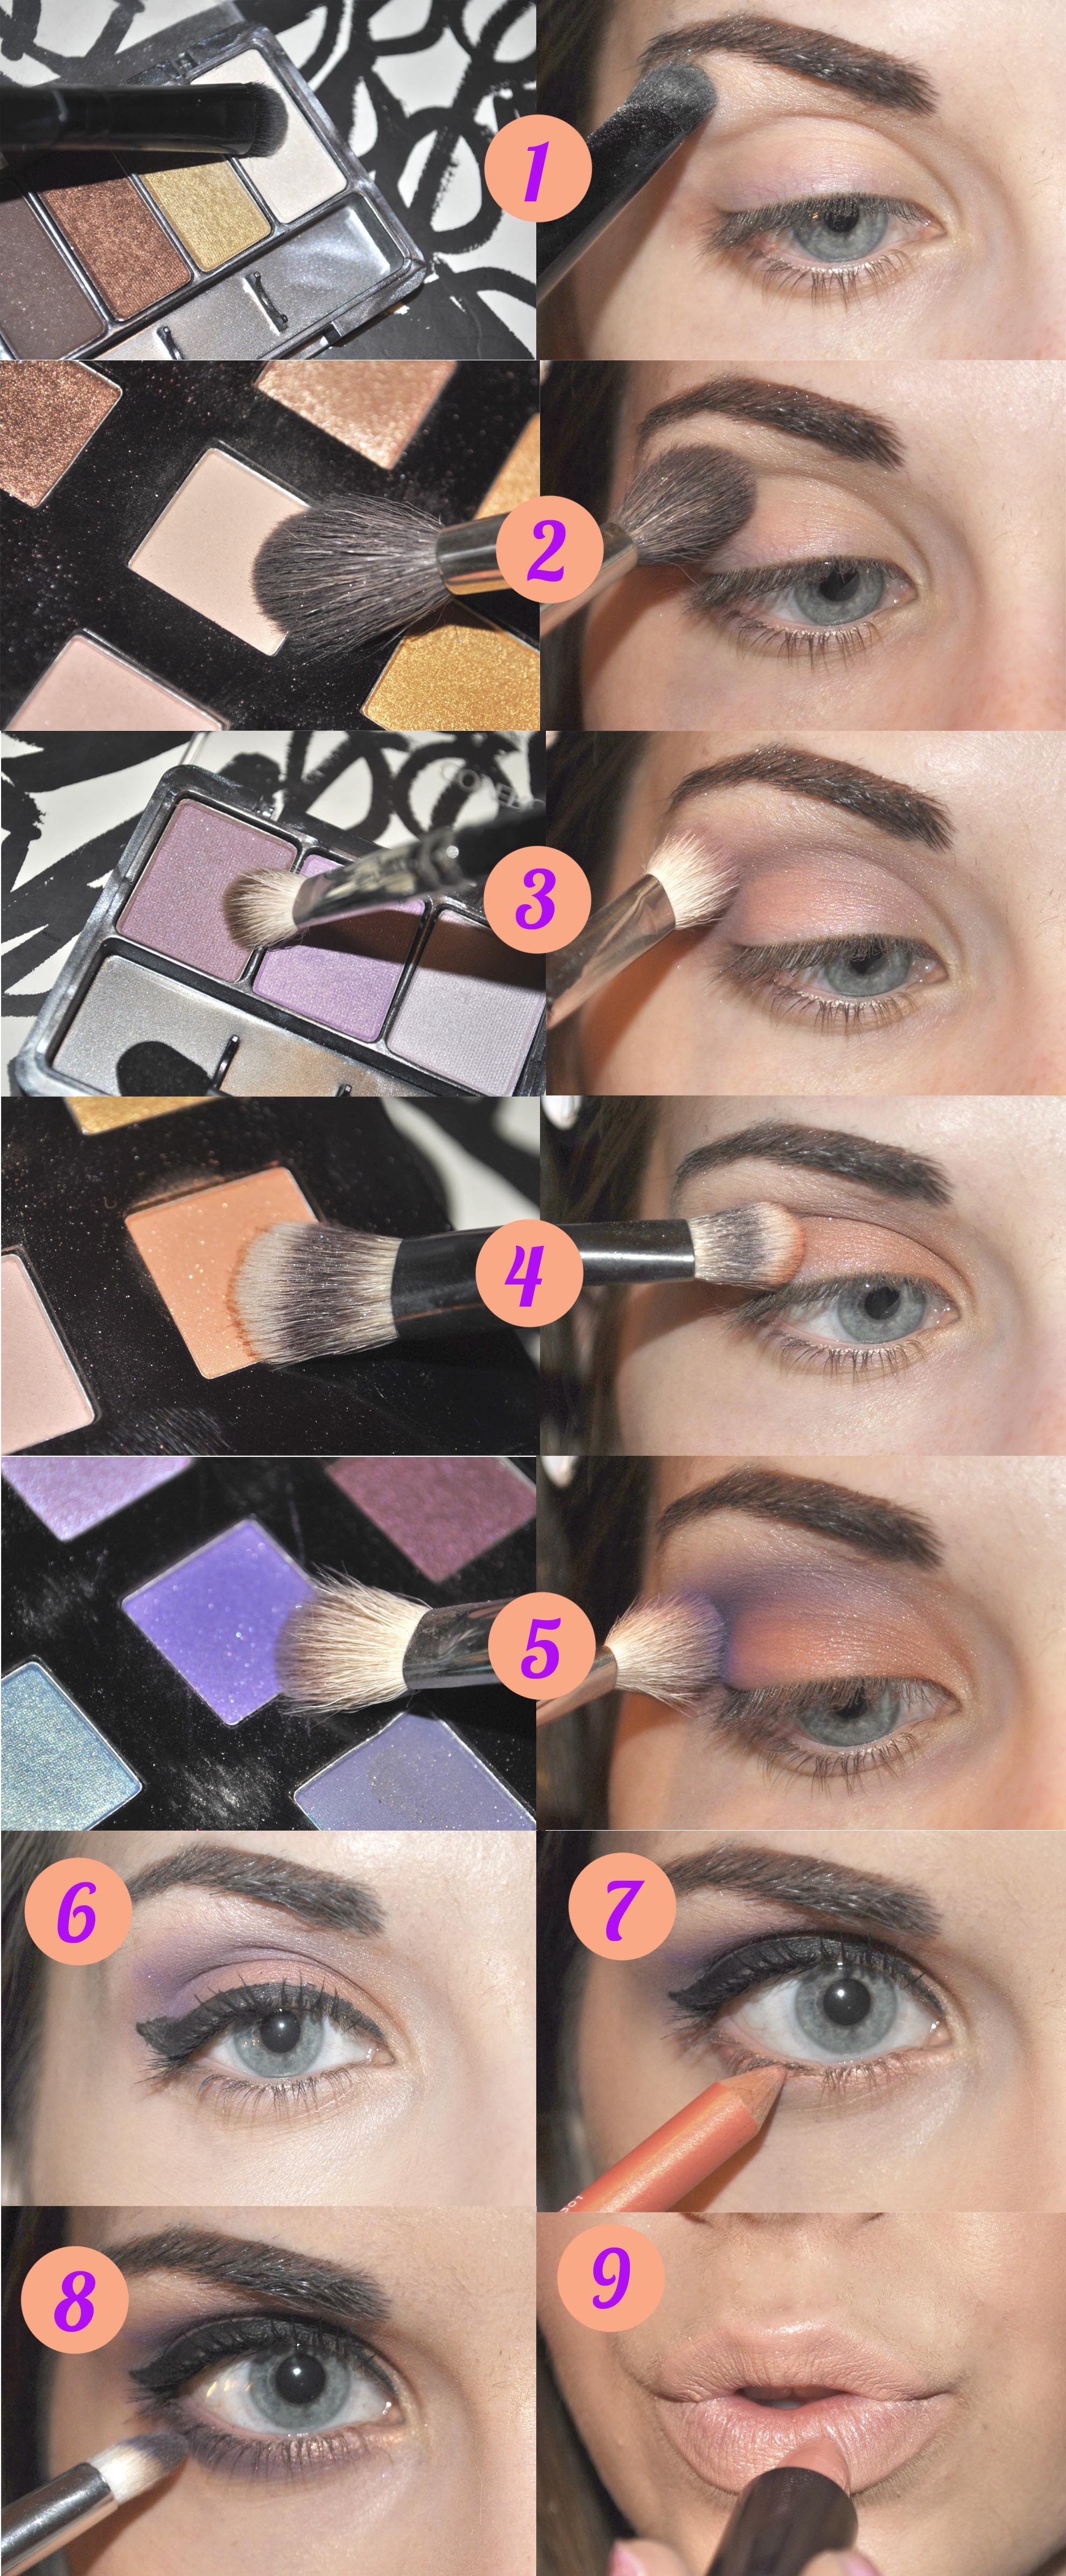
1. Starting at the brows, fill them in (I used my Sleek Cosmetics Brow palette in Dark), and then with a white colour, apply this to your brow bone to highlight. I used the shimmery white shade from the CoverGirl Coffee Shop quad.
2. With a matte tan shade (the one I used is from the Sephora Color Anthology palette; Naked from the UD Naked palette is a good dupe), apply this under your brow highlight, but above the crease, acting as your transition colour.
3. With a purple shade and a crease brush (MAC 217), apply this in your crease. I mixed two purples from the CoverGirl Eye Enhancers 3-Kit Shadows in Dance Party.
4. With an orange sorbet colour (mine is from the Sephora Color Anthology palette), apply this on your lids.
5. Because I wanted the purple in my crease to be a bit more pronounced, I went over it with a neon purple from the Sephora Color Anthology palette. Make sure to blend!
6. Line your upper lash line with a black eyeliner, winging it out. I used CoverGirl Bombshell Intensity Liner in Black and then went over the line with CoverGirl Ink It! liner in black because I wanted it a bit darker. After, apply your favourite mascara. I doubled up CoverGirl Lash Blast with CoverGirl Flamed Up mascara for super-flirty lashes.
7. With an orange sorbet liner, apply this along your lower lash line and on your waterline. The liner I used is by Yves Rocher, which is doubled ended with a grey shade on the other end.
8. With that same neon purple, apply this with a pencil brush on the outer corners of your lower lash line. After, apply mascara to your bottom lashes.
9. For the lips, apply a nude lipstick. I used CoverGirl LipPerfection lipstick in Creme (obsessed with this shade!).


And that’s the final look! For the face, I used CoverGirl Tru Blend foundation in L4, Tru Blend concealer in the lightest shade, CoverGirl Spices bronzer for my contour, Tarte Cosmetics Amazonian Clay Blush in Darling (from the Off The Cuff palette), and for my highlight I used CoverGirl Tru Balm The Luminizer.
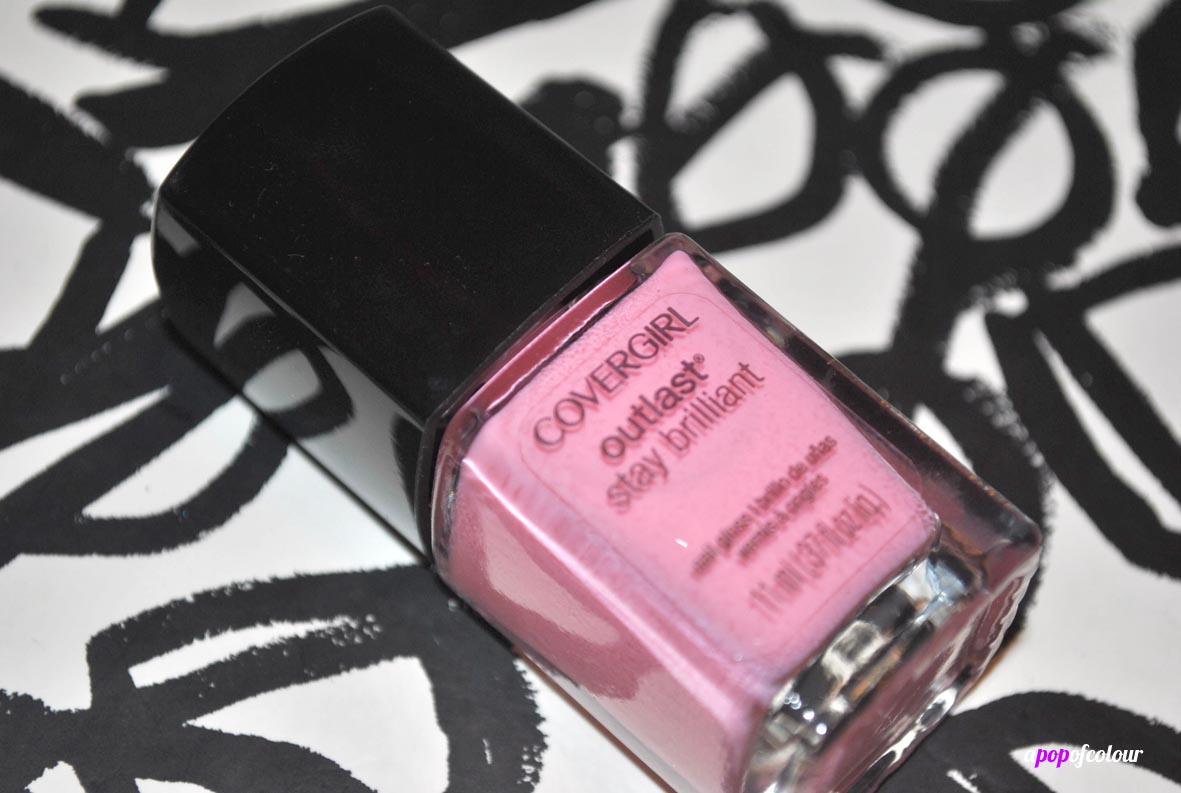
To finish off the pastel look, I painted my nails with CoverGirl Outlast Stay Brilliant Nail Gloss in Bon Bon, and then on the tips applied L’Oreal Paris Top Coat in The True Gold for an ombre effect.

What’s your favourite way to incorporate pastels in your makeup?
Disclosure: I am a #BeautyUnited blogger. As part of my affiliation with this group I receive products and special access to P&G events. The opinions on this blog are my own.
Like what you read? Check out these related posts.

Contour and highlighting is a must for me, and although I mostly use a powder bronzer for my highlight combined with a shade lighter than my skin tone for my concealer, acting as a highlight, I have found that I have been reaching for cream bronzers more (maybe because cream blushes are so in at the moment?).
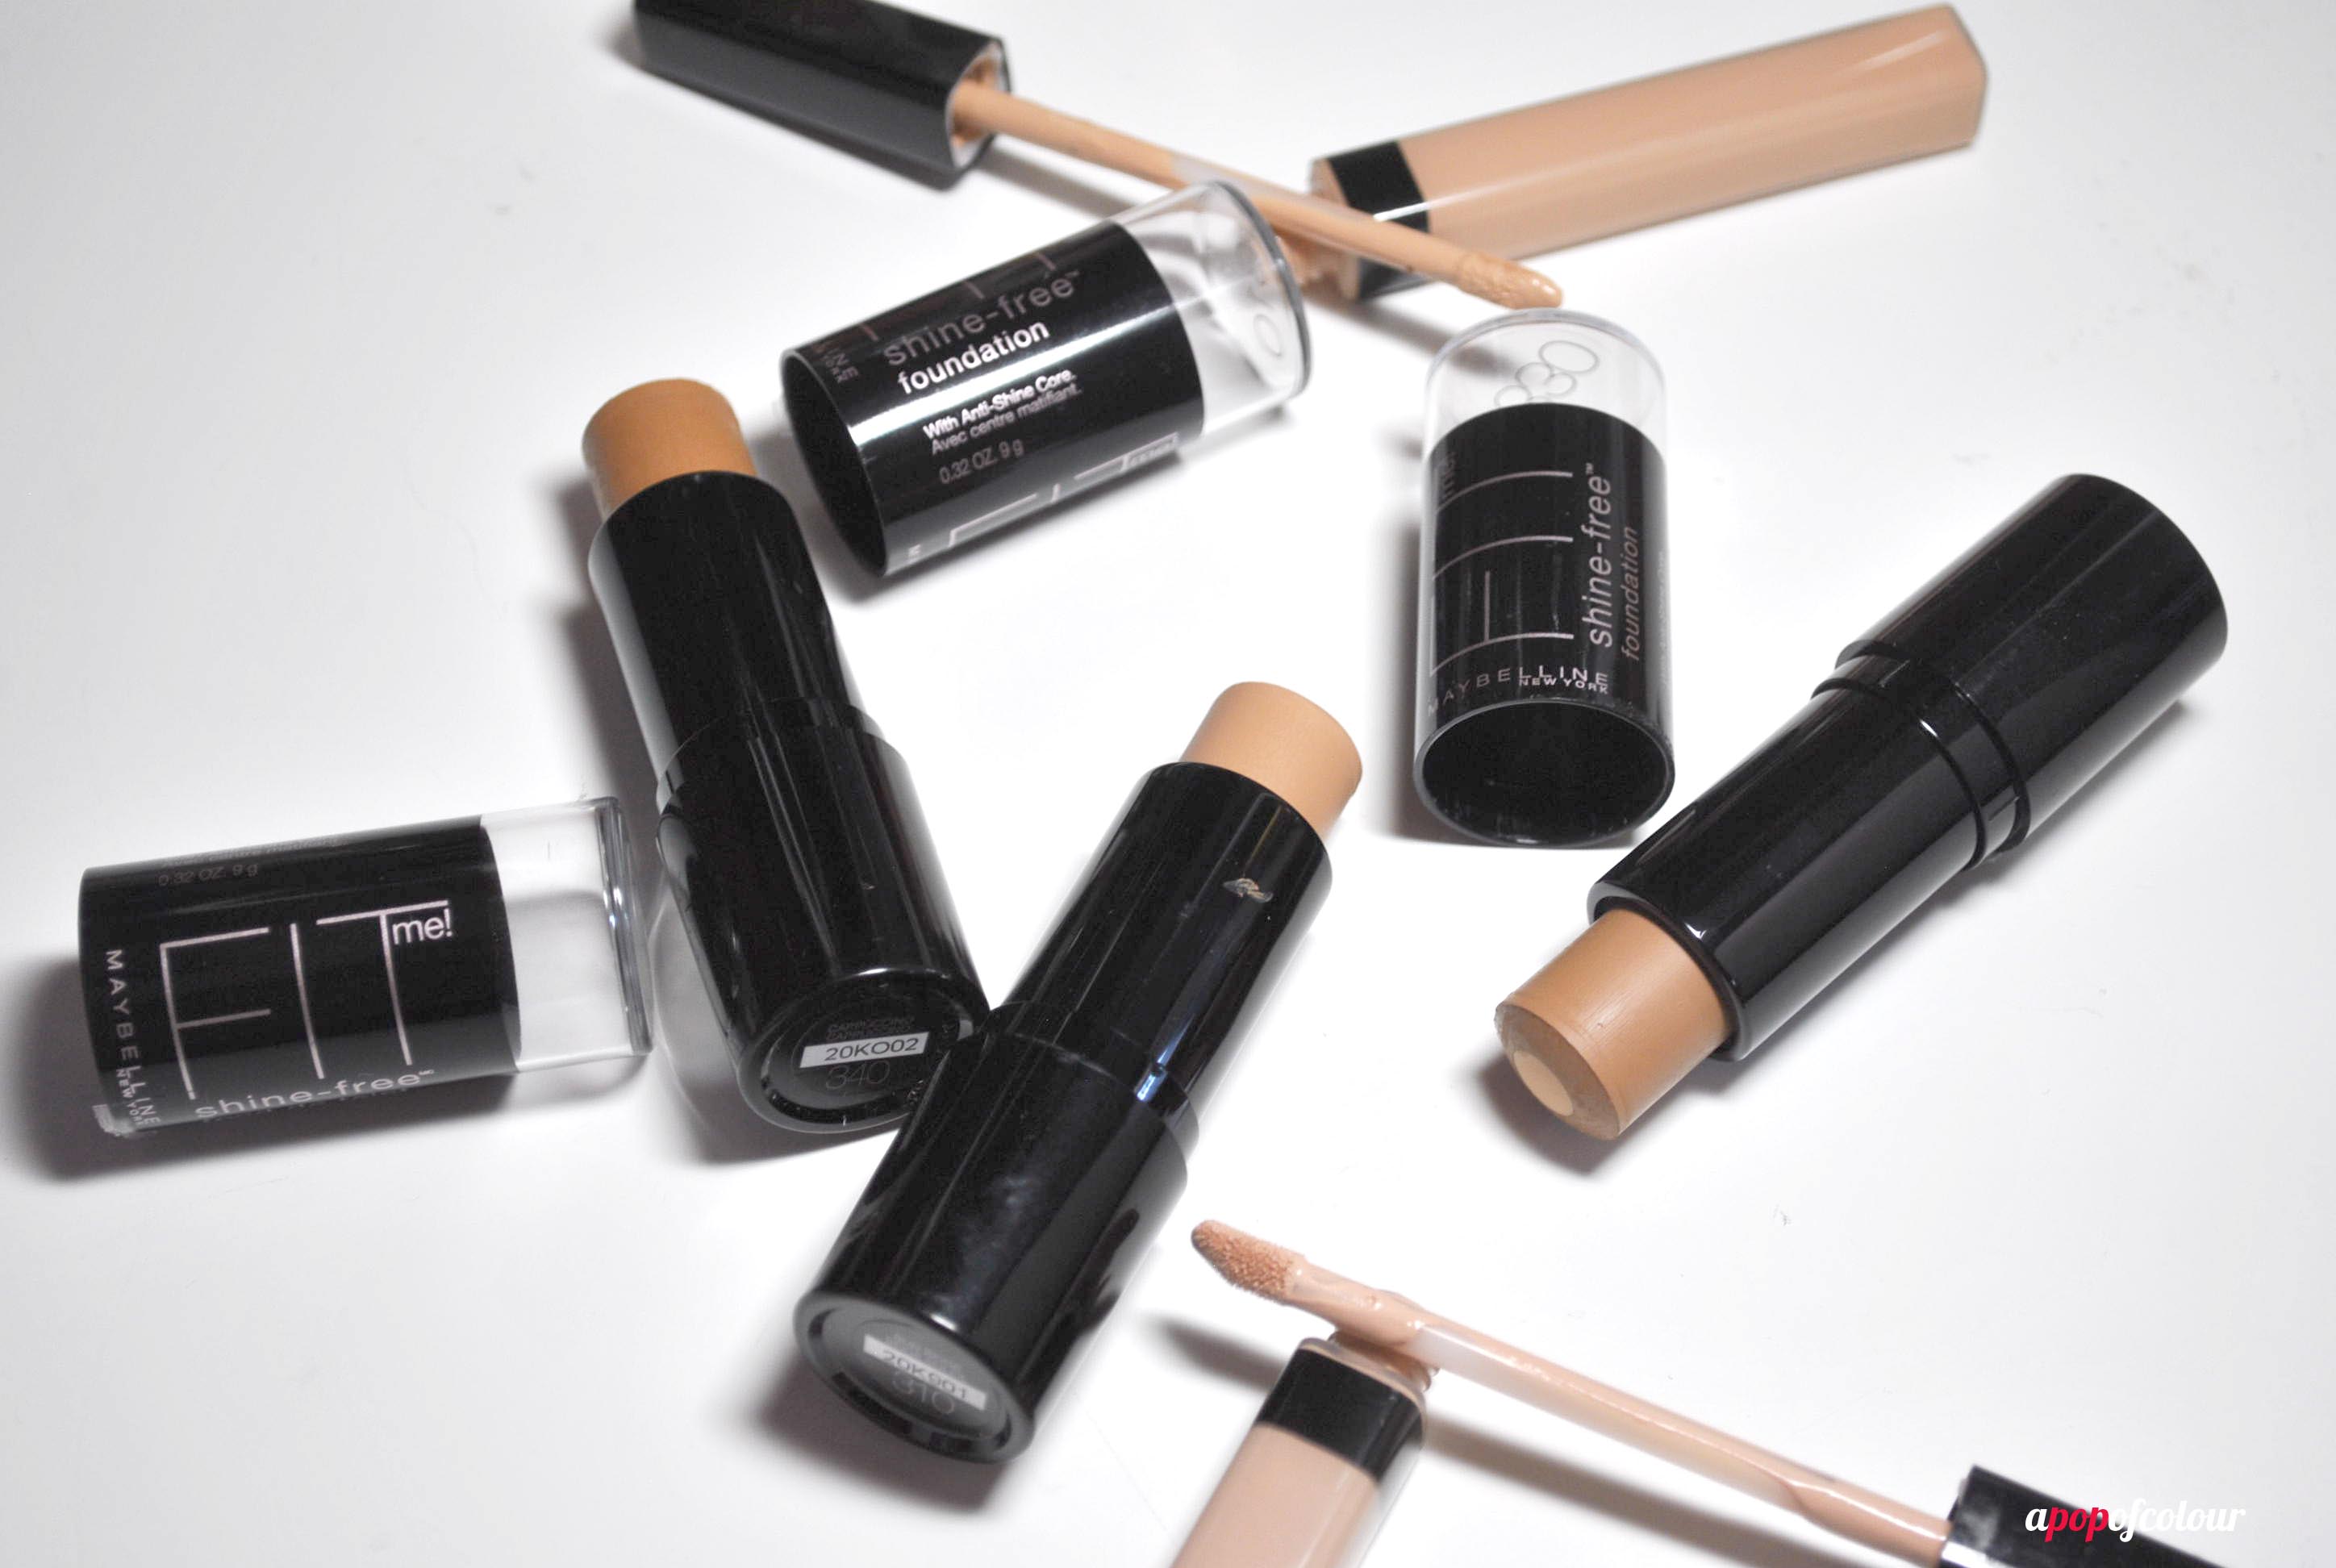
It seems like a big fad right now is using a cream foundation in a dark shade to use as your contour. Bobbi Brown’s Foundation Sticks are a great option for this, however, if you don’t want to shell out the C$53 for the product, Maybelline has a great alternative.


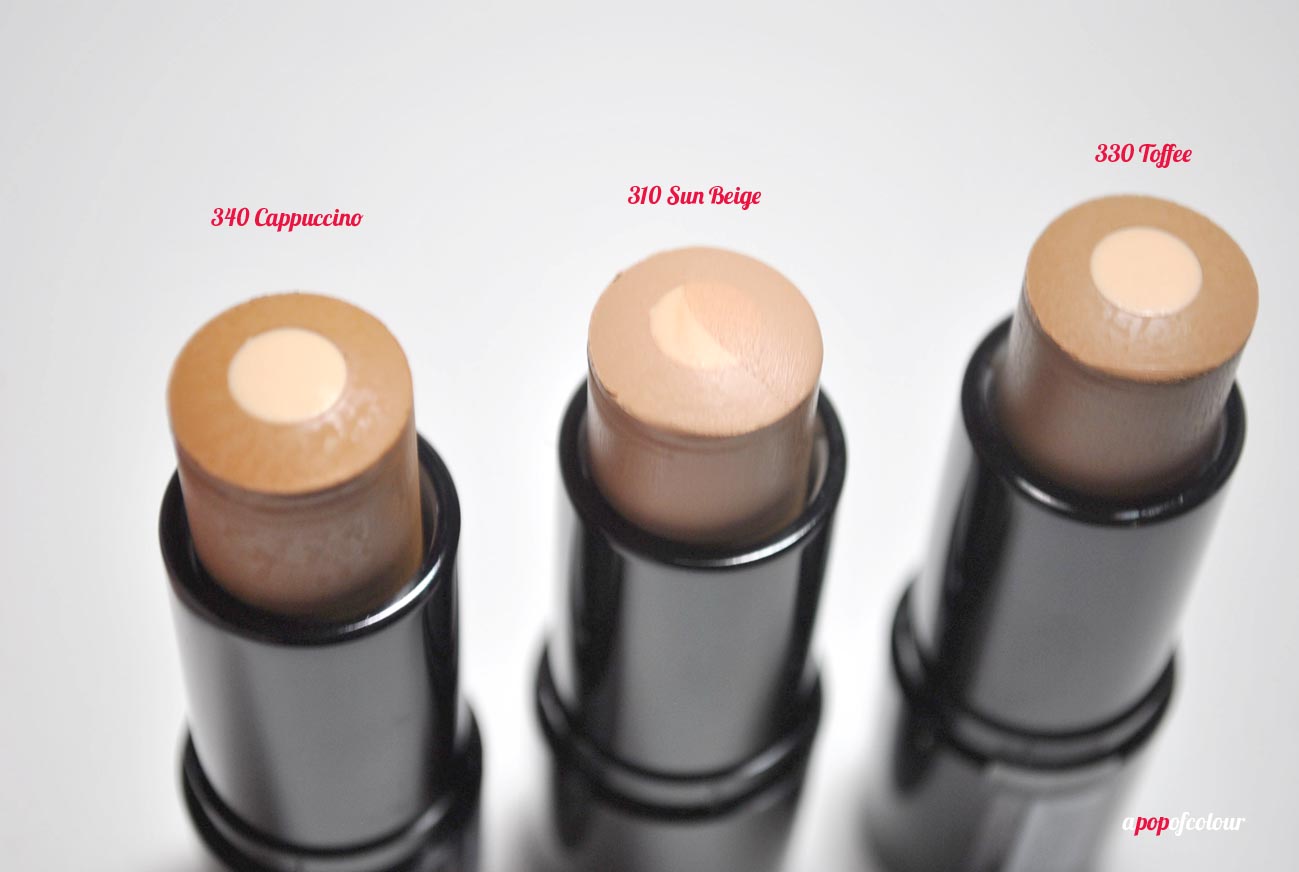
Maybelline Fit Me Shine-Free Foundation is available in 12 different shades, running the gamut from pale to dark. I haven’t actually tried this product as a foundation, but it’s fab for contouring. Since I’m a fair-skinned girl, I chose to go for the really deep colours because you obviously will be blending these bad boys out. I would say I’m Ivory or Classic Ivory right now in the foundation, and for this post, I actually contoured with 330 Toffee and 310 Sun Beige. I also have 340 Cappuccino, which will be perfect for the summer when I have a tan (well, “tan” as I don’t get too dark). The great thing about this product in particular is that it goes on as a gel foundation but sets as a matte powder, so you get the best of both worlds. These also blend out perfectly.

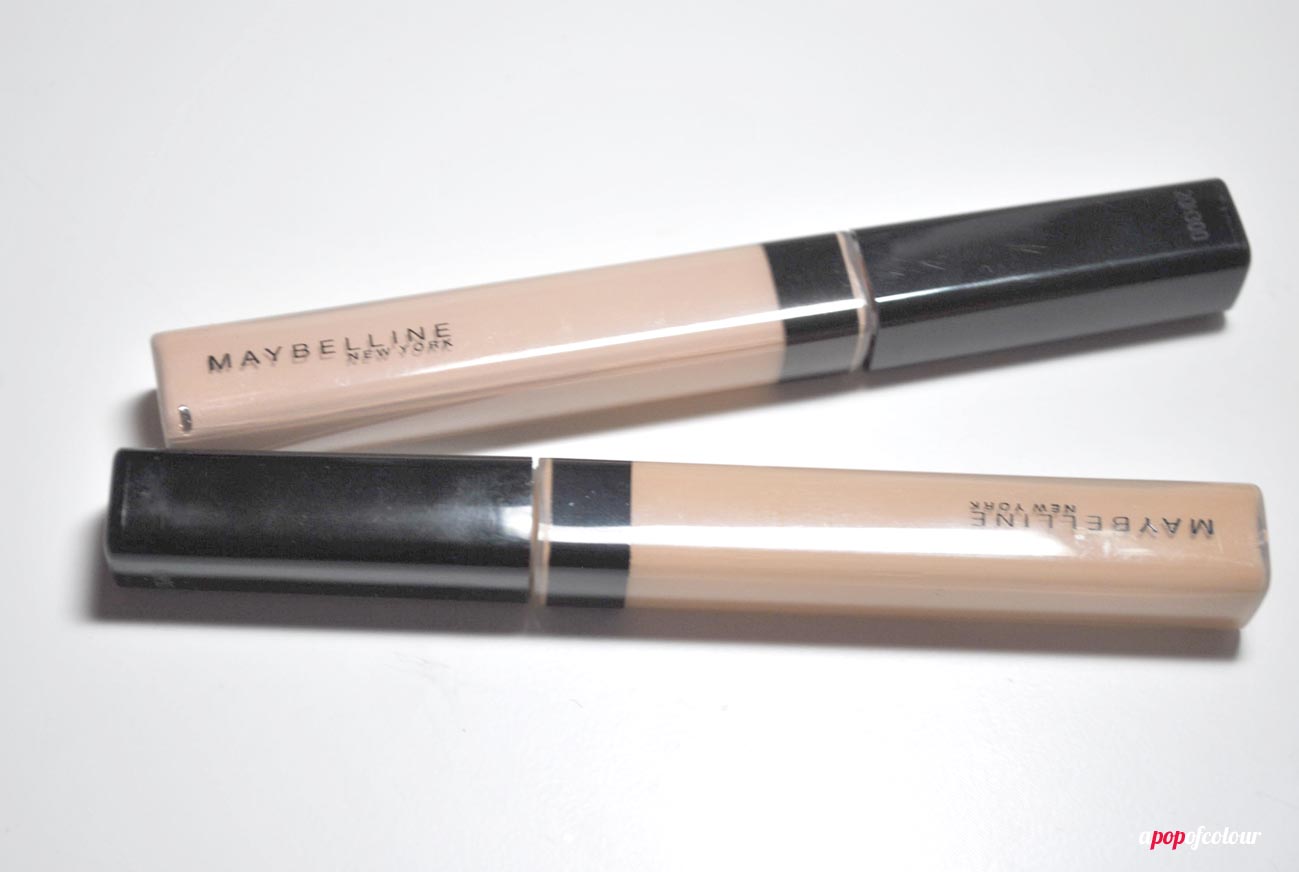
For the contour, I also kept it affordable and in the family with Maybelline’s Fit Me Concealer, which packaging is very similar to NARS Radiant Creamy Concealer. I have the colours Fair and Light, and the trick with this is to go a shade or two lighter than your skin tone to brighten up the eye area. The doe-foot applicator on the wand makes this product extremely easy to apply and control where the product goes.
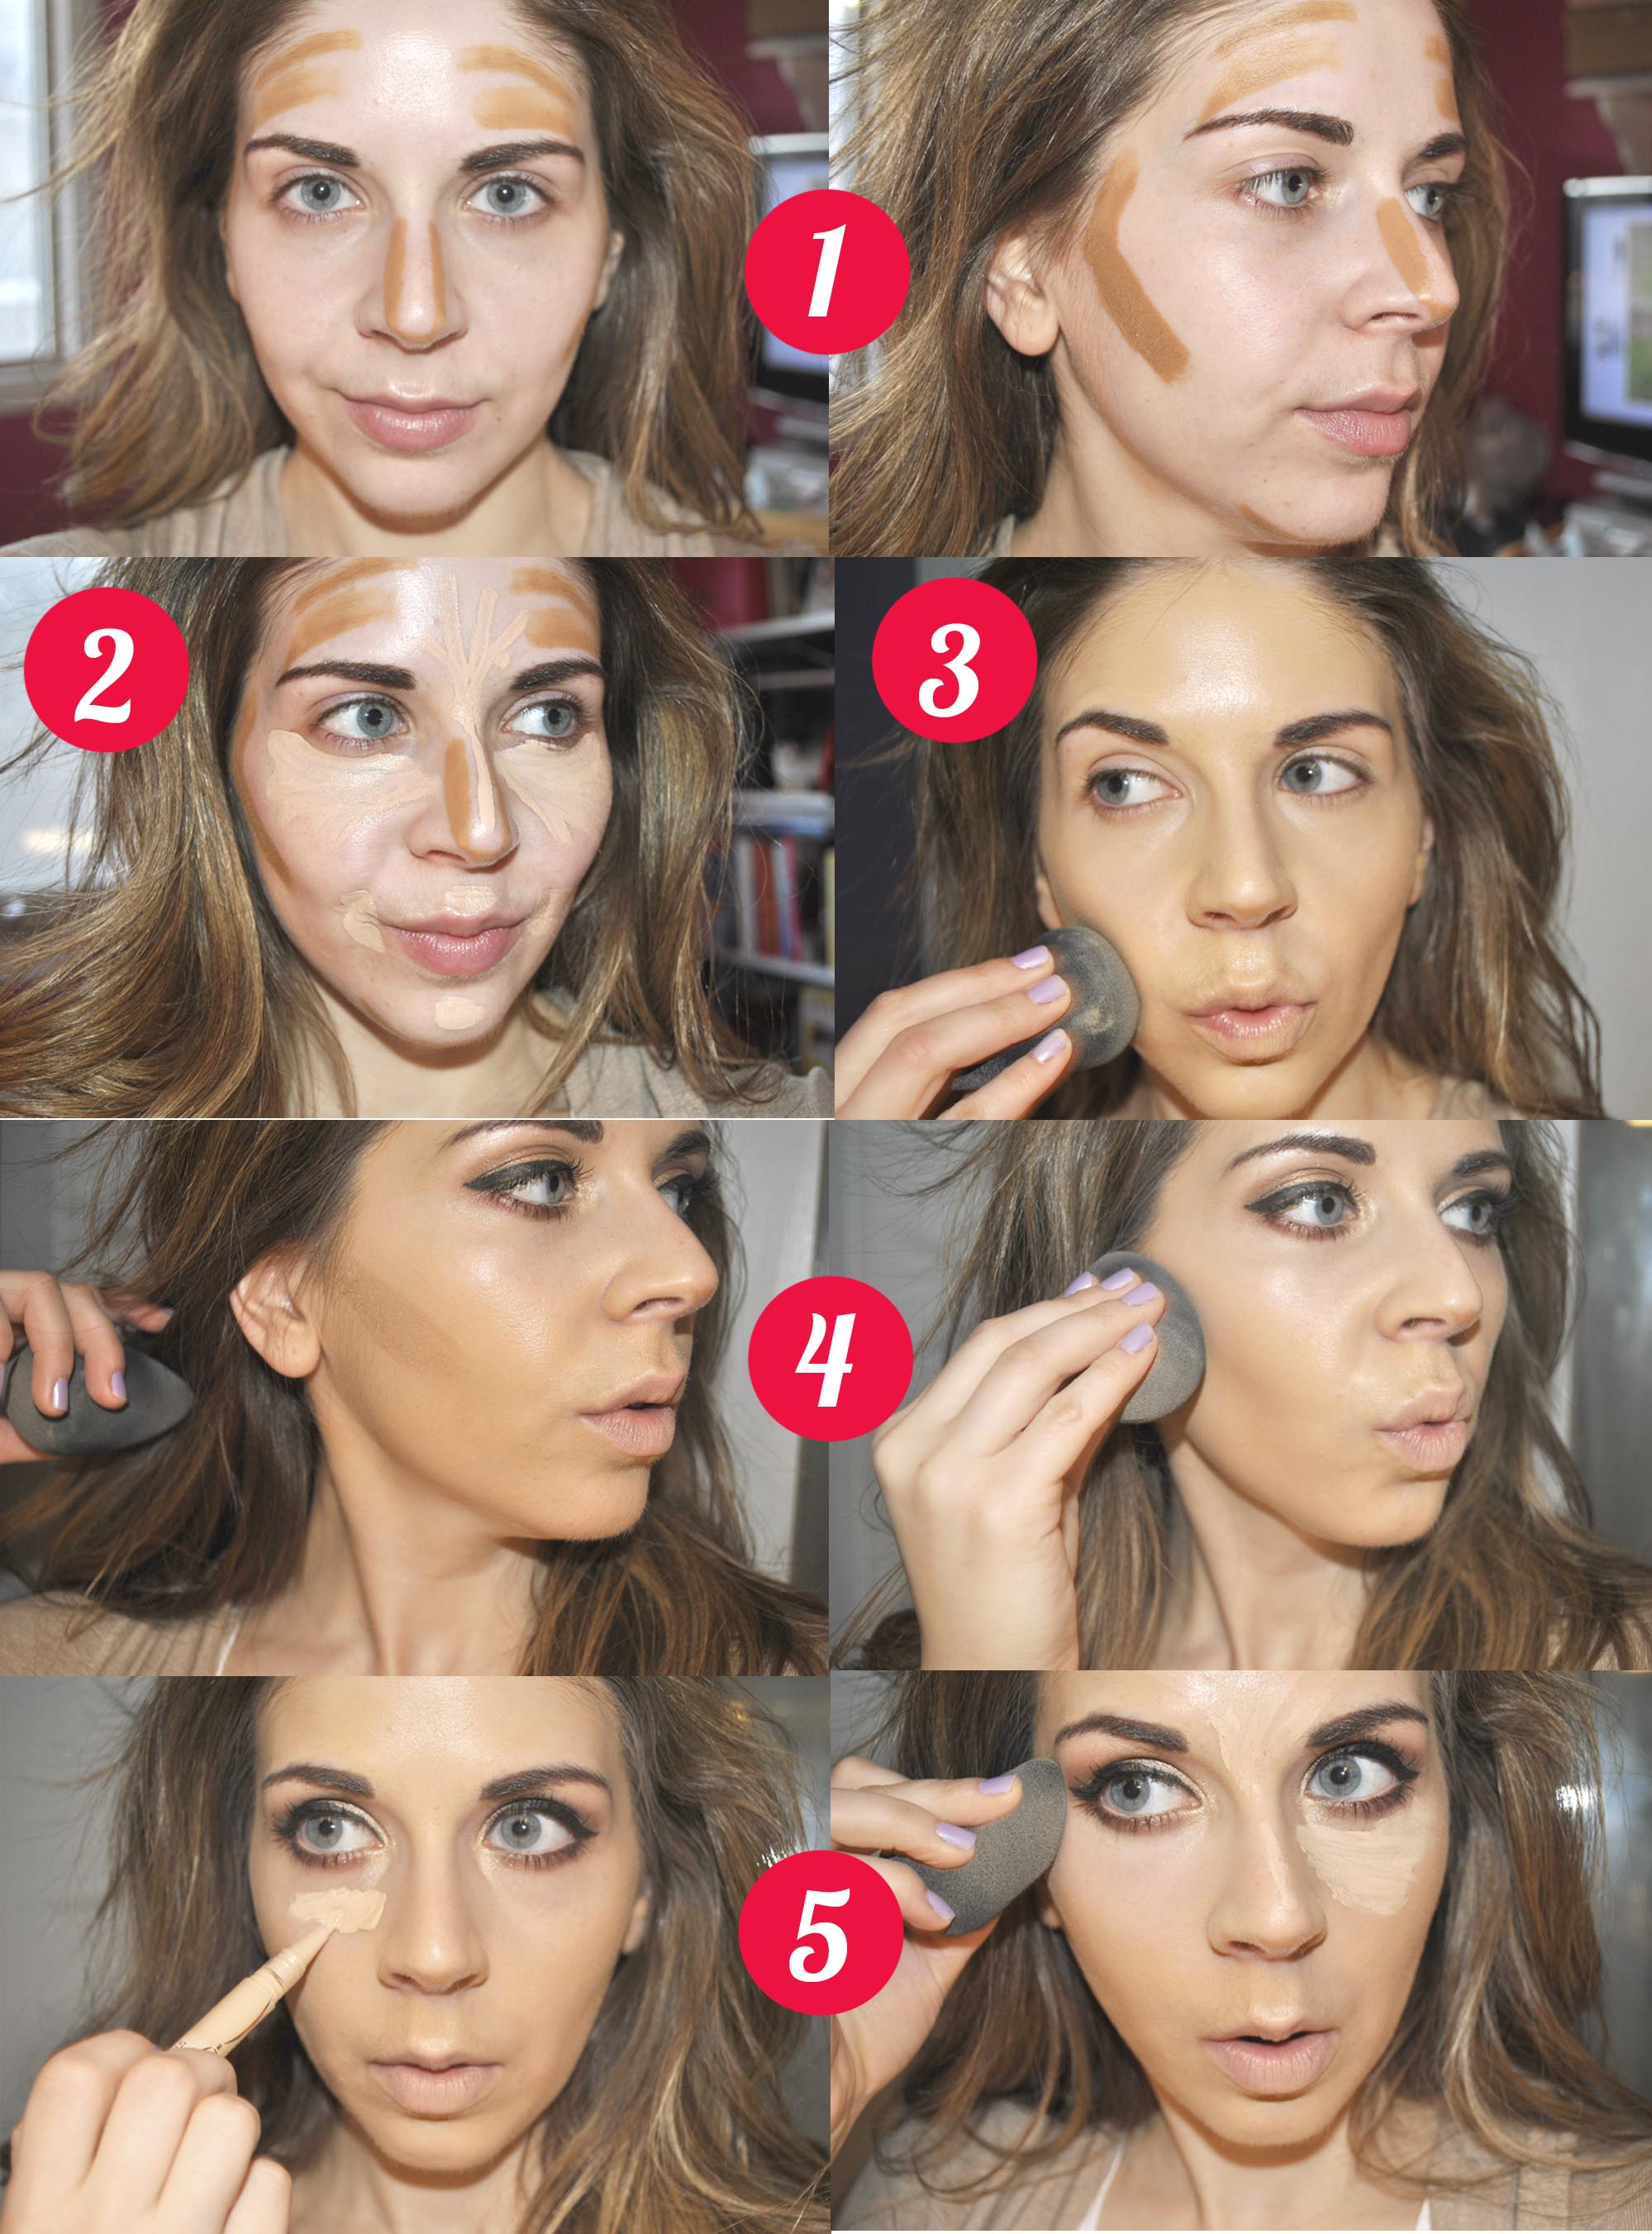
Okay so there are a few ways of doing the whole liquid contour/highlight thing. I have done an in-depth post about it in the past but this is the way I usually do it when I am really playing up my makeup. If it’s for everyday wear, I will just layer the cream bronzer/deep foundation over my regular foundation, then blend. In this instance, we are starting with the contour and highlight and then adding the foundation on top for a more natural look.

1. Starting with a dark cream foundation, apply this to the hollows of your cheekbones, your temples, along the bridge of your nose and on the bottom of your chin. I used Maybelline Fit Me Shine-Free Foundation in 330 Toffee.
2. With a concealer, lighter than your skin tone, apply this under your eyes, on the bridge of your nose up to your forehead fanning it out, along the edges of your mouth, your cupid’s bow, and on the centre of your chin. I used Maybelline Fit Me Concealer in 15 Fair.
3. With your regular foundation and a damp Beauty Blender, apple this on your face blending everything out. I used a full-coverage foundation (Becca Ultimate Coverage Complexion Creme) so it ended up covering a lot of the colour (hence why I went back in for the next step).
4. Because I wanted to make my contour a bit more pronounced, I applied 310 Sun Beige along the hollows of my cheekbones and then blended that in with my damp Beauty Blender.
5. To add a bit more oomph under my eyes, I went in with Maybelline’s Dream Lumi Touch Highlighting Concealer, which is like a dupe for YSL’s Touche Eclat. This product really brightens up the eye area, which is perfect for this look.
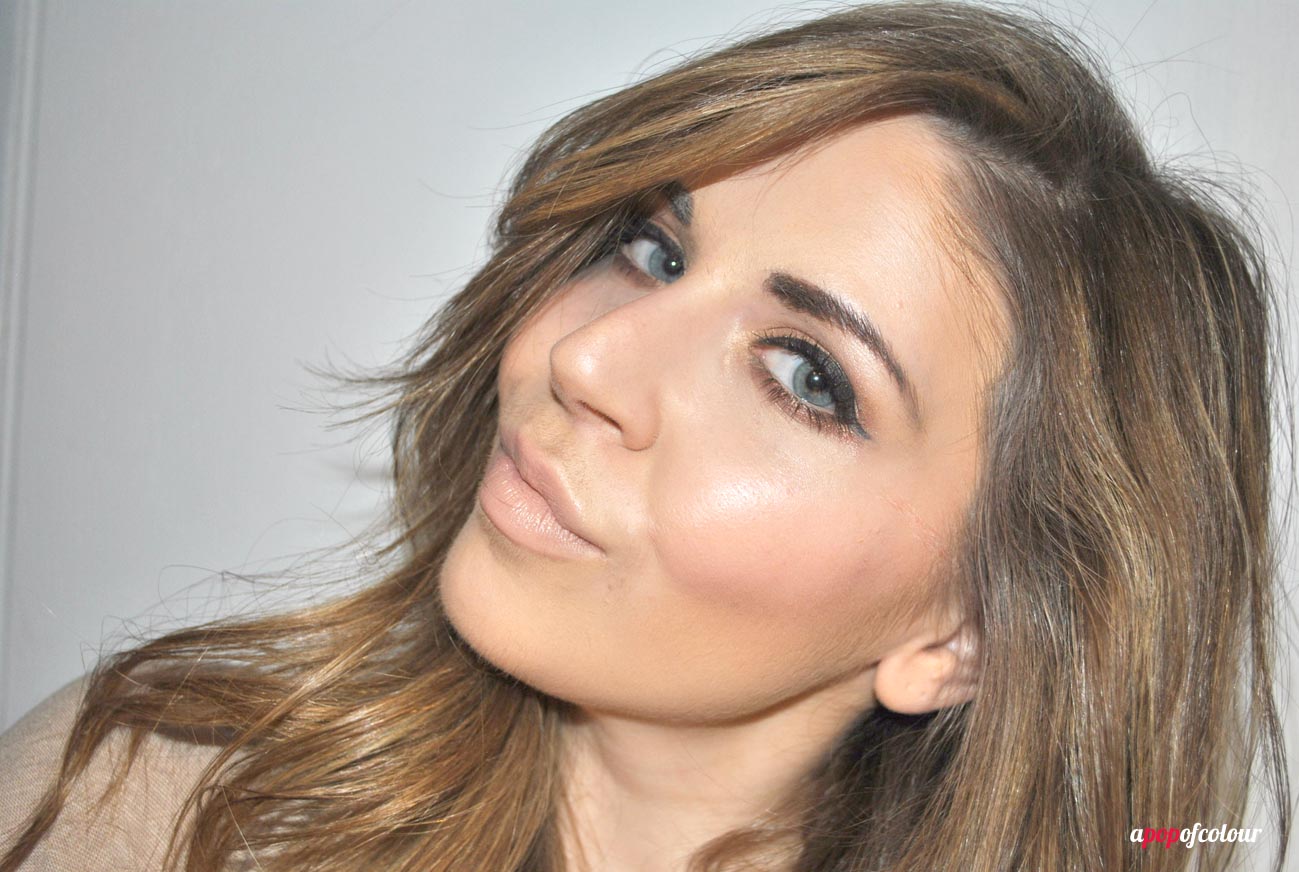
 Liquid contour and highlighting may look a bit scary when you are first applying the products (think moments of “what the heck am I doing?”), but once everything is blended out, the whole thing looks so natural. Also, I love layering a powder contour over top of my liquid one to really sculpt my cheekbones and make the colour last longer.
What are your favourite products for liquid contour and highlighting?
Please note, this post contains products sent by PR. All opinions are my own.
Like what you read? Check out these related posts.