
I feel like if there’s one place people would be surprised that I haven’t visited yet, it would be Los Angeles. The city of angels is a place I’ve always wanted to go to, but for some reason I haven’t gotten farther than outside the doors of LAX.
I’m heading there for the Easter long weekend and couldn’t be more excited. We have the itinerary down (The Grove, Beverly Hills, Morphe Store, Universal Studios, Santa Monica Pier, etc.) and I have all my appointments set for next week (sugaring, pedicure, etc.), so I wanted to share some of the must-have items that I’ll be packing for the sunshine state.

Since it’ll be mid-April and the temperatures should be hot, showing lots of skin is mandatory. Coming from Canada means I’ll still be naturally ghostly white, however, as always, I like to fake it with a spray tan or an at-home self tanner. You guys know I absolutely love St. Tropez, this tanning product comes in a variety of different formulas and they are always coming out with new ones as well.
For an awesome bronze look (yes, bronze, not orange), I was quite surprised with the St. Tropez Gradual Tan Classic. I’ve only ever really used the Self Tan Classic Bronzing Mousse before so when I saw the word “gradual” on the bottle, I was a bit disappointed, thinking it would be like the Jergen’s one, where you have to use it for like a week before you get a suitable colour. Well, I was wrong. The formula in this one comes out like hair mousse (a fluffy, whipped texture) and is white, so unfortunately you can’t see where you’re putting the product. I used a self-tanning glove, however, they mention you can use your hands, which if you choose to go that route, make sure you wash them really well after application. I always apply this stuff before I go to bed after showering (make sure you also exfoliate in the shower to get rid of dead skin cells, I’ve been digging the Sephora Collection Smooth Finisher Exfoliating Bath Mitt) so when I wake up I’m nice and bronzed. For being billed as a “gradual” product, you actually end up with a nice glow after just one use, although if you are travelling, I would apply this at least two to three nights in advance so you are really nice and bronzed.
To maintain that glow on vacay, pack the St. Tropez In-Shower Gradual Tan. This one I was also skeptical about since you leave the product on for a short amount of time before rinsing it off. Once you’re done washing yo’ self in the shower, turn off the water and apply this formula all over your body. Wait three minutes then rinse it off using warm water.
I wouldn’t recommend using this product to build your tan from scratch as it really didn’t add much colour to my skin (if at all), but using it to maintain my existing tan seemed to make the product more efficient. They do recommend leaving this guy on for three minutes, however, I’ve read that the longer you have it on, the deeper your tan would be. This is efficient to pack since you don’t have to wear it during the day or night (self tanner does have the tendency to smell). It’s a sneaky and efficient way of getting your tan in there.
Finally, since it’s the sunshine state, a sunscreen is a must. Self tanner doesn’t add any SPF to the skin, so I’ll be packing TarteGuard SPF 30 for some major sun protection (plus that cute bottle is to die for). I also use sunscreen during the day as my makeup primer for my face. They recommend using sunscreen daily to prevent aging and wrinkles (oh, and sunburns too, obviously!).

To really highlight that California look, a bronzer is a must. I’ll be packing this giant Stila All Day Bronzer for Face and Body. This matte bronzer is perfect for contouring, as well as adding that allover LA glow. I like this guy because the formula is really soft on your face, making it easy to add a little (for that daytime bronzing look) or build up the colour (to sculpt the cheeks for a night out).
Speaking of nights out, when I got the Stila Magnificant Metals Glitter & Glow Liquid Eyeshadow in Karma Kitten I just knew I had to pack this for LA. This liquid eyeshadow is as bright as wannabe actors’ dreams to be movie stars. Although this product is a showstopper, there are numerous ways to wear it. You can do a glitter lid or you can layer it with a deep black cat eye for a wink of shine (like seen below).

Finally, since I travel so often, I can never have enough travel skincare products. These Sephora Collection Green Tea travel bottles are perfect for your carry on since they are 100 ml. The Micellar Cleansing Water & Milk in Green Tea washes off all that makeup at the end of the day, and the Sephora Collection Cleansing & Exfoliating Cleansing Cream washes and exfoliates your skin, leaving it ready for serums and moisturizers. This product comes in a variety of different ingredients but the green tea one mattifies and fights blemishes, making it perfect for that hot, smoggy LA air and weather.
To say I am excited is certainly an understatement. Since we’ll be checking out some LA hotspots, I’ll be packing a ton of different makeup products (my travel makeup bag is not going to cut it this trip, I’m bringing all the big guns). Let me know what you guys would bring on a trip to Los Angeles, as well as some places I need to check out when I’m there!
Also, make sure you follow me on Instagram and Snapchat (apopofcolour) for highlights from my trip!
What do you pack for travel?
Please note, products provided by PR. All opinions are my own!
Like what you read? Check out these related posts.

 * Warning, this post contains photos with needles.
Yes, I have gotten lip fillers. More than once actually.
I’ll admit it, I totally got sucked into the whole Kylie Jenner lips hype that for Hanukkah two years ago I asked my boyfriend for lip fillers. And then I asked for them again for my birthday. Here’s the thing, though I don’t need them since the size of my lips are about average (I’ve never had issues with them being too small), once I started to get them done, they had the right amount of oomph that I fell in love with the effect.
I think when people think of lip fillers (and I can think of a couple friends who would say this), they imagine those huge duck lips that are so unbelievable large that it’s totally noticeable that that person has had work done. I have had people ask me about it and if I did anything with my lips, and when I tell them that yes, I have had them enhanced with fillers, I’m usually met with the same response: they look great!
So this leads me to today’s post. I teamed up with First Glance Aesthetic Clinic and Surgery Centre, located at 1851 Grant Avenue here in Winnipeg, Manitoba to get my lips done and write about the process since the first time I got it done I had a lot of questions myself. The clinic features a modern, state-of-the-art facility, as well as a fully accredited operating room which is equipped with the latest advances in technology. Although there are a few clinics here in Winnipeg, First Glance has consistently been chosen as the best plastic surgery clinic in the city, as well as one of the busiest in the country. Aside from plastic surgery procedures, they also offer treatments like body contouring, microblading, lasers and fillers, as well as a retail section, where you can pick up advanced skincare products and other items like Latisse.

This was my first time at First Glance getting this procedure done. Previously I went to a different clinic in the city for lip fillers and have always been happy with the results. I think the most commonly asked question I get, and it was one I was curious about as well, was how much are they? Well, when you get fillers, they do it by syringe. You can either do half a syringe or a full. The first time I did the half since I’ve never had this done before and I didn’t know what to expect, however, after the initial swelling went down I found that my lips weren’t all that different from how they looked before. The second time I went with the full syringe and definitely recommend doing the full since if you are going to spend the money on this procedure, it would be more worth it in my opinion since you’ll see better results. It’s hard saying what the price would be since it depends on the product used and how much of it you get. For this visit I ended up getting a full syringe of Juvederm Ultra and the cost I was told is around C$400.
All three times I have gotten Juvederm as the filler. Juvederm is a smooth-consistency gel made of hyaluronic acid, a naturally occurring substance in your skin that helps to add volume and hydration. The results are immediate and there is no downtime (although they do recommend no exercising after as it could lead to bruising). There are a few different formulas of Juvederm, there’s Juvederm Ultra for versatility in contouring and volumizing facial wrinkles and folds, and then there is Ultra Plus, which is a more robust formula for voluming and correcting deeper folds and wrinkles. There is also Juvederm Volbella, which is a newer filler treatment for the lips and is designed for natural-looking lip volume, as well as defining the lip contours, diminishing vertical lip lines, accentuating the border of the lips, plumping them up to make them full, and enhancing the cupid’s bow. Usually you would have a consultation first with the nurse who injects the product and she would chat with you about what you want your lips to look like and then recommend what would be best. While other lip fillers exist, I have only ever had Juvederm injected, so I’m unfamiliar with what the results would look like for the others. Juvederm also has an app where it would show you what your lips could potentially look like as well if you are curious about the results you could get.
Anyways, after filling out all the medical forms for the procedure, Amanda, the nurse injecting the product (although they do this at plastic surgery clinics, it’s usually nurses injecting the product, not the surgeon themselves) came in and started to chat with me about what I’ve had done before and what I wanted my lips to look like. Since I had them done at another clinic previously I wasn’t quite sure which form of Juvederm they used. She explained that if you mix and match them, I could potentially have a reaction to the product which would result in me taking medicine and most-likely a plastic-surgery-gone-wrong look on my face. After asking me a number of questions, she came to the conclusion that I had Juvederm Ultra and that’s what she used for my lips this time around.
As for what I wanted my lips to look like, I wasn’t sure. My bottom lip is quite full already, but my top lip is uneven. The ends taper off at the sides and therefore it’s quite difficult to apply lipstick evenly for me. Looking at photos of how my lips looked last time I got it done, Amanda said they were filled out more horizontally rather than round. After looking up who had nice lips on Google, my friend suggested Rosie Huntington-Whiteley and I agreed that she had a nice pout, so we went with that as the guideline.


Once we narrowed down how we wanted to do the shape, she put on the topical numbing cream, which to me is the worst part of the whole thing. It’s a gel that they apply to your lips and surrounding skin to numb the whole area so the injection doesn’t hurt. You have to sit there with that stuff on for 20 minutes while your lips go numb (they also feel huge too BTW).
As for the actual injecting part, does it hurt? Yes and no. It all depends on your pain tolerance. You have the numbing cream on so that definitely helps with the pain factor. I have a pretty high pain tolerance so for the most part it didn’t hurt, although depending on where she was injecting it some spots pinched more than others. They also give you one of those stress ball things that you can squeeze if it hurts too much. Amanda did a little at a time and then would step back and take a look to see how it looks and where I needed a little more. I’m told Amanda is one of the best injectors in the country (she also mentioned she books four months in advance), and I can certainly see why. She was very thorough and took her time making sure that she got my lips done right. The formula was mostly injected into my top lip with lots of definition on the cupid’s bow (she said a defined cupid’s bow is a look of youth since your lips tend to fall and sag as you get older). There was a little bit of the formula left in the syringe, so she put it in the philtrum, the ridged skin part underneath your nose and above your cupid’s bow to define the ridges.
After about 20 minutes she was done or injecting and massaging (to make sure it was even and no bumps) she gave me a Juvederm ice pack to put on my lips. She said only to hold it on for two minutes as if you have ice on there for too long the injection could freeze. My lips did look very large, but that was due to swelling. After about a week they did go down in size and they are now a perfect pout.


With lip injections you do run the risk of having bruising, which I did have on both my lip and a little on the side of my mouth. Everyone is different though and just because you bruise one time doesn’t mean that that will happen the next time you get it done (my first time I didn’t bruise at all). There are a number of factors that go into whether you’ll bruise, such as if you take aspirin (which is kind of like a blood thinner) before your treatment, or if you drink alcohol or eat garlic one to two days before the treatment. Also, like I said, exercising is not recommended after the injection since that makes your blood pressure rise, which could lead to bruising.
It’s been almost two weeks since I’ve had the procedure done and I think I can safely say that the size of my lips now are probably what they will look like for the next few months. How long the filler lasts really depends on the person as there are a number of factors that determine how long it takes for your body will break the formula down. For me, I noticed they last anywhere from six months to a year. Although my lips did shrink from when I had it done last May, Amanda did say that there was some filler left in my lips as she was injecting it this time around. I’ve also read that if you are skinnier then your body will break down the filler faster.
Since the procedure is instant, you will see results right away and there is no downtime after it’s done (although, like I said, no exercising for 24 hours!). Your lips will feel stiff and I would avoid eating or drinking anything hot. Even now they still a little stiff if I go to pout them, but that will eventually go away.
So are lip fillers for you? It depends. I’ve had so many people ask me about them and they have pretty much the same questions that I had myself before I got it done. I would definitely do your research and take a look at the clinic’s website, testimonials, and social media to see before and afters. Like I said, First Glance is one of the largest and busiest plastic surgery clinics in the province and although this was my first visit there, I knew I was going to have a great experience just based on what I’ve heard from people. Fillers are a pricey habit to maintain, but if it makes you happy, then it’s definitely worth it in the long run. As for the pain part, once they numb you it really isn’t that bad. My issue is more about needles. The first two times I had fillers I almost fainted after the procedure since I don’t do well with needles in general. Honestly though, I just closed my eyes the entire time and the squeeze ball definitely helps.

Prior to the first time I got my lips done, I watched loads of YouTube videos, read blog posts about what to expect, and looked up the hashtag #lipfillers on Instagram. I teamed up with First Glance on this post because there are so many questions out there about lip fillers since they are so popular right now and we both wanted to share how amazing the experience can be and what it’s like to get them done. If you have any questions at all, please leave me a comment below and I’ll be happy to respond.
Also, make sure you check out First Glance Aesthetic Clinic and Surgery Centre if you are in the Winnipeg area, I was actually quite surprised with the range of services they offer (like microblading and tattoo removal, who knew?!). Also, give them a follow on Instagram and a Like on Facebook.
Have you gotten lip fillers before? What was your experience like?
Please note, I am working with First Glance Aesthetic Clinic on this post. They did provide the lip filler gratis, however, this did not affect my thoughts on the procedure or their clinic.
Like what you read? Check out these related posts.

I’ll be the first to admit it, I have a lot of lip products. If you were to open my lipstick drawer, it literally looks like something exploded in there. I can’t help it, I love trying out new lip items, whether it’s a new formula, new colour, or a new brand. Really, you can never have enough.
So that brings me to today’s post. Recently I got to try out a few different Sephora Collection lip products for spring as the French retailer has come out with some amazing formulas to rival their other luxury brand counterparts, and the best part is the price.

Although there are a few different formulas here, my absolute favourite you-need-this-formula are the Sephora Collection Cream Lip Stains. Available in 40 different shades, these matte liquid lipsticks retail for C$18, which is a total steal compared to other matte liquid lips out there.
The term “stain” in the name of the product totally threw me off because to me this isn’t a true stain (we’ll get to one of those shortly), it’s your run-of-the-mill matte liquid lip, but an amazing one at that.
I have a few different brands that offer this formula, like Kylie Cosmetics, Kat Von D, Lime Crime, etc. and the Sephora Collection ones is just as good, if not better than a few of them. As you know, the colour (applied with a doe-foot applicator) goes on like a liquid and then sets to a matte that won’t budge. The colour is high-coverage and is infused with avocado oil so it’s super comfy as well.


I received two of the colours, #42 Rose Wood, a burnt red, and #33 Pink Peony, a pink taupe nude. Pink Peony is my favourite of the two, however, I was quite impressed with how Rose Wood ended up looking on my lips. Also, with darker colours you typically need to apply these more often, however, Rose Wood held its own of the majority of the day. I did some touchups here and there (mostly on the inner lip area), but for the most part, the colour stayed put as the day went on.

If you are living for lip liners, give the Sephora Collection Contour & Color Liner and Lipstick Duo a shot. This double-ended product has a liner on one end and a complementary lipstick on the other. Available in eight shades, these retail for C$20 each and also offer a matte finish but are definitely more creamy on the lips than the Cream Lip Stains. Also, with its double end, it makes the application of the product super simple.
I have uneven lips so I’m constantly having to wipe away and reapply product. This double-ended product made the application super simple, plus who doesn’t love a two-in-one product?
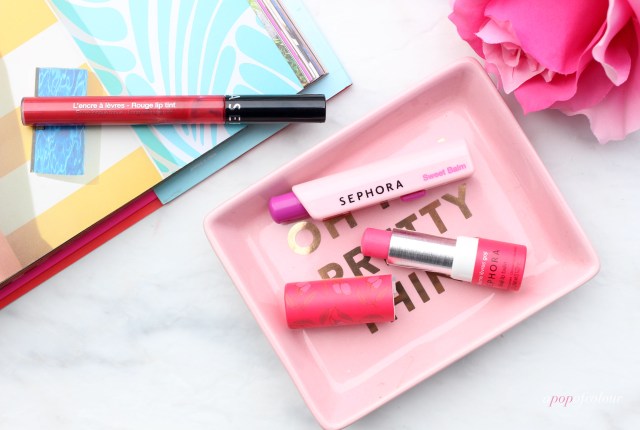
Now, back to talking about stains, Sephora has also released a true stain lipstick with their Rouge Lip Tints. Available in eight shades from reds to pinks to oranges and purples, these are a staining pigmented gloss that provides weightless saturated colour.
I got the shade 01 Rose, and upon swatching this on my hand, I noticed how staining it really was. Seriously, that swatch was on my hand for two days, which is great if you like colour that lasts, but not good for removal. These retail for $15 each and I definitely recommend going slow with the application on these since it will stain your skin if you mess it up.

Finally, if you are more of a balm girl (who doesn’t need a lip balm in their collection?), Sephora Collection has two moisturizing lip balms that offer some nice colour payoff as well.
The Sephora Collection Lip Balm & Scrub is a range of six lip balms, each featuring a different ingredient to nurture lips. Although five of the products in the line are a balm (coconut, rose, goji, tangerine, and almond), the honey one is the lone scrub of the collection. Depending on the star ingredient, your lips will benefit, whether that be nurturing and soothing (coconut), nurturing and shine (rose), nurturing and protection (goji), nurturing and tone (tangerine) or nurturing and moisturizing (almond).
I got the goji formula, which also gives your lips a radish-pink tinge. This one also has a sweet candy scent (not sure if they all smell this way) and each of the balms and scrub retail for C$8 each. Wear is comfortable, and really, who doesn’t need a lip balm in their collection? Especially when they come housed in the cutest cardboard tube.


Speaking of cute packaging, Sephora also has a similar lip balm that also offers a slight wash of colour as well. The Sephora Collection Sweet Balm, available in three shades (pink, coral, and violet), also retail for C$8 and are a moisturizing tinted lip balm that has the coolest container. Just slide up the handle and the product appears, making it super simple for travel (no mess here!).
In case you haven’t figured it out yet, I’m kinda obsessed with all these new Sephora lip goodies. I’ll be honest, I often find the Sephora Collection aisle in the store to be a bit overwhelming since there’s so much colour and loads of things to play with. If you are in store though, you definitely need to check out some of these products, especially the Cream Lip Stains!
What lip product are you digging this season from Sephora?
Please note, I was sent these products from PR. All opinions are my own.
Like what you read? Check out these related posts:
