Feb
2012
Simple Everyday Makeup
My apologies for my lack of blogging, it’s been almost a week now. I tried a mini sample of Make Up For Ever’s HD foundation and the next day my skin so got incredibly dry that I wasn’t up for blogging about anything makeup related. Well luckily after a ton a moisturizer and some Rosebud Salve (that stuff is seriously a life saver) my skin is almost back to normal, but I still have a few dry spots.
Anyways, because I wanted to keep my makeup to a minimal so my face could breathe this was actually the look I was wearing all week and I have to say, I’m kind of addicted to it now. It’s so simple and you really don’t need a lot of products. I used a few different mineral foundations because they are lighter on the skin than liquid foundation (which is what I usually wear), a few cream shadows, eyeliner, mascara, and that’s pretty much it. Super simple, light, and quick.
Starting off with a clean palette I applied Benefit’s The Porefessional to my skin. This a primer that minimizes the appearance of pores, which isn’t really a problem I have but it leaves a nice finish on my skin. When my face was super dry I skipped a primer and just applied the foundation but since my skin is slowly getting back to normal I can apply this once again.


Next I grabbed my Bare Minerals Original SPF 15 Foundation and buffed it onto my skin. I really like this foundation as it leaves a nice finish on my face. I like how this foundation is light (which allows my skin to breathe) and the fact that it has minerals is a huge perk too, especially if you are having an allergic reaction on your face (like me).


Instead of a blush or bronzer I used this PUR Minerals foundation in the colour tan which I got in my January Luxebox. This colour is too dark for my face to use for foundation so instead I use it as an all over glow. It’s lighter than bronzer so with my super pale skin it adds a nice warmth to my complexion. PUR Minerals is another mineral foundation line similar I would say to Bare Minerals.
Using the same brush I applied my foundation with, I applied this product on my cheeks, temples, and the bridge on my nose.

 Moving onto the eye area, I used MAC’s Paint Pot in Bare Study, a cream/white colour, on my brow bone to open up the eye area.


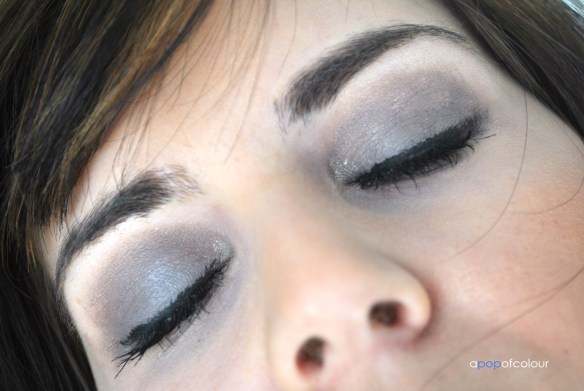
Next I grabbed my Maybelline 24-Hour Color Tattoo in Tough as Taupe (obsessed with this) and applied it all over my lid and then in the crease. I applied a little more of the product in the crease to darken it up.
I choose cream products for my eyes instead of powder ones because I felt that they would be better for dry skin. Plus, both of these products dry nicely too so they look like a powder anyways.
Grabbing the MAC Paint Pot again, line your inner corners to make your eyes pop, then using the Maybelline 24-Hour Color Tattoo in Tough as Taupe, line your lower lash line.
Grabbing a gel eyeliner, like Sephora’s Waterproof Creme Eyeliner in Must Have, line your upper lash line.

Almost done! Curl your lashes and coat them in your favourite mascara. I used Rimmel London’s Lash Accelerating Mascara in black.

To finish up the look, grab a lipgloss or lipstick and paint away! I chose NARS Turkish Delight lipgloss because I wanted something nude with a bit of shine. Because the eyes are a bit darker I like to pair them with a nude lip.

So here is what the finished eyes look like. It’s a simple look with a darker eye and it’s so easy to do. I’m actually kind of glad I discovered it (even though it all happened because I got an allergic reaction), but it’s definitely been my go-to look for this week.

Just a heads up, I’m going to La Belle Province this week so there will be a lack of posts.
Hope you all enjoyed the look and let me know if you tried it!
Like What You Read? Check Out These Related P
24-Hour Taupe – Maybelline Color Tattoo in Tough as Taupe
- Easy Brown Smokey Eye Featuring Maybelline’s Color Tattoo in Tough as Taupe
- What’s in my purse
- The Cult Collection: NARS Orgasm and Turkish Delight
- Loose Button Luxebox January 2012


